Owning a tool doesn’t make it useful

A hammer is a fairly self explanatory tool. Same goes for a screw driver. Most tools are easy to understand and use properly. An audio measurement rig is not one of them. An audio measurement rig must be assembled and then maintained. An audio measurement rig is more like a scientific tool than a construction tool. You don’t build things with an audio measurment but instead you use it to optimize and then check your work. In order to do so, you need a broad understanding of not only the art and science of sound systemdesign but the tool itself. One of the benefits of Meyer Sound’s SIM is that the tool is purpose built and self contained. You plug your mics into the device and an feed the output to a console, system, etc… With SIM everything is labeled.

On the other hand, with audio measurement software that runs on an off the shelf computer (Smaart, SpectraFoo Complete, Systune, etc…) you have to have do everything yourself and keep track of what is what. In theory there shouldn’t be much difference between SIM3 and Smaart but there is. Both tools have their benefits and downsides. SIM is expensive, relatively heavy and somewhat fragile. Not a good combination for tossing in your backpack as you get on a plane.

Even so, if money grew on trees, I’d have a SIM rig sitting next to my Smaart 7 rig. I believe that having to choose one tool over another is short sighted. Hammer or screw driver? Roofing hammer, finish hammer or rubber mallet? Each tool does things a bit differently and offers a different perspective on the same thing. For example, SpectraFoo started out as a Pro Tools plugin and has retained that aspect of it’s functionality but added some tools that are useful for live audio purposes. Consequently, I am fortunate to own SpectraFoo Complete even though I think that Smaart 7 is a more useful transfer function tool. I like them both for different reasons. Having more than one measurement tool allows for verifying the tool itself. If I measure with Smaart and SpectraFoo Complete and get the same results, I can be confident that my rig is working. Transfer functions are not terribly complicated to understand but without that understanding, there is little chance of stumbling onto the answers. I was provided with Smaart 4.5.1 back in the 2001 and never got past playing with the RTA function. I had no idea what a transfer function was. It was not until I saw a system designer use transfer functions and had them explain the details to me that I was sold on investing the time and expense into getting an up to date rig and learning how to use it. I know of others who have the tool but don’t really understand why it’s so valuable or what to do with it. The purpose of this website is specifically to address that situation. I may not be able make a horse drink the water but I can certainly lead it to the river and show it how. If you’ve got the tool but haven’t made the leap into using it in your daily audio work, now is the perfect time!

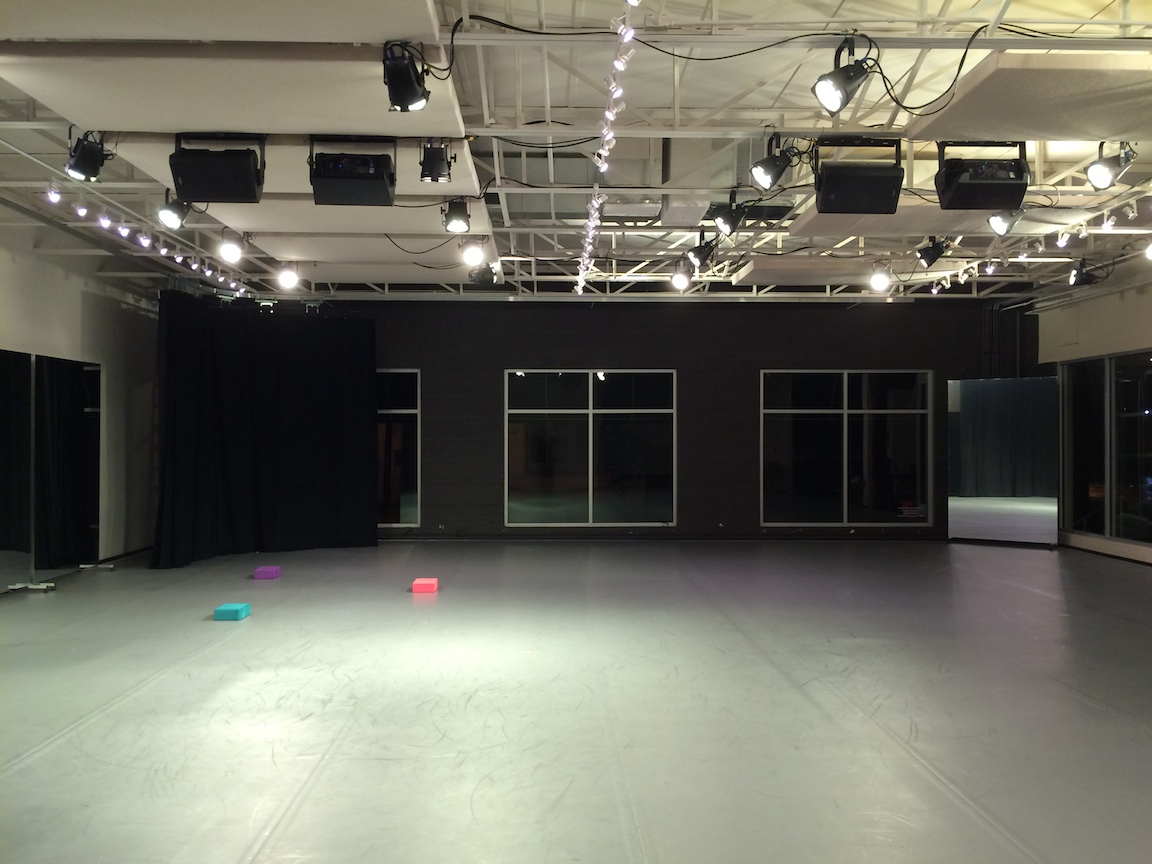
Bruce Wood Dance Project studio A – (4) QSC K10

There is a special event coming up at the new Bruce Wood Dance Project studio this coming weekend and the installed pair of QSC KW10s were located 90 degrees off axis of the audience. There is also the matter of mains / monitors which ideally would be aimed in opposite directions. How do you do a stereo mains / monitors with (2) speakers? You don’t. You need more speakers. On Friday the organization purchased two more QSC K10 and yokes and tonight I installed them. Two aiming forward toward the audience and two aiming backward toward the dance area.
QSC – K10
Bruce Wood Dance Project studio 101
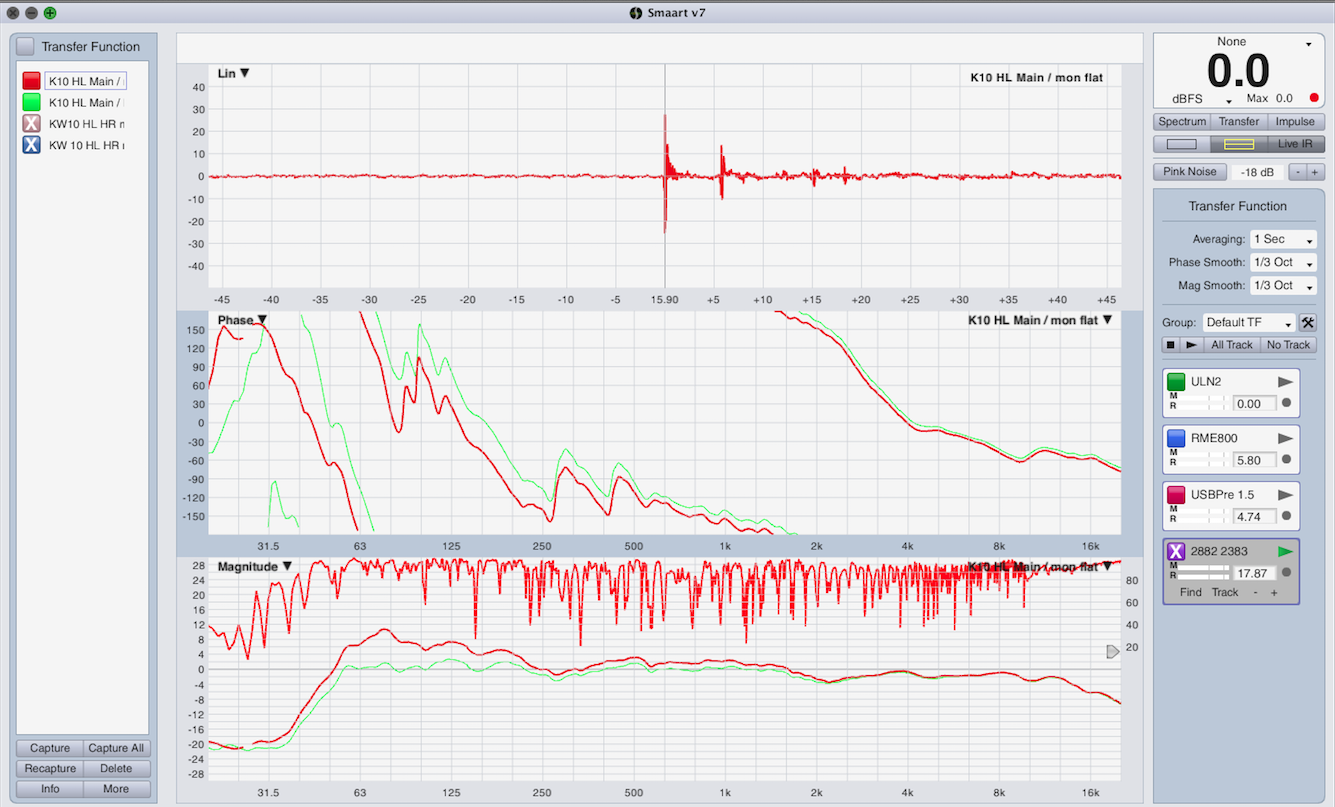
There are only (2) drive lines going into the ceiling area at this point so for now HL Main is jumped to the rear facing SR monitor (same signal). What this means as far as the measurement process goes is that I can’t turn one or the other off without a ladder. Fortunately I want to see how they work together since that will be the only way to hear them once I’m finished. With speakers next to each other but aiming in different directions, one would expect the low frequencies that are omni directional to combine but at a certain frequency both speakers would become directional. In effect, the lows are combining and the highs are isolated. With a measurement mic on axis of one speaker but no the other, we will expect there to be excess low end. The following trace (red) shows the two speakers with and without processing (EQ). Notice the excess low end.
QSC K10 main : mon no eq
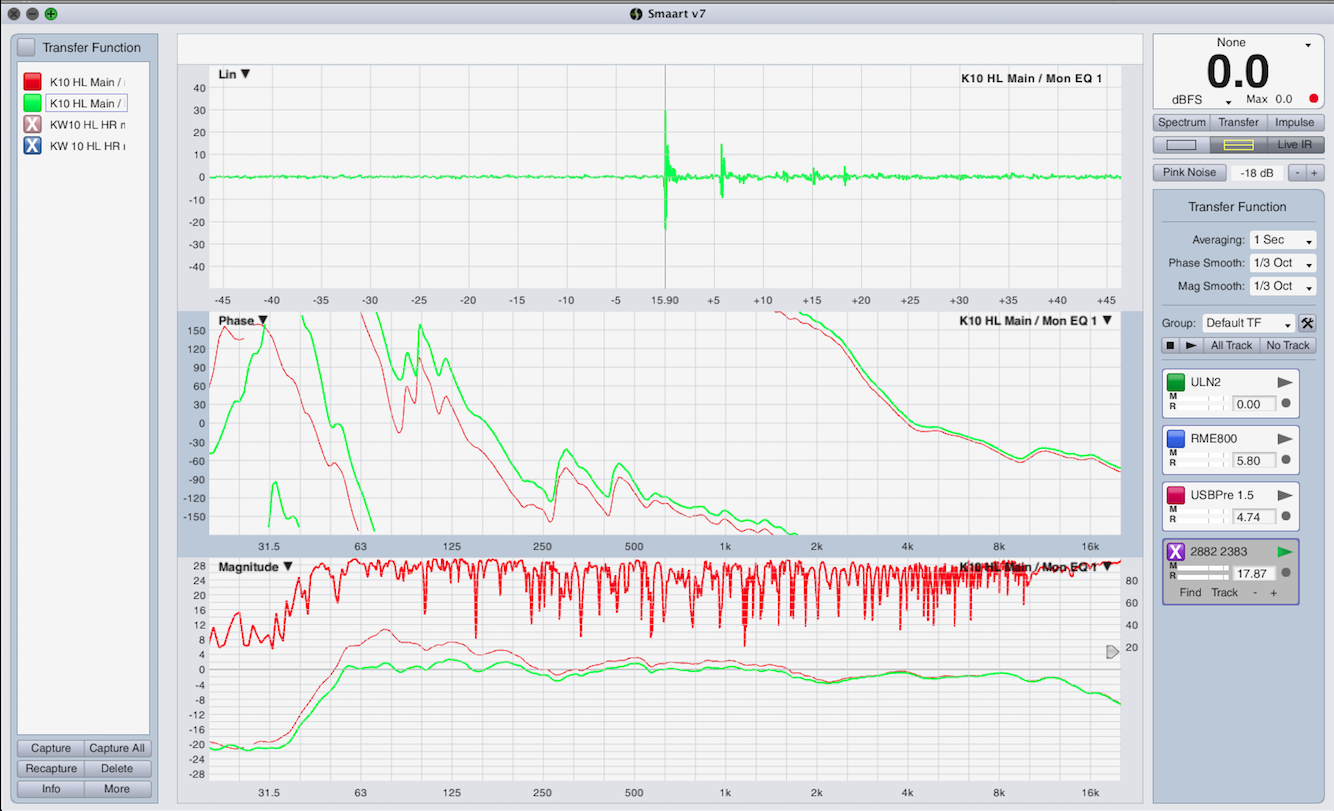
The next trace is the same information but with the green trace selected which shows better the post eq curve.
QSC K10 main : mon eq 1
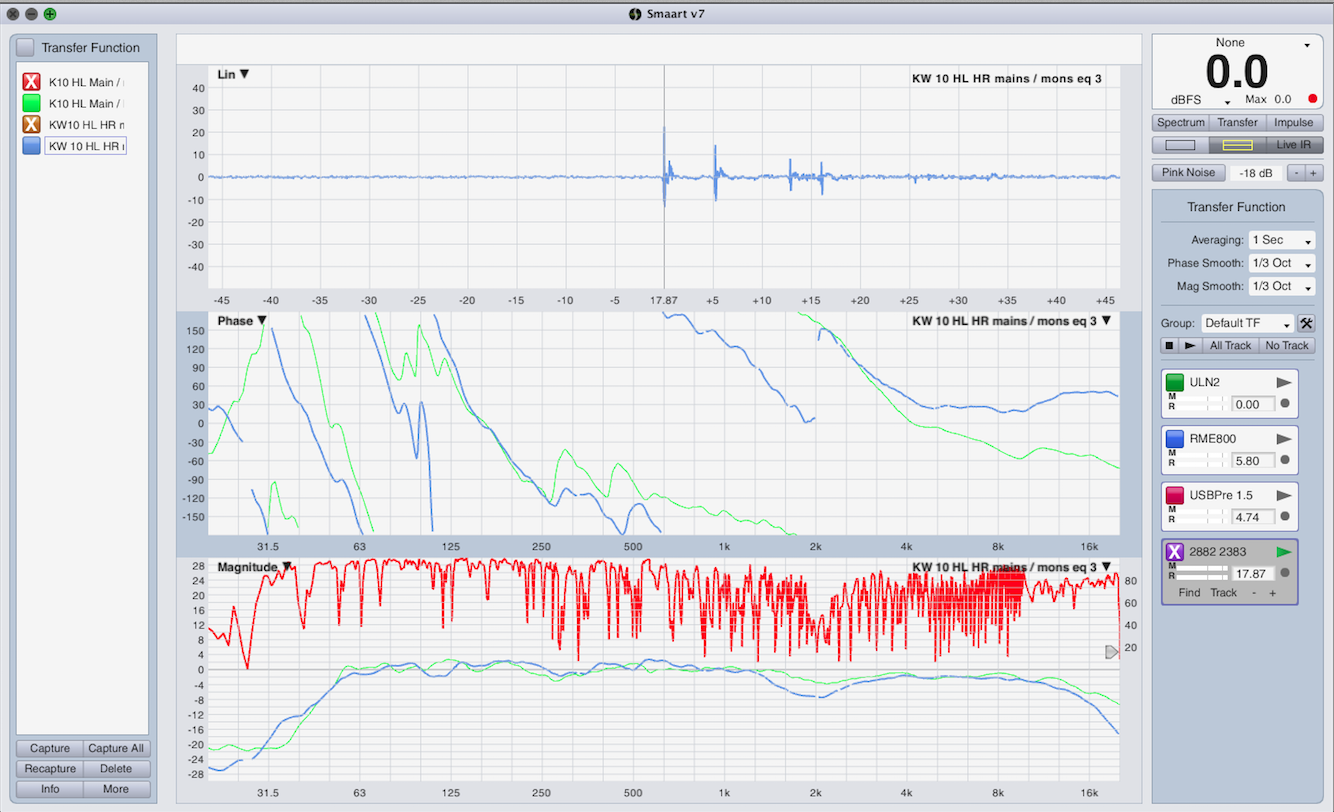
Lastly, I placed the measurement mic near center of the two main speakers to see how the whole system works. In the final trace, you will notice that there is a dip between about 2kHz and 4kHz which I chose to leave alone since one would expect there to be some sort of cancellation at the seam between the two speakers.
QSC K10 quad eq
The final rehearsal leading up to the event this evening was last night and at around midnight I received the following text from the stage manager: “Sound is in good shape. The speakers sound GREAT!” This is no accident. First I had to advocate for a system design that met their expectations. Then I had to locate the speakers in the best location for their purpose and aim them to avoid reflections while optimizing coverage. Then I had to resolve the inherent low mid build up from having (4) speakers near each other via EQ. Once that was done, a “the speakers sound great” review is typical.

Color coded measurement mics

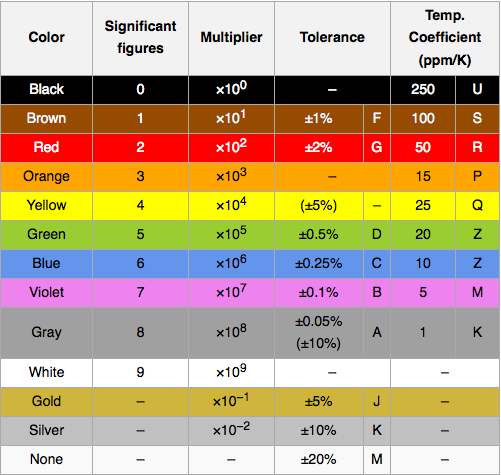
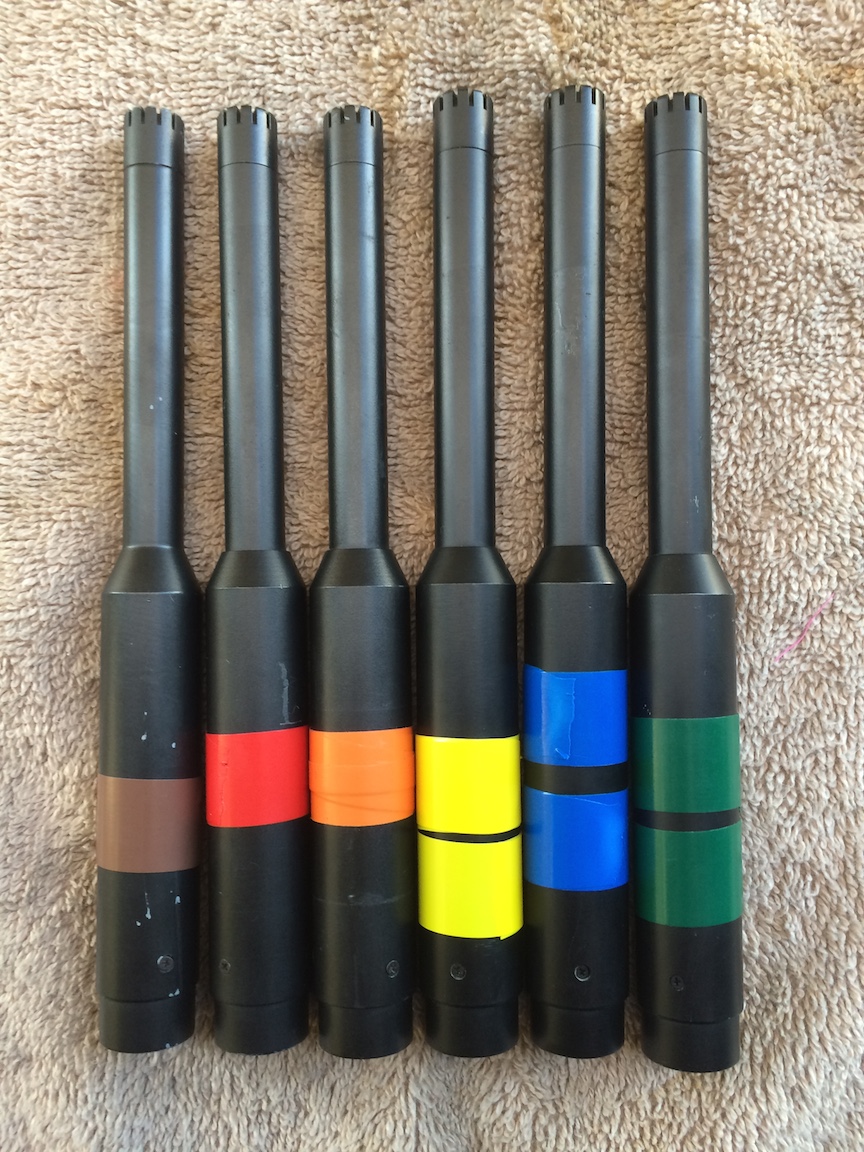
I don’t recall who told me they color code their measurement mics but it’s a great idea and one that I’ve adopted to keep track of which mic is which. For the color choice, I’ll follow the resistor color code which is a carry over from my days at SHOWCO. If you knew the resistor color code you could assemble and troubleshoot a SHOWCO sound system as all the amps, speakers and cables were color coded.
WIKI – Electronic Color Code
Resistor Color Code
Audix mics color coded
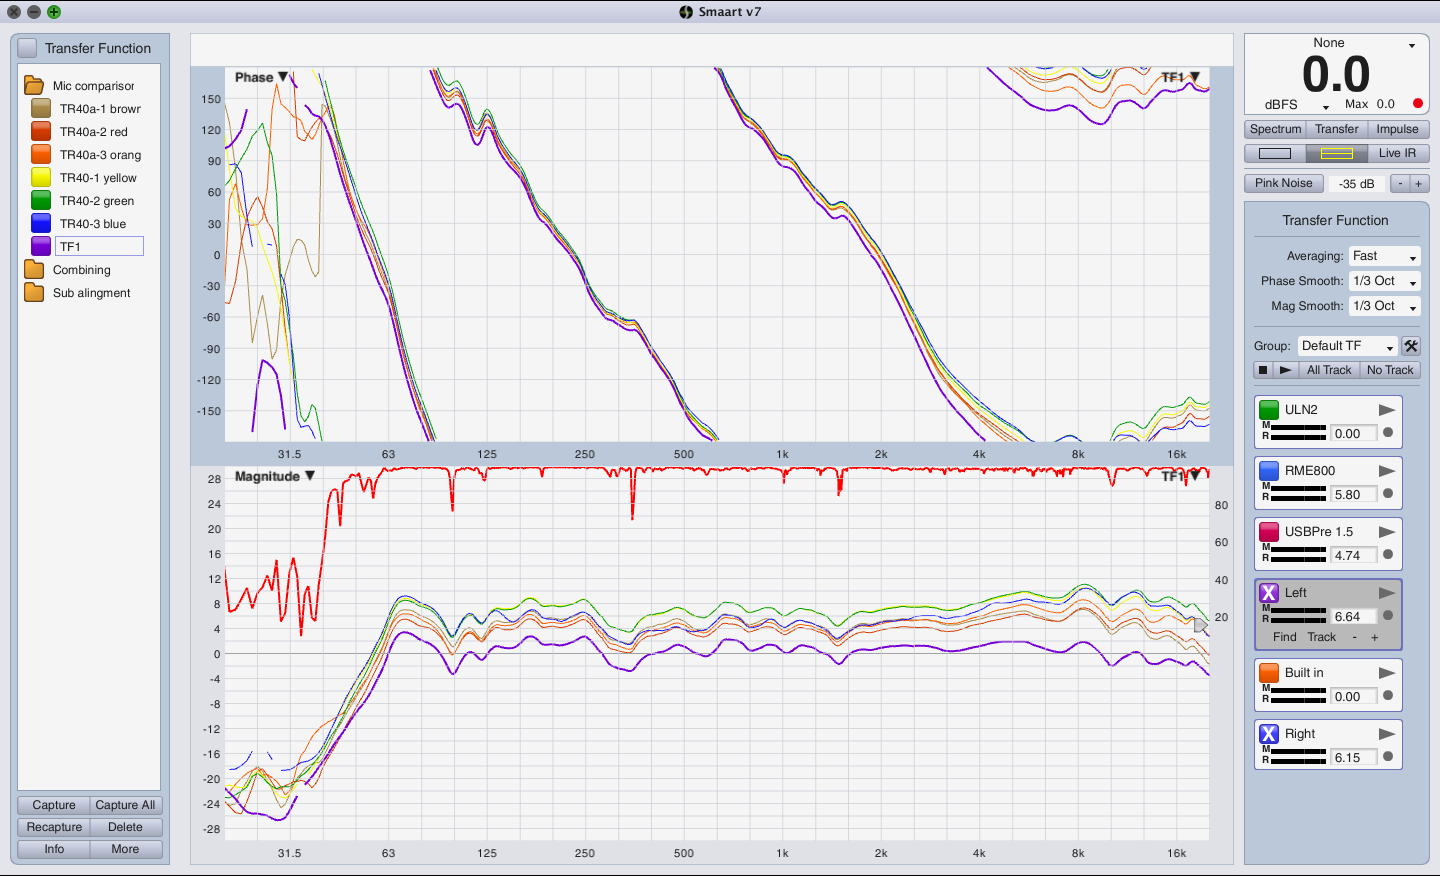
It’s important to note that these mics don’t measure the same in frequency response or sensitivity.
Here is a screen capture of all (6) measurement mics (plus a TF1) for a reference without adjusting for sensitivity differences.
Audix measurement mic no offsets
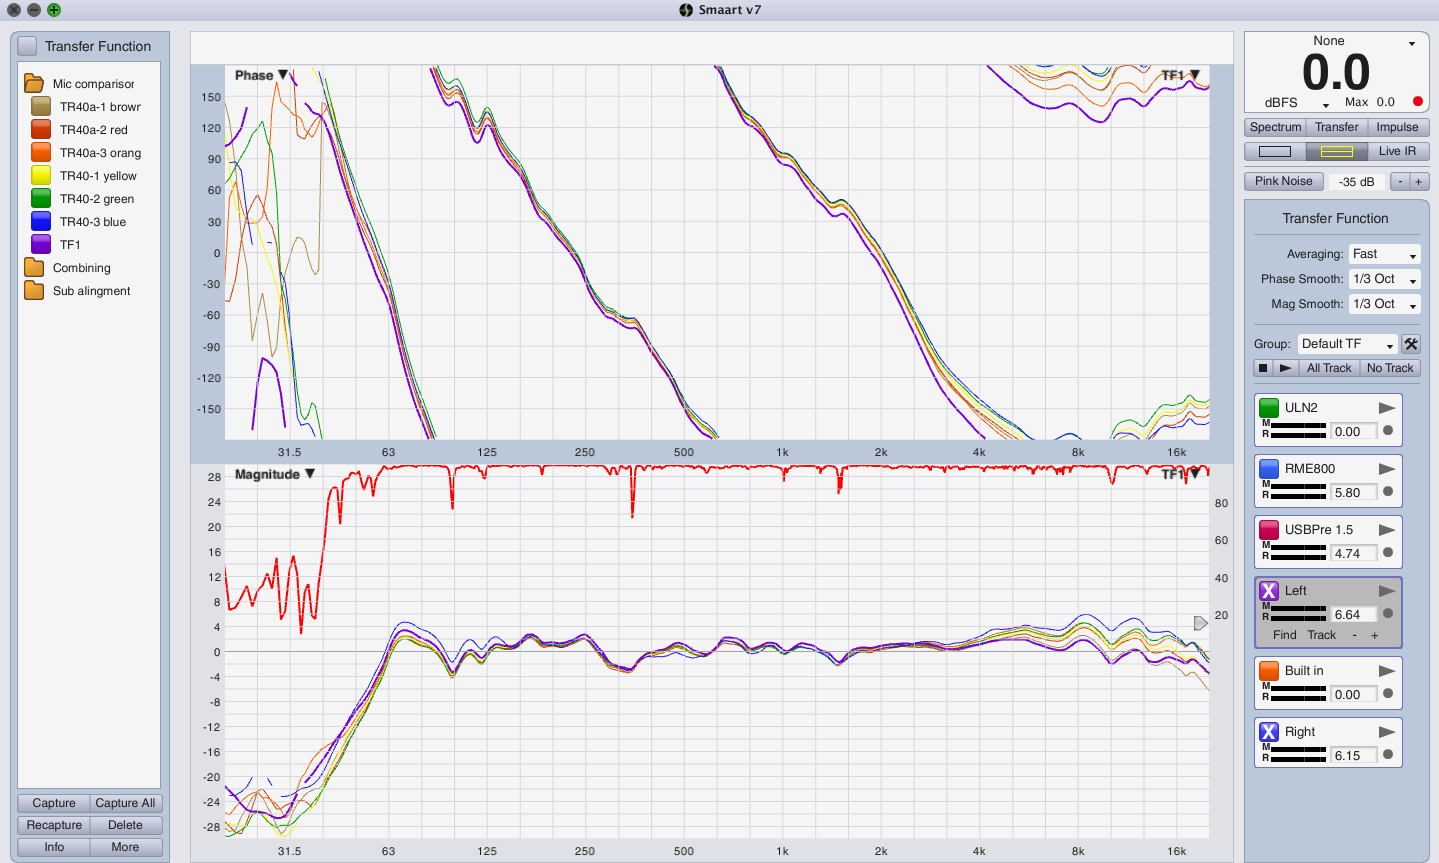
This is the same traces after I’ve manually adjust the trace offsets in an attempt to match them. Notice the difference in the high frequency range.
Audix measurement mic comparison offsets

Hyperlinks and the Uncertainty Principle

A dear friend of mine once said that hyperlinks were one of the greatest inventions of our time.
WIKI – Hyperlink

I was just reading about the law of conservation of energy
WIKI – Conservation of Energy

and clicked on the hyperlink for Uncertainty Principle
WIKI – Uncertainty Principle

Which is an aspect of the explanation of Quantum Mechanics
WIKI – Quantum Mechanics

Which deals with explaining how a wave functions.
WIKI – Wave Function

All of this is related to Fourier Transforms
WIKI – Fourier Transform

Which is the theory and math behind fast fourier transforms
WIKI – Fast Fourier Transform

Which is the basis for how we measure audio in the modern world
WIKI – Audio System Measurements

It’s amazing how so interrelated things are.

RF Venue – RF Explorer Rack Pro arrives

Today was an RF scanner party at my house. Not only did the RF Explorer Rack Pro I ordered arrive (which includes Clear Waves software license) but a short while later the SMA to BNC adapters I ordered off eBay showed up too. When I ordered the Rack Pro, I also ordered a spare antenna to try with my existing RF Explorer WSUB1G handheld unit. In order to use the Rack Pro antenna, I needed an SMA to BNC adapter.

Consequently, I was able to experiment with the RF Explorer Rack Pro / Clear Waves combination and also try out the Rack Pro antenna on my RF Explorer WSUB1G handheld tied to Vantage software. Based on my initial tests, it appears there is about a 5db sensitivity increase using the Rack Pro BNC antenna when compared with the stock Nagoya N-773 antenna that comes with an RF Explorer WSUB1G. What this means in real terms is that the provided data using the Rack Pro antenna is more accurate and shows things that don’t even register with the stock antenna. This isn’t to say that the stock antenna isn’t useful but that the Rack Pro antenna is a welcome addition to the kit.

I also ordered some BNC 50ohm termination adapters to protect my Rack Pro from overload when it’s not in use.

Why you should tune your stage monitors in the venue prior to an event

Let’s assume there is a stage full of floor wedges that are being provided by a rental company. Shy of verifying them with a measurement rig, there is no reason to assume the wedges are all functional much less able to provide a flat frequency response just because they came out of a truck. In fact the chances of them providing a flat frequency response is almost zero. Here are a few scenarios I’ve run into over the years.

1. The local has his / her favorite settings to make the monitor sound good which could mean anything.
2. No one has any opinion at all and maybe doesn’t even care. After all, “it does makes sound.”
3. You’ve been provided with a really nice monitor rig that is well maintained and the local has tuned them for you (and not with his voice).

The first time I actually made the time to measure all the stage wedges provided for my show was an eye opener. I was provided with “custom” 2 way active boxes. By measuring each box individually, I found some frightening things. In some cases the woofer & horn were out of polarity leaving a huge hole in the frequency response through out the crossover range. I also discovered extreme imbalances between woofer & horn due to the amp settings which by the way changes the crossover frequency. I also found one wedge that only produced highs because the speakon connections were loose. It was on this specific gig that I decided to purchase Smaart 7. Specifically for it’s LIVE IR function.

This might be a rare case but my guess is that any sound company that is providing “custom” active stage monitors that doesn’t own a measurement rig (and know how to use it) is providing inferior gear and service. At one time in history, all stage monitors were “custom” made. Fortunately the industry matured and we now have some very good sounding and well processed options. This isn’t to say that they don’t need to be verified and tuned. I speaker with a perfectly flat response won’t be perfectly flat anymore if it’s near a wall or near a corner of a room (a typical situation on a small club stage). If you use 2 wedges as a pair (typical), you will have severe comb filtering across most of the frequency range unless you aim those speakers correctly to avoid it. Even so, you can expect the low end of a wedge pair to be enhanced and expect to need some low end reduction in order to provide a flat frequency response to the user. Many monitor engineers use their 31 band graphic EQ to “shape” or “correct” the response of a wedge but I would strongly argue that is the wrong approach. Stage monitors should be processed for a flat frequency response (just as a sound system should be) leaving the 31 band graphic EQ flat. This allows for quick adjustment of the mix if necessary. If you use the graphic eq to shape the response of a stage monitor, you’ve already hacked things up before the artist arrives.

For years I saw band riders that said, “no passive wedges, all wedges must be active 2 way with 2″ HF driver.” In theory,

In my view, unless you’re provided with a self powered wedge, you’re better off with a well designed passive wedge than an unknown active wedge. Whether you’re designing a passive or active wedge (or any speaker for that matter) you have to select the right drivers, build a box that those drivers are happy in and then optimize how those drivers interact and work together. Get it right and you’ve got a marvelous thing. Get it wrong and no amount of EQ will solve the issues. With a passive wedge designed by a reputable company, there isn’t much to go wrong. You can damage the driver / drivers by using too many or too little watts but otherwise it will just work. Once you move into the active realm, there are a dozen or more things to go wrong. One of the mistakes I’ve seen made on active stage monitor rigs more than once is to adjust the balance between the lows and the highs using the amp channels. To be clear, there is a right and wrong way to adjust the response of an active speaker and it shouldn’t be done at the amps once the speaker has been correctly configured. How? With a measurement rig. A measurement rig will help make important decisions like the crossover frequency, balance between lows and high and the general shaping of the speaker. Once all that is done correctly, it’s a safe bet that the wedge will sound good AS IS and whatever might need to be adjusted will be easily managed with the industry standard 31 band graphic eq provided on pretty much every monitor rig in the modern world. If you get the crossover / balance between drivers and processing wrong, there is little chance the graphic eq will be able to solve the issues.

Questions:

How do you choose the appropriate cross over frequency?
How do you choose the correct amp / amps to power a passive or active speaker?
How do you process a speaker in such a way that it has a flat frequency response on the floor?

Sound Devices USBPre

The Sound Devices USBPre was an industry standard for 2 channel audio measurement purposes until the USBPre 2 came out. I’ve always been curious about both of these devices due to their quality, size and popularity and recently came across a good deal on a USBPre and thought I would try it out. The short story is that the device is well built and works if given the right circumstances. The long story is that I would not recommend a USBPre for modern measurement purposes. It’s got too many things working against it. If you already own one, it certainly has value. If nothing else as a high end headphone amp and 2 channel recording interface. Consider the following before you purchase a legacy USBPre.

1. The USBPre has unbalanced RCA outputs so in order to do a reference measurement loop and feed pink noise to a sound system you need adapters or a RCA to 1/4″ cables. The balanced 1/4″ inputs can be configured as LINE or DI inputs, neither of which is ideal for interfacing with unbalanced RCA level signals.

2. Since the USBPre is discontinued and no longer supported by Sound Devices, it will NOT work with modern 64 bit operating systems using the existing Sound Devices driver. If you have an older PC (running 32 bit XP, Vista or Window 7) or a Mac running OSX 10.6 or older, there is no reason a USBPre can’t work for audio measurement purposes. I did exactly this tonight using a MacBook 2008 running 10.6.8, SpectraFoo Complete. There are a few things you have to do to get it to work but it works. I had to create an aggregate device in the audio midi setup that includes USBPre – 2 inputs / 2 outputs. By default the USBPre inputs / outputs appear as two separate devices (2 input OR 2 outputs) in OSX.

There is a 3rd party driver that in theory will allow the USBPre to work with a 64 bit OS:
USB Audio – universal driver
There are no guarantees the driver will work for your system and I’m not sure it’s worth nearly $50 for the driver but I got the demo driver to work. It makes a beeping sound about every 30 seconds but I was able to get my USBPre configured in Smaart 7 / OSX 10.9.5.

I love the form factor of the USBPre and now will budget for purchasing a USBPre 2 in the near future. When you’re traveling, size is a factor and the USBPre 1 & 2 are about 1/3 the size of my Metric Halo and RME interfaces.

If you are in the market for a portable 2×2 audio interface for measuring purposes the Sound Devices USBPre 2 is hard to beat.

Audio Control CM10

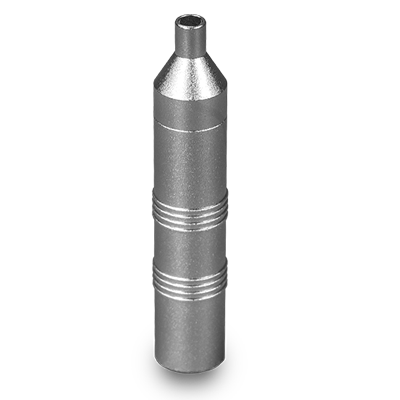
I recently borrowed an Audio Control CM10 measurement mic to compare it with other measurement mics I own.

Audio Control CM-10

Audio Control CM10
For a sound source, I used a QSC KW122 speaker. The DUT (devices under test) are the mics. If I used the one mic and measured a batch of speakers, the speakers would be the DUT.
The comparison was between:
Audio Controls CM10
Earthworks M30BX (self powered)
Audix TM1 (current measurement mic model)
Audix TR40a (discontinued measurement mic model)

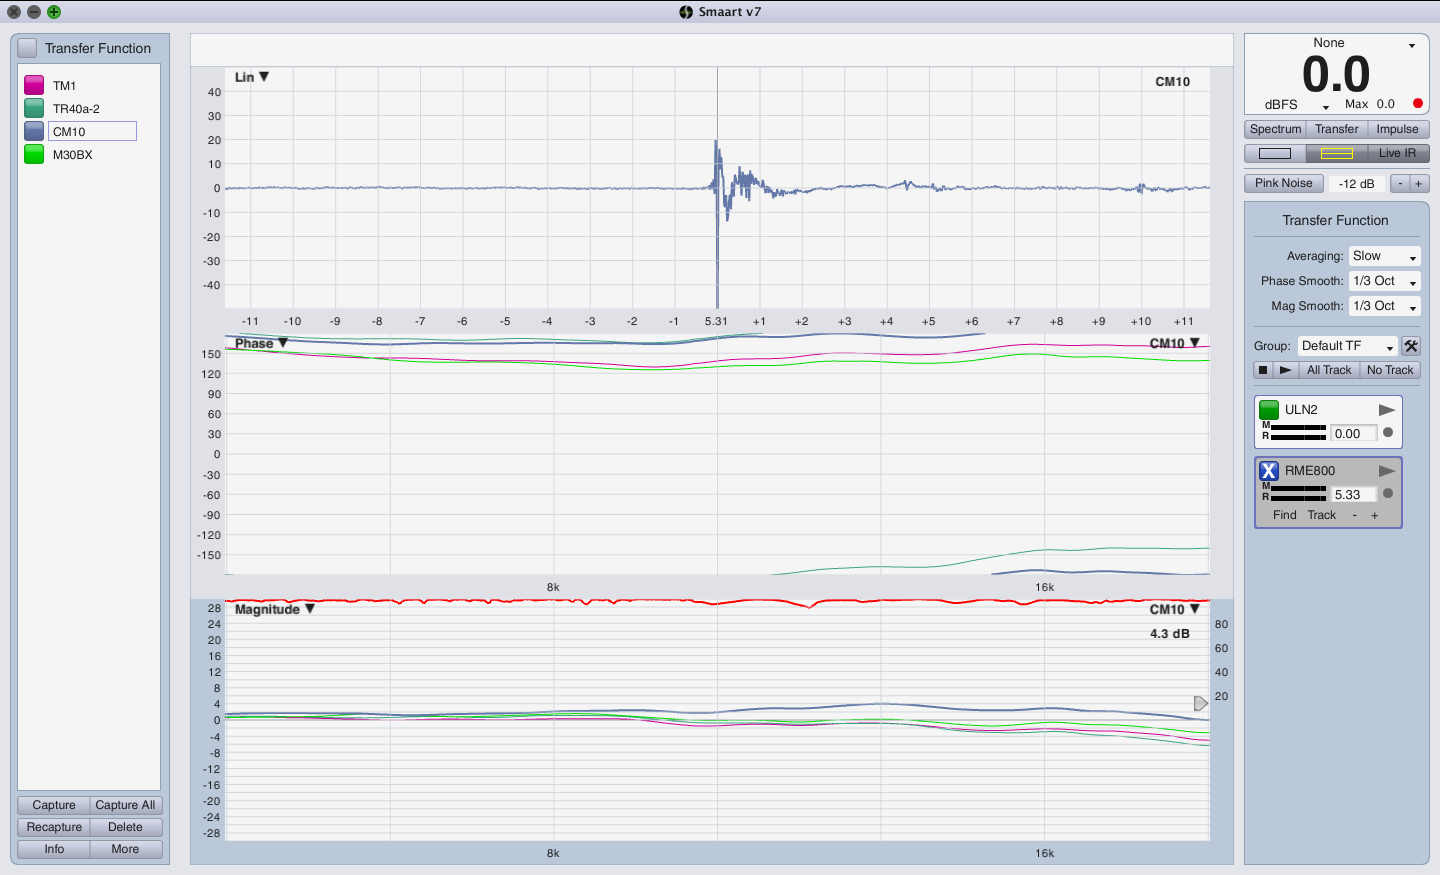
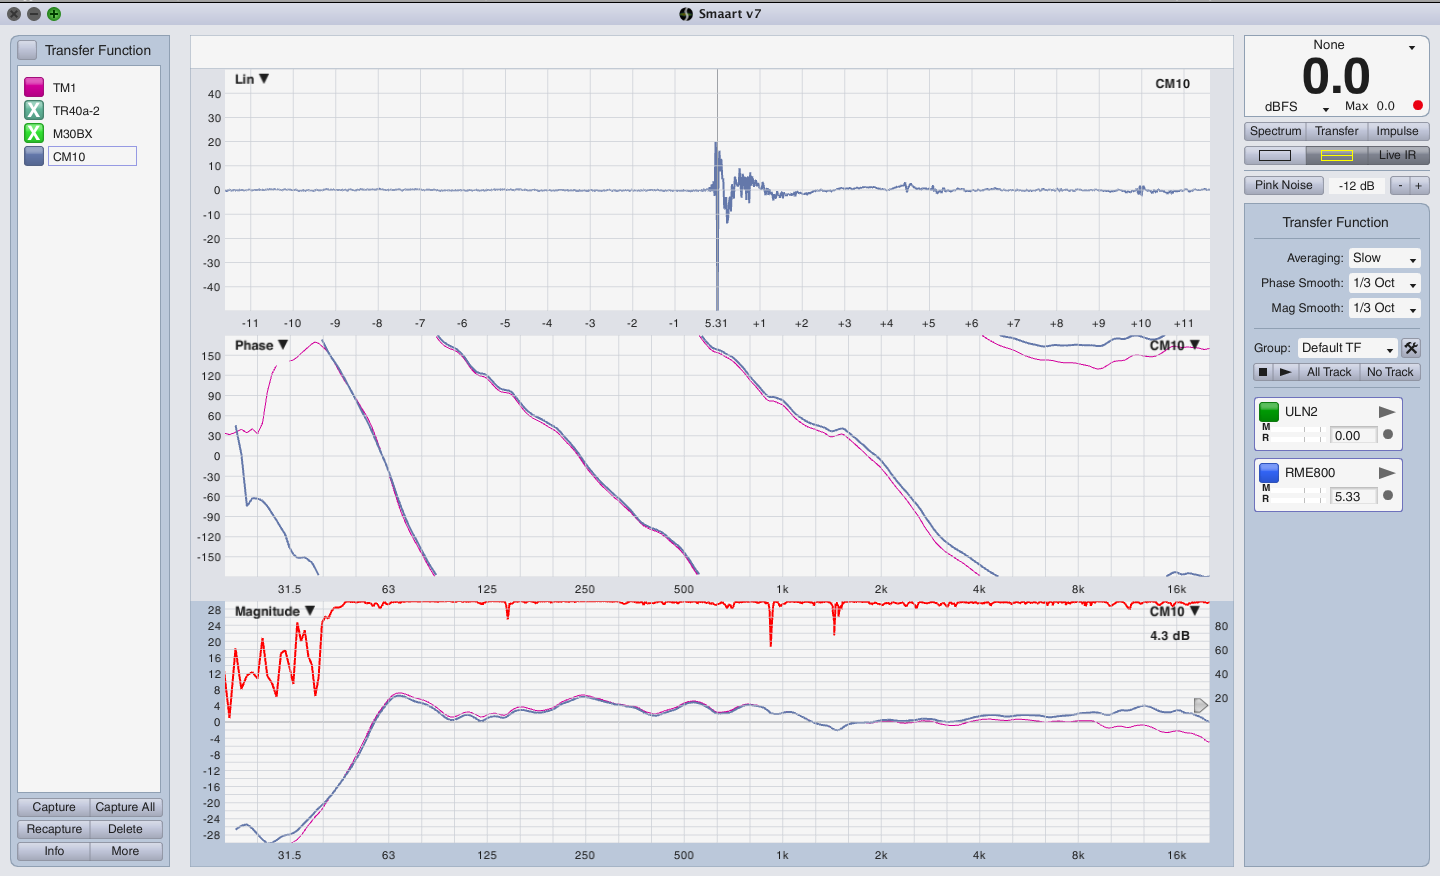
In the following image, note that the mic traces match closely in frequency response until about 4kHz and then only the CM10 begins to deviate from the other traces. This indicates that the frequency response of the CM10 above 8kHz is less accurate than the other mics. Even so, the deviation is minor. Maybe 4db off from the rest at certain frequencies.
Audio Control CM10 comparison

This next image was made using the ZOOM function in Smaart 7. I have zoomed in to the range between 5kHz and 20kHz so the CM10 deviation is more noticeable.
Audio Control CM10 comparison 5k to 20k

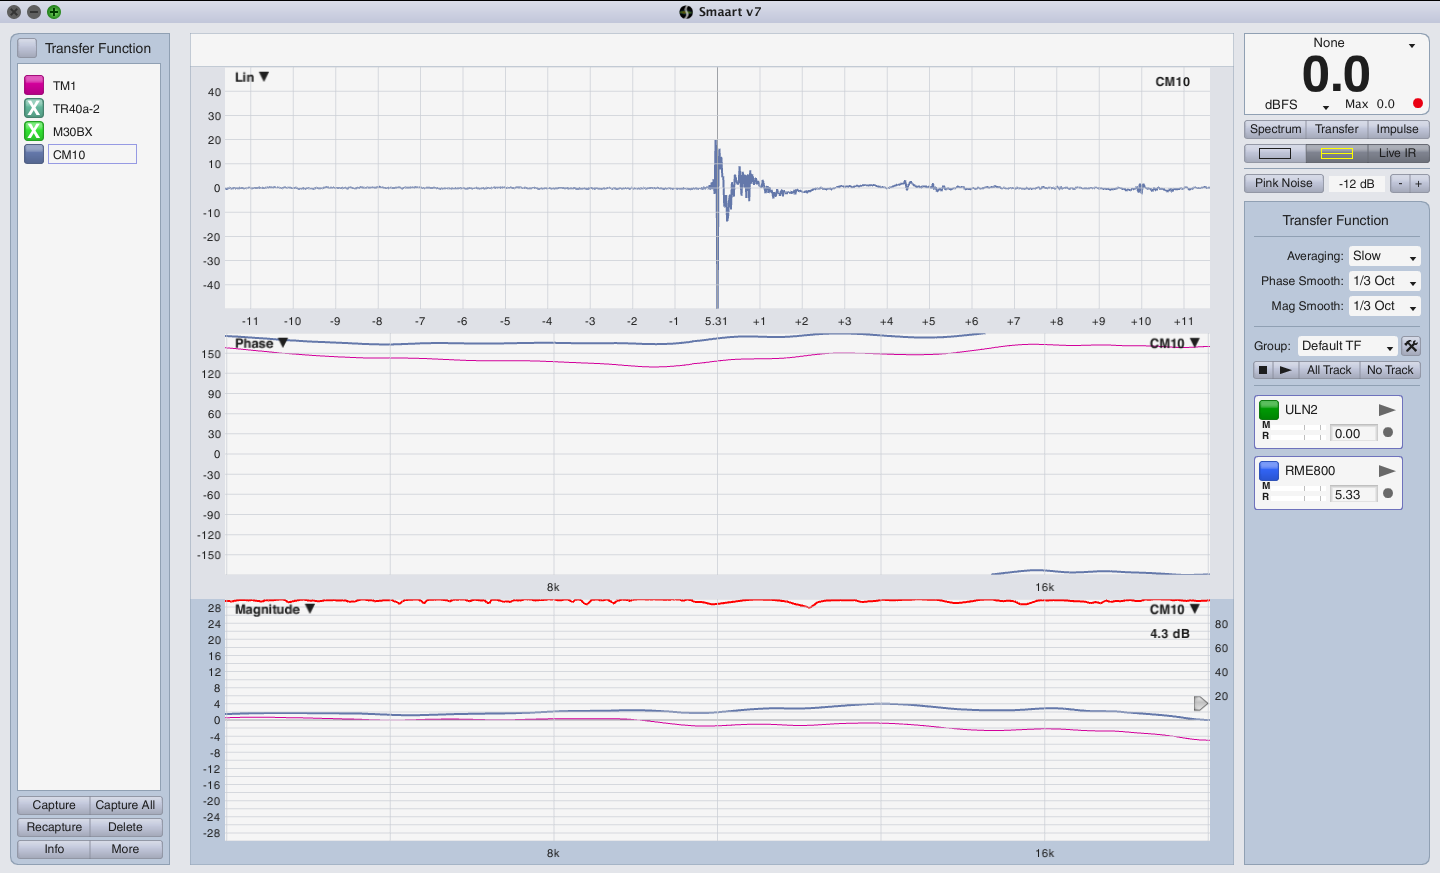
To simplify things, the next image is a comparison between just the CM10 and Audix TM1.
CM10 : TM1 comparison

This is a zoom between 5k and 20k of the same two microphones.
CM10 : TM1 comparison 5k to 20k

I would need to measure a sample of brand new Audio Control CM10 units to know for sure if this older CM10 mic meets the factory spec for the mic. One could certainly make relatively good decisions about system optimization using the CM10 measurement mic.

RF antenna theory

There is little point in learning about RF scanning and coordination if you don’t understand how sending and receiving antennas work. I don’t currently possess that information. I have a general idea but it’s already clear that I need a better foundation. For the last week or so since I dove head first into RF, I keep recognizing similarities between transfer functions and RF. I’m actually beginning to think that RF is much more difficult to grasp and do well. This is good news. Who would think that sound system design and optimization could be considered “easy” in comparison to another aspect of professional audio? What is becoming obvious is that there are many parallels between the two concepts. Both deal with frequency, wave length, time, constructive and destructive interference, phase, etc… Both use tools to visualize what we cannot see with our eyes. One uses and RF scanner & the other uses a measurement mic and transfer function. Different ranges of the same electromagnetic spectrum.

I won’t be surprised if learning more about RF actually answers some of the questions I still have about sound system design and optimization. One can hope.

Most of us in the live audio realm deal with RF mics and I’d be willing to be bet that many of us have only a slight understanding of how the technology actually works and how to optimize the hardware. “RF coordination and optimization”.

Properly using RF gear and coordinating your frequencies is a fairly straight forward process. Understanding sending and receiving antennas is the final frontier of optimizing RF. Get it right and your rig is artifact free. Get it wrong and your event is ruined.

The industry has a few antenna types that we need to know about if we’re going to pick the right antenna / antennas for the job.

HELICAL:
Professional Wireless Services – Helical Antenna
RF Venue – CP Beam

DIVERSITY FIN
RF Venue – Diversity Fin

LPDA (Log Periodic Dipole Array)
Lectrosonic – LPDA (Log Periodic Dipole Array)

Here is great article by Volker Schmitt & Joe Ciaudelli of Sennheiser:
prosoundweb.com – Understanding Wireless : Positioning Antennas For Trouble Free Transmission

Here is a white paper explaining how the Diversity Fin design works provided by RF Venue:
The Diversity Fin Antenna and Polarization Diversity for Wireless Microphone Applications

Here are some links to RF Venue’s Alex Milne’s blog.
RF Venue blog – Understanding the Difference and Debunking the Myths Between Active and Passive Antennas
RF Venue blog – What is ERP?
RF Venue blog – Polarization, Polarity and Polar Pattern: What’s the Difference?

RF Explorer – Arts 5th Avenue

This afternoon I stopped off at Arts 5th Avenue in Fort Worth Texas to deliver a RF hand held mic system. I had a choice of (2) Sennheiser EW100 series G2 systems. One in the A band (516mHz to 558mHz) & the other in the B band – (620mHz to 668mHz). I’ve had trouble getting the unit in the B band to work in Fort Worth but not in Dallas. Why?

INSERT TRACE HERE:

While I had the two systems side by side I noticed that the whip antenna’s for both rigs are the same maximum length. In fact, after that, I checked an old 700mHz system and it has the same whip antennas. Can the same receiving antenna (extended to the same length) be optimal for picking up 3 different frequency bands? Logic would suggest no but I don’t know enough about RF principles to know. Obviously I have a lot to learn about how antenna’s work…

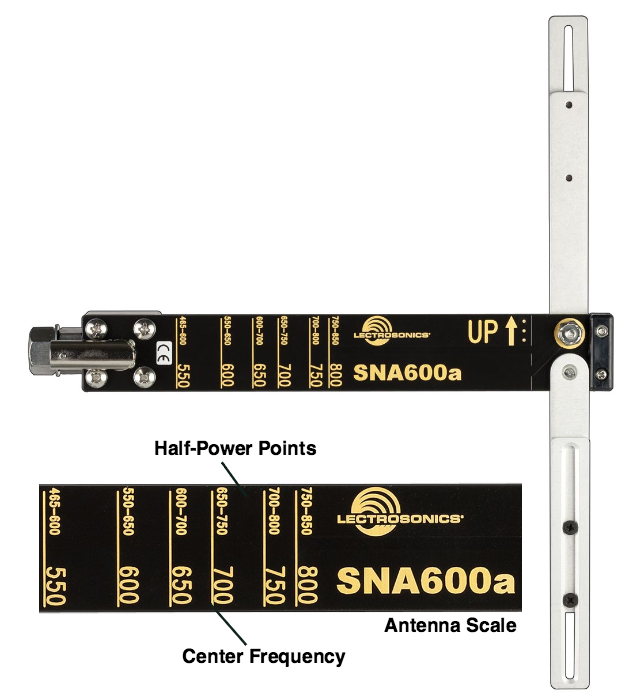
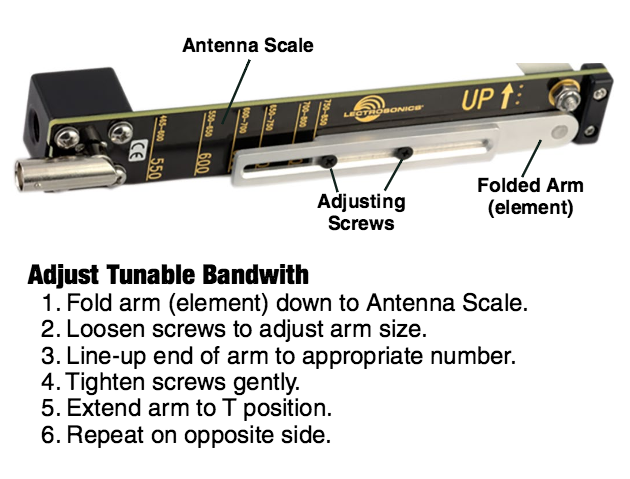
A clue is given to us by Lectrosonics. Their SMA600 dipole antenna is adjustable and the length to frequency increments are etched right on the antenna.
Lectrosonics – SNA600 dipole antenna PDF
Lectrosonics SMA600

Lectrosonics SMA600 tuning instructions

The length of an antenna is it’s tuning. Knowing that, we can’t ignore the length of our antenna’s as they relate to different frequency ranges. Obviously an antenna might work to some degree regardless of it’s length (think coat hanger for a TV antenna) but that doesn’t mean that the signal is being captured optimally.

Here is a website that provides an antenna wave length calculator:
csgnetwork.com – antenna generic frequency calculator

Smaart 8 preview & Smaart class announcement for San Diego 2016

Smaart 8 logo
Just got this email from friend and Rational Acoustics instructor Harry Brill Jr.
QUOTE:
Please pass this on to anyone you think would be interested. Maybe this would work for the guys that want to get trained.
http://www.rationalacoustics.com/events/sandiego/
There are special discounts available to attendees that register for the class and purchase Smaart before class. Smaart 8 is coming out March 15 and well be at an introductory upgrade price for Smaart 7 owners. I will be able to offer additional discounts over what Rational offers directly.
http://www.rationalacoustics.com/smaart-v8-preview/
If you buy v7 (even at the class discounted rate) from now until v8 is released you will get a free upgrade to v8. After v8 is released you will get v8 when ordering a new license. It’s important to note if you are upgrading from an older version, you may be better off upgrading to v7 then later getting v8 for free, than to wait until v8 comes out, since you may be skipping a version, and that usually means paying more for the upgrade.
Harry Brill Jr.
Vice President
Tiger Audio, Inc.
proaudioguy@tigeraudioinc.com
http://www.tigeraudioinc.com
END QUOTE
Here is a direct link to the website to book the class:
http://www.tigeraudioinc.com/sandiego2016.html

RF Coordination

Most of us in the pro audio industry deal with RF (wireless mics, clearcom, assisted listening, walkie talkies, etc…) but few actually have a solid grasp of all the essential elements that make it work properly (knowledge of the hardware, understanding of the physics, antenna theory, frequency coordination, intermodulation distortion, etc…) There is nothing easy or simple about doing RF well and as the FCC sells off more and more bandwidth, our lives regarding RF are going to get more and more difficult. Might as well begin the process of preparing now.

Recently, after having some RF issues, I bought an RF scanner and the software necessary to monitor and save RF spectrum scans. Interestingly the universe is now handing me a cornucopia of RF issues to work with. This morning I received a text message from a staff member at a church that has (5) Sennheiser EW100 series A band (516mHz to 558mHz) RF mics. Via Teamviewer app, I was able to log into the local computer that records the services and see that (4) out of (5) RF receivers were being stomped on. I was also able to mute those channels so the church could get through their morning service without interruption from RF blasts. I headed to the church as soon as possible and we retuned everything to a new area of frequencies that is hopefully clear. Note that the existing frequencies were clear when I arrived but suffered so RFI (radio frequency interference) earlier in the day. Something is intermittently causing issues. No choice but to run from it.

In order to coordinate RF correctly, you need a few resources. An RF scanner is mandatory so you can scan the local RF spectrum and see if there are any openings. An RF scanner is not a panacea because it only scans when it’s active so if you scan for 5 minutes and then stop and then some RFI comes along, you won’t know it via the scanner. In addition to scanning locally, you also need to know what to expect regarding broadcast signals in the local area. In theory your RF scanner would show you the same data but sometimes the FCC data isn’t up to date in which case, if you used only their data to coordinate frequencies, you might avoid using some of the RF spectrum that is actually clear. For example, if a broadcaster becomes dormant.

Some of the information needed is readily available on the internet.
For the USA, here is a wiki article that explains the frequencies that DTV channels use.
WIKI – North American Television Frequencies
WIKI – North American Television Frequencies Broadcast Television

Once we know that X TV channel uses between Y&Z frequencies, we can understand what spectrum may be fair game for our purposes. Remember, there are no guarantees.

Here is a chart that shows which DTV channels are active in X location.
FCC DTV map

Programs like IAS, Clear Waves and RF Guru will include this information and use it when helping choose frequencies. Meaning that you can figure it all out for yourself by piecing all the data together or you can use an existing set of tools to do it for you.

Manufacturers like Sennheiser provide a website where you can check for known frequencies.

Sennheiser Frequency Finder webpage

You fill out the zip code or city and then set a few parameters and the webpage will provide you with a suggestion for where you tune your mics.

Here is the website for checking Shure gear:
Shure – wireless frequency finder website

The main problem with using the manufacturers information is that they logically only support their devices and the frequencies their devices operate on so if you have multiple brands of models of RF gear, you’re on your own to coordinate the RF system. This is where software like IAS is invaluable. IAS has gear lists so in addition to taking the data generated with an RF scanner, you can configure it so that it knows that you have X number of channels of RF mics, wireless com, etc… and it will know which device is tuneable and which ones aren’t and also the range they can tune over. Then IAS will provide you with a master list of frequencies you should try to avoid IMD and still make your rig work. IAS will also indicate if you aren’t going to be able to make your rig work as specified. $550 might seem like a lot of money until you ruin a show trying to coordinate your RF without it.

Allen & Heath GR1 rack mount mixer

I’ve been needing a 1RU rack mount mixer with a few stereo inputs and have been watching Ashly mixers on eBay but recently I saw an Allen & Heath GR1 and thought I would give it a try.

Obviously before I put it into service I want to verify that it functions correctly. The GR1 is a rather complicated device in as much as there are a lot of configuration options available via internal jumpers.

Allen & Heath GR1 Brochure short form PDF
Allen & Heath GR1 Brochure long form PDF
Allen & Heath GR1 User Guide PDF

My measurements from the various inputs to outputs show that the signal path to the L/R outputs is golden but there is something terribly wrong with the Mono output. At first I couldn’t get a useful measurement. As if I was getting self generated noise. I unplugged my measurement rig and landed the Mono output on a Whirlwind Qbox (small self powered speaker). Sure enough, white noise coming from the Mono output with no input signal on the mixer. As a reference, I tried the same setup with L & R outputs. Clean. So something is wrong with the Mono output stage. It may be due to something being configured incorrectly inside the device. It may be from being damaged.

Two small speakers, huge hall, what could possible go wrong

I took family and friends to see a show at Bass Performance Hall this afternoon. I had seen a show produced by the same company before which was one of the best shows I’ve ever seen so expectations were high. Sadly the production became more of a learning experience for how not to do sound.

The production included only (2) speakers. One on each side of the set. The speakers were both on tripod stands which tipped the speakers backward a bit. I didn’t think much about this at first but as soon as the show started it became obvious that the spectral balance of the sound system was not balanced at all.

I purposely bought seats in the center and as close to the stage as I could get so that we could see and hear well. What came out of the (2) speakers was excessively low end heavy. So much so that the prerecorded female dialogue was muddy sounding. The male dialogue was even worse and mostly unintelligible. Consequently, there were whole scenes that just didn’t work.

For me, this makes a few things very clear that need to be considered whenever designing a sound system.

1. air loss is inevitable and it tilts everything toward the low end over distance
2. inverse square law dictates that level will decrease by half with each doubling of the distance
3.To make matters worse, low frequencies are supported by room boundaries so the inverse square law only applies to direct sound that doesn’t get reflected back into the room.

So the voices were muddy sounding which made it near impossible to follow the story which made the show difficult to enjoy. Proof of this was that people left at intermission. People got up and left during the show, kids started crying, cell phones came out, etc… A missed opportunity for a show that has all the potential to be stellar.

I actually texted house crew at intermission about the situation hoping it would be resolved before Act 2 began but knowing that without a reference point, there was no way to easily resolve the situation.

Before the show started I texted with house staff whether or not the production tuned the system. The answer was no. 🙁 The logical question is “Why Not?” How is it even considered anything but mandatory to tune your system once it’s located in a acoustic environment? That is the equivalent to tuning your guitar at home and not tuning it when you get to a new location.

Let’s optimize the existing setup and also redesign the system as an exercise in who things might be made better.

OPTION 1 – AS IS and optimize as much as possible.

The existing (2) tripod mounted speakers should be aimed to cover the most seats evenly. I can’t know for sure but my gut says the speakers were aimed upward too much for the seating configuration. So aim the speakers and then equalize the system to compensate for the distance and air loss. There would have to be a balance between excessive high frequencies at the front rows and not enough at the rear seats but that would be a worthy pursuit. If in doubt, error toward less low end than more knowing that the room, air and distance is going to make things bass heavy anyway.

OPTION 2 – redesign and optimize

Anyone that been to a modern venue or concert in the last 20 years has likely noticed that the main speakers are up in the air. This design approach evens out the playing field so that those in the front seats aren’t bombarded by excess level so the sound system can reach the rear of the venue. With speakers on the stage, you can only get them so high off the deck.

So I would fly the main speakers until they provided acceptable coverage for all but the first few rows of seating. I would add front fills for those seats so the on axis point of the main speakers could be aimed further back in the venue without worry about leaving the front rows uncovered. This is a typical approach to coverage. At some point in a large venue, it’s just time to add delay speakers to make up for air loss and distance. Doing so adds intelligibility back to the rear seating areas. With the flown mains, front fills and delay speakers, it would be possible to provide even coverage to all the seats.

Interestingly, what I describe is exactly what the venue has for a house sound system. If the traveling production had used the house system, I dare say the audience would of had a much different and better experience. The moral of the story is that a system that works well for a smaller venue might be completely inadequate for a larger venue. This is probably a true statement in general. “If it works for a smaller venue, it won’t work for a larger venue.” Physic isn’t affected by budgets or shortsightedness.

So a recap.

With absolute certainty:

Your sound system WILL lose high frequencies due to air loss over distance (loss of intelligibility)

Your sound system WILL lose general level over distance (loss of intelligibility)

IF your sound system is near stage level and raised up high enough, those up close will experience excessive level in order to provide adequate level for the rear seats. The one tool for correcting this is axial loss (being off axis of the sound system) but that is not a good tool to use IF it causes excessive reflections in the room (loss of intelligibility)

At least indoors, the venue will enhance low frequencies due to boundaries but not mid and high frequencies which will tilt a sound system’s response toward the low frequency range (loss of intelligibility)

At the end of the day, intelligibility is king as far as I’m concerned. Especially when it comes to story telling. It may be acceptable to have a muffled vocal at a rock show but not for musical theater or theater. If we can’t understand the words, we can’t follow or even care about the story.

Sound Transmission Class

Im about to start a garage renovation with a goal being to sound proof part of it for recording purposes. Before I can decide on the construction design I have to decide how much sound isolation I want to achieve. STC or sound transmission class gives some helpful information regarding this matter.
WIKI – Sound Transmission Class

RF Explorer and Touchstone Pro – first use

I’ve been experimenting with my RF Explorer RF scanner and Touchstone Pro scanning software on the kitchen table to get a handle on what does what. Today I had a meeting at a church I previously designed the sound system for and out of my own curiosity too my RF scanning rig. The church’s RF gear consists of (5) Sennheiser EW100 beltpack transmitters / receivers with the stock antennas. When the gear was installed about 5 years ago, I used the receivers onboard scan function to select frequencies. Recently I was told that there has been some sort of noise / static. Having asked the logical questions to narrow the hunt down, it appears that the issues happen when some or all of the people wearing transmitters go to the far end of the building to greet the congregation. That part of the building is a separate structure with mostly stone between the receivers. There are some stained glass windows. After setting up my RF scanner rig and beginning to scan, I noticed that (2) of the frequencies in use were very near some peaks shown in Touchstone Pro. This is exactly why having a RF scanner & software is necessary. When the Sennheiser unit performs it’s scan it last about 2 minutes. There is no information given about what it finds during the scan, at what level any interfering signals are. It just says, “X frequencies clear…” Knowing what I know now, scanning for 2 minutes is a poor indication of what might happen 2 minutes or 2 hours or 2 days later. In my view the most important function a RF scanner rig can play is to collect an RF history at a certain location. A 2 minute scan could easily miss all sorts of things.

So I retuned (2) of the (5) units and then sync-ed the transmitters to the receivers. Then I tested both mics and then took one for a long walk while my friend watched the RF level indicator on the Sennheiser receiver. He said that the level did drop a bit when I went to the other part of the building but not completely out.

Touchstone Pro can export CSV files in various formats to be imported into Intermodulation coordination software like IAS, Shure’s WWB & . I saved my results in two different formats and packed up.