This screen shot is taken from the current Spectra Foo manual (072214) – page 83

This screen shot is taken from the current Spectra Foo manual (072214) – page 83
Since the purpose of a transfer function is to compare signals you might want to compile a list of measurements and them compare them at the same time. Transfer function tools allow for saving data, managing what shows in the measurement window and even to recall the data at a later time if you save your measurements.
SpectraFoo calls these saved measurements “snapshots” and you manage them in the overlay list window.
Here is an example of a overlay I recently made using snapshots.

In order to keep track of the difference (if any), I took a snapshot via the “TAKE SNAPSHOT” button at the bottom left side of the TF window.
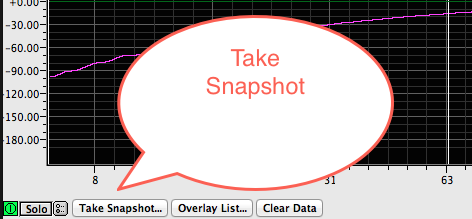
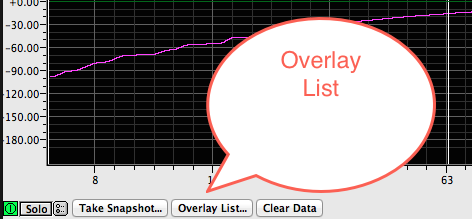
In that same area is a button to display the snapshot overlay list.
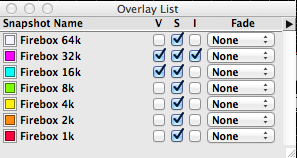
This is what the overlay list looks like for this measurement process.
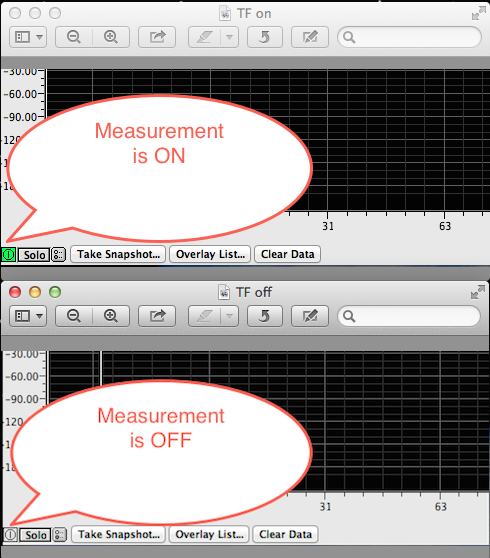
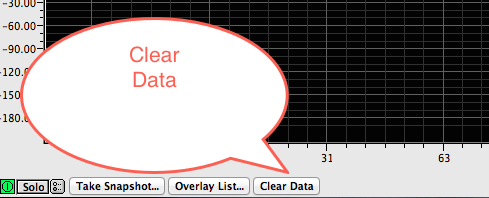
When you’re saving snapshots and then comparing them, it’s sometimes helpful to discontinue the measurement process and clear away any remaining data on the screen so you’re only looking at snapshots. These are the places to stop the measurement and clear the window.
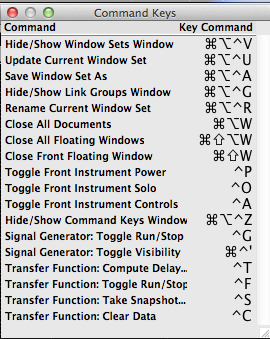
All of the functions mentioned above can be achieved with key commands:
This is what it looks like when you turn off the measurement tool & clear the realtime data while showing all the snapshots.
I’ve known for years that engineers who make measurements wirelessly are using a special type of wireless specifically designed or the purpose. We are told that we need a digital wireless without a compander circuit to be able to measure accurately. Fine. No doubt those that know about such things are right but I wonder what sort of problems come up with using an off the shelf wireless rig.
Since as a general rule, we use omni mics for making audio measurements the path of least resistance is to start with a wireless lapel / omni lav mic. For this experiment, I’ll be using a Sennheiser Evolution series rig.
INSERT RESULTS HERE:
Armed with the key commands, you’re ready to zip through some measurements…
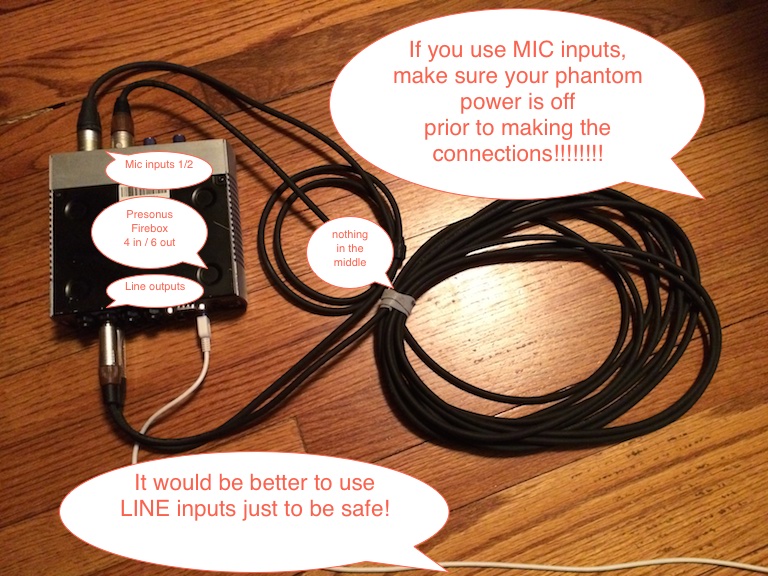
One of the first measurements I recommend performing is to measure the outputs of your audio interfaces against the inputs. This test verifies they match in gain and that there are no malfunctions. This measurement is about as simple as it can get.
(1) audio interface (two channel minimum & preferably with balanced input and outputs)
(2) patch cables (may be XLR to XLR / XLR to TRS / TRS to TRS / TRS to TS / TRS to RCA)
This is what your setup might look like:
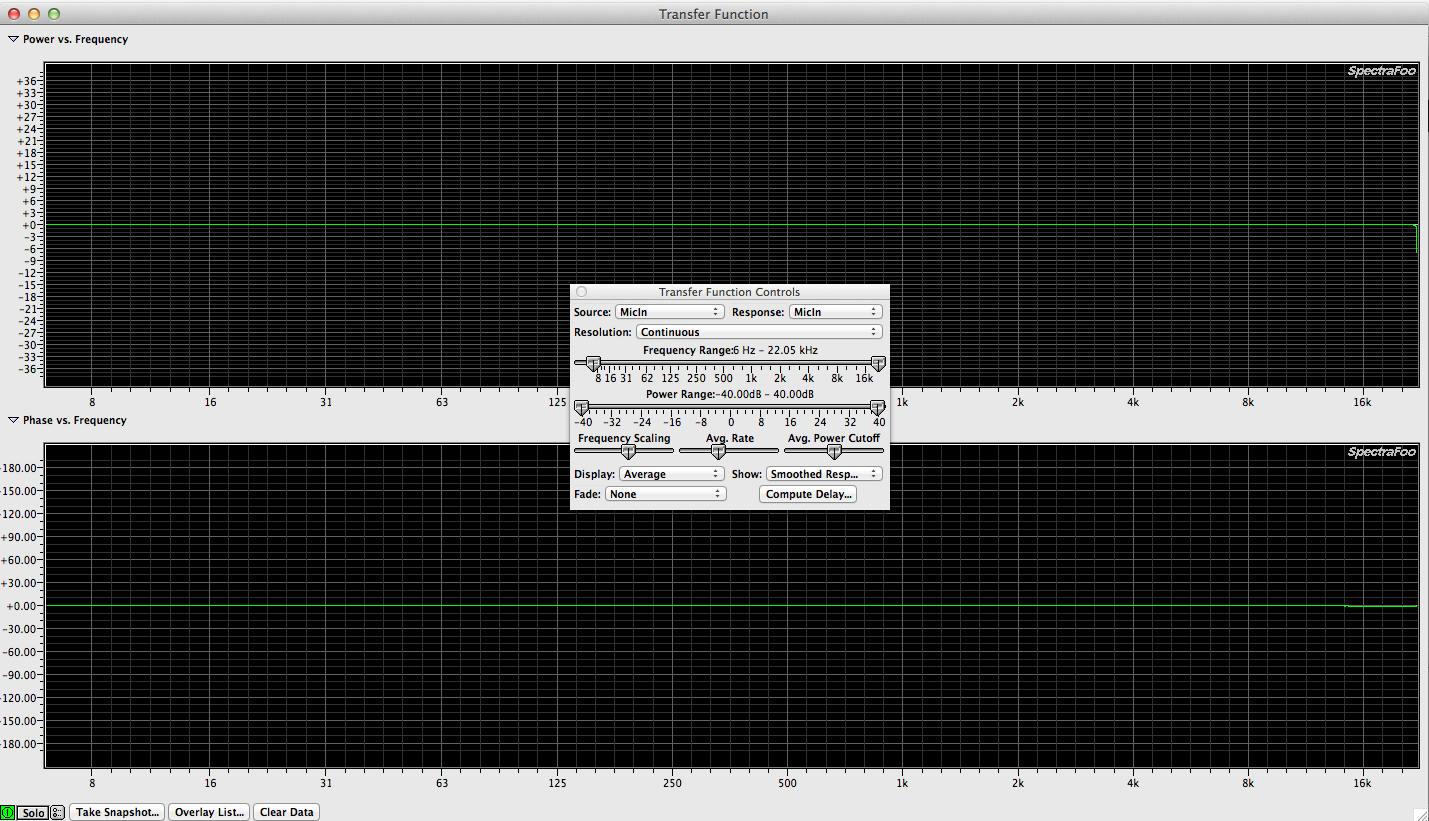
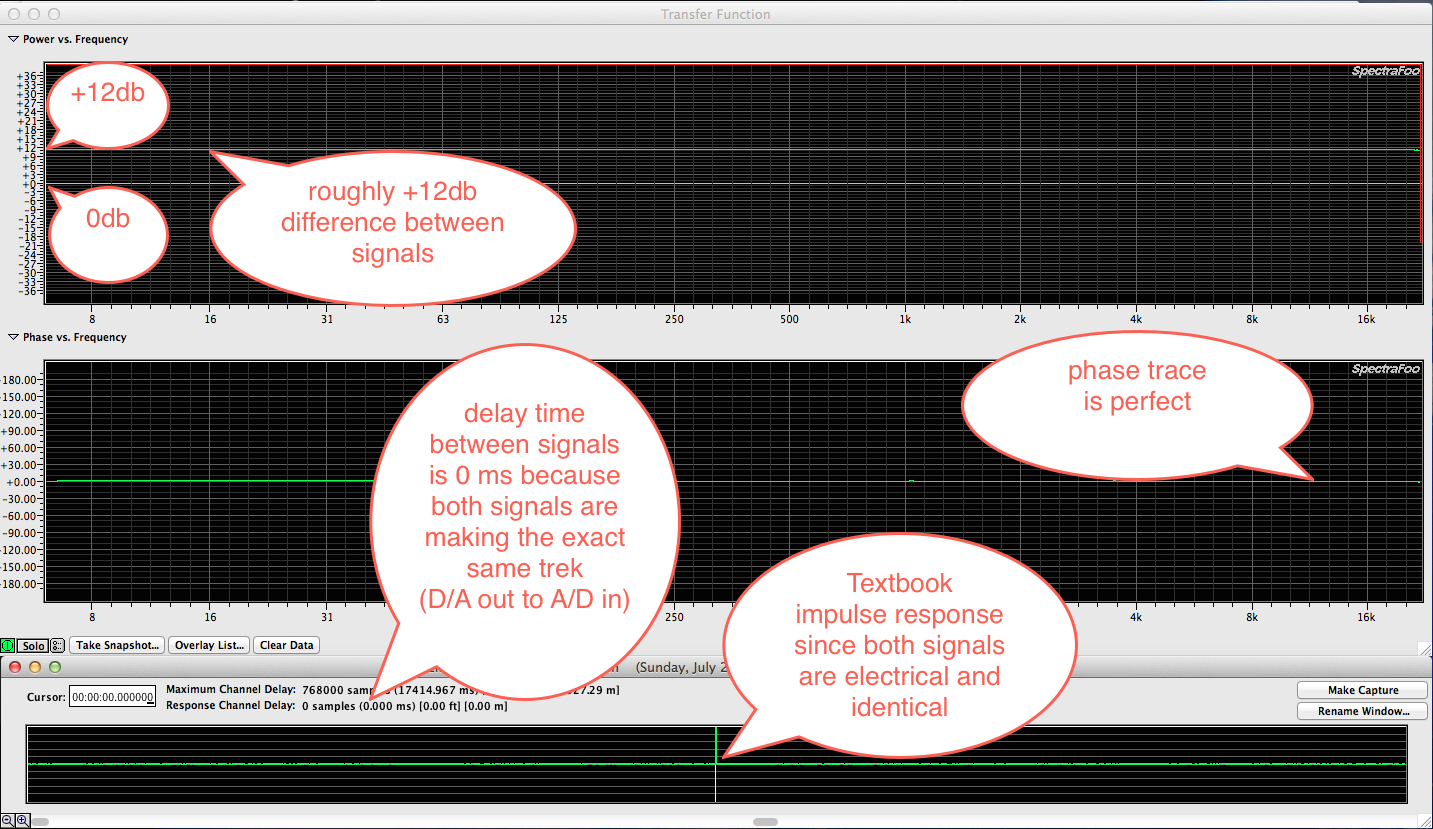
In this measurement process we measurement two signals passing through the same analog circuitry and D/A A/D converters. Assuming that everything is functioning and the cables are wired correctly, we are comparing identical signal paths so the measurement should be perfect. The expected measurement will have perfect frequency and phase response traces. Like this:
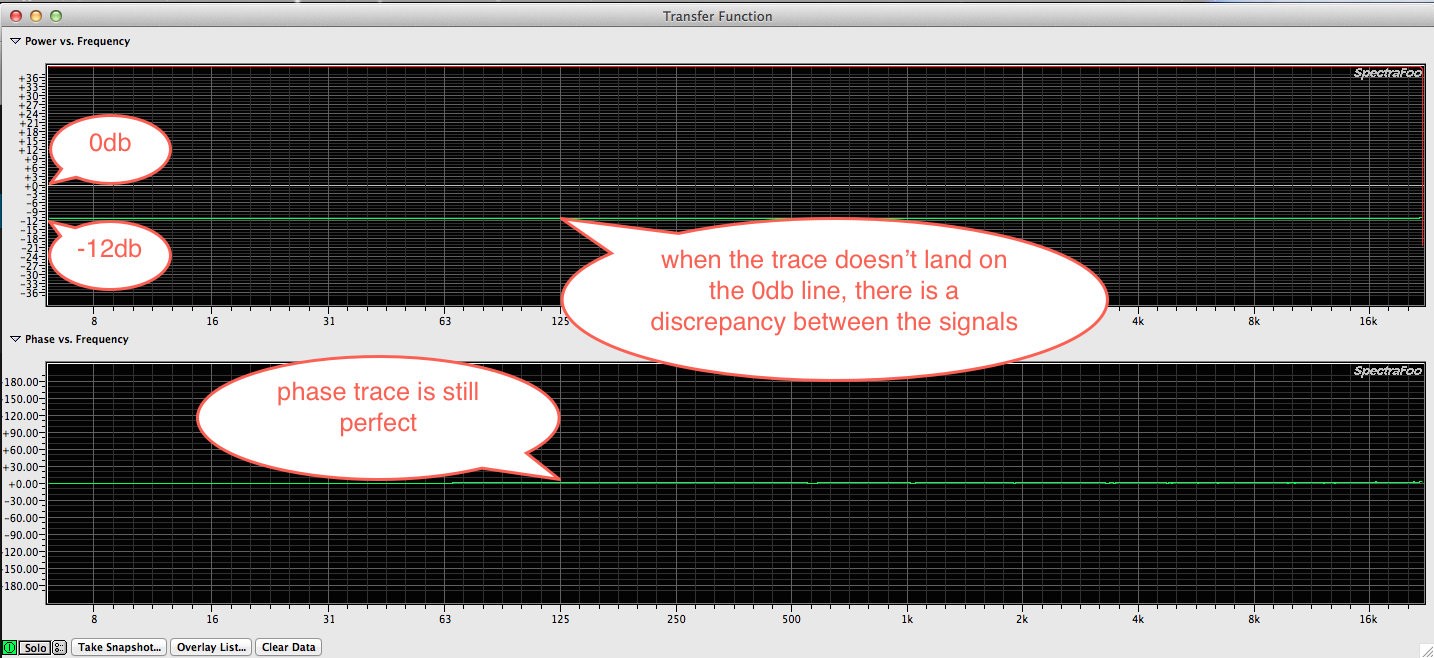
If you have a perfect phase trace but the frequency response trace doesn’t align to the 0db marker, you have a gain discrepancy. This could be due to different gain settings on the audio interface which is simple to correct & verify or you may have a patch cable that is wired wrong. In either one of these cases, the measurement might look like this.
In this case, I created this gain mismatch by boosting the gain on one of the inputs. If I reverse the signal assignment settings, the phase response trace will still be perfect but the frequency response trace will indicate -12db instead of at +12db. Like this:
If your audio interface has more than 2 channels, it would be wise to measure each one against another. As long as they all measurement exactly the same against another, you can move on to making more complicated measurements.
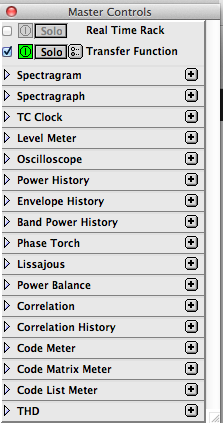
The transfer function instrument in SpectraFoo can be found under the WINDOW tab on the top of the app window.
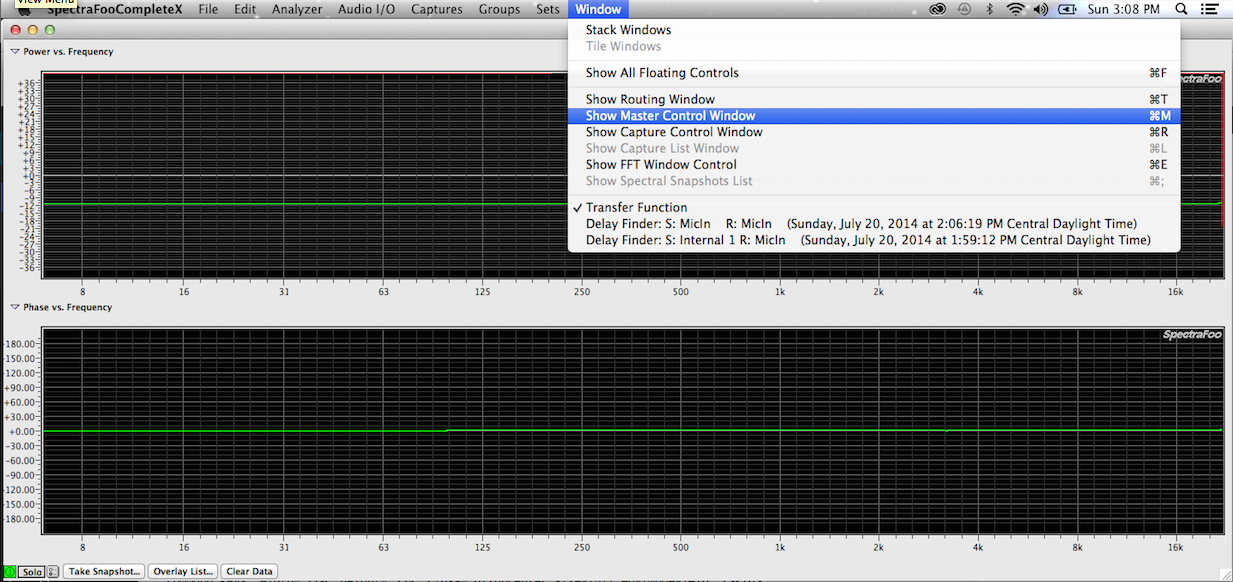
From there you need to turn the instrument on:
To use the transfer function tool in Foo efficiently, it helps to learn the key commands by heart. This will save a lot of time!
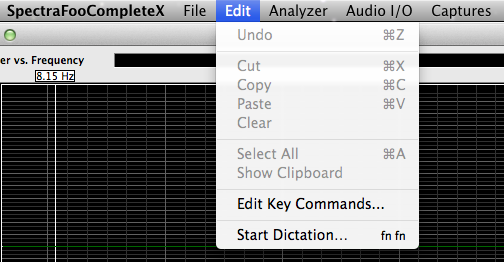
This is the default list of key commands:
These key commands relate directly to the transfer function window:
CONTROL / C = CLEAR
CONTROL / F = RUN / STOP
CONTROL / S = SAVE SNAPSHOT
CONTROL / T = COMPUTE DELAY
These key commands are universal to all instrument windows but are very useful for managing the transfer function window:
CONTROL / G = TOGGLE SIGNAL GENERATOR ON/OFF
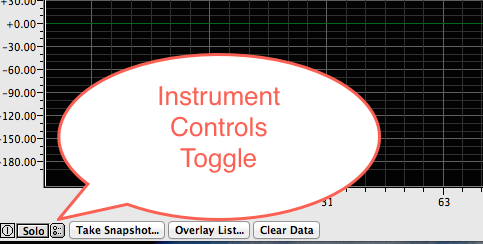
CONTROL / A = TOGGLE FRONT INSTRUMENT CONTROLS
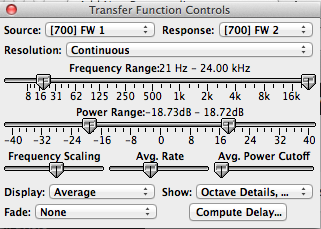
This is the instrument control window in the TF instrument.
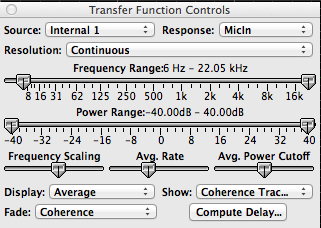
Another way of opening and closing it is to click on this button:
If you forget them , you can reference the same list located here from within Foo:
Obviously measuring things wrong and then making decisions and corrections based on bad measurement information is a waste of time at best.
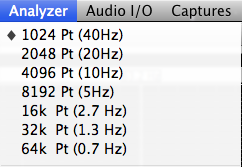
I was curious how the different data point (the size of the sample window) affects a measurement.
In SpectraFoo Complete there are the following options to choose from.
In order to keep track of the difference (if any), I took a snapshot via the “TAKE SNAPSHOT” button at the bottom left side of the TF window.
In that same area is a button to display the snapshot overlay list.
This is what the overlay list looks like for this measurement process.
When you’re saving snapshots and then comparing them, it’s sometimes helpful to discontinue the measurement process and clear away any remaining data on the screen so you’re only looking at snapshots. These are the places to stop the measurement and clear the window.
All of the functions mentioned above can be achieved with key commands:
This is what it looks like when you turn off the measurement tool & clear the realtime data while showing all the snapshots.
When I first began working with transfer functions, I compiled a new PDF that includes only information related to transfer functions so I wouldn’t have to hunt for it in the full manual.
Here it is:
SpectraFoo4 FFT Only
Here is a link to the current full manual:
SpectraFoo Manual – Complete
Depending on your current configuration, it’s possible for Foo to update the main preference file to a state that is unstable. If Foo crashes and then refuses to reopen without crashing again, have no fear.
SOLUTION:
In OSX versions prior to 10.9, your library is located:
In Mountain Lion (10.9), your user library is hidden from you by default. Hold the option key while choosing the “GO” menu in the Finder, and choose “Library” from that menu.
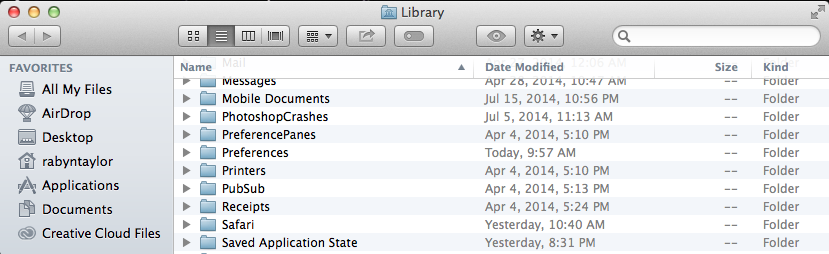
Proceeed to:
Library/Preference/SpectraFoo Preferences
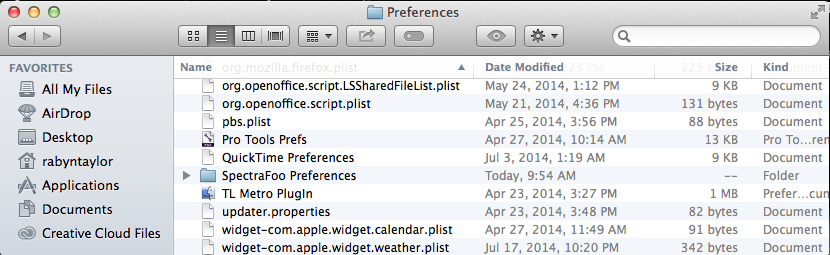
Proceed to:

Once inside the “SpectraFoo Preferences” folder you will find a file called:
SpectraFoo Prefs
Put that in the trash, empty and restart Foo.
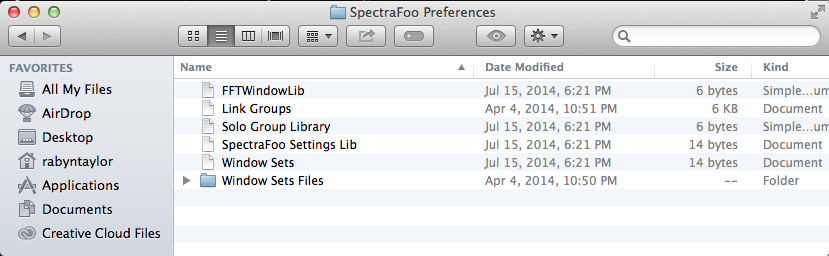
There is no reason to delete the folder & the other files unless you are having issues while successfully running SpectraFoo which may be caused by another preference file. Once you restart SpectraFoo, the app will create a new SpectraFoo Pref file and things should be stable. Note that any chances you had made to Foo will be lost so it’s a good idea to make a copy of your SpectraFoo Preferences folder once you have things all configured to your liking.
Part of the magic of Foo is being able to make Window Sets and be able to move between custom screen layouts with keystrokes but I’ll cover that in another post.
When you start SpecraFoo for the first time, there are some configuration duties that must be completed before the system is ready to use.
Generator Use in 7.4
Quote:
“Transfer Function measurements can also be referenced internally to Smaart’s signal generator by enabling “Allow Multi-Device Transfer Function” option on the Transfer Function page of the main Options dialog and selecting the Generator as your reference signal source. In practice there are a few caveats to doing this, again mainly associated with delay times. For one thing, the latency of the measurement system from the output to the input becomes a factor in measuring absolute delay times. (This is generally not a factor when actively recording both input signals.) Another is that the latency through the measurement system may not be consistent from one measurement to the next, meaning you may need to measure the delay again each time you stop and restart the measurement and/or the signal generator. And finally if the measurement signal input and the output used to stimulate the system under test are not identically clocked, then the reference delay time will be subject to drift while measuring, and not just when restarting the measurement.”
After spending a few months gathering, cataloging & regurgitating the information on this site, I realize that it might all be a bit overwhelming for a visitor. Welcome to my world! I am probably on my 10th+ attempt to read & comprehend Bob McCarthy’s book “Sound Systems: Design and Optimization”. Each time I understand a little bit more. I’m going to assume that if I don’t give up, I’ll get there.
If nothing else, watch the youtube videos available on the VIDEO page. I’ll be adding more links & possible producing some in house.
Write if you have questions.
Until I read this , I hadn’t really thought about the randomness of pink noise but now I will have to find out more…
ACO Pacific – Extremely Random pink noise generator
“Many computer generated noise sources utilize 16 bit registers with 32 kHz sample rates. The resulting 2 second pseudo-random cycle has a limited bandwidth – typically 50 Hz to 16 kHz and the repeated 2 second “fold-over” of the registers produce a measurable “click” – a source of measurement error often requiring averaging 10’s or 100’s measurements. The 3025 has a useful bandwidth of 1.6 Hz to 39 kHz with 119 uHz line resolution.”
How random is software based pink noise generated in Smaart, Spectra Foo, etc…? What about hardware based pink noise generators?
coming soon
What I Learned In Smaart Class
I found this article reading over posts in the Rational Acoustics forum here:
Rational Acoustics – user forums thread on Smaart Class
Here is a quote from this thread:
Sound Forum thread about the Audix TM1 / Lectrosonics TM400 kit – RF issue
QUOTE:
Karl Winkler
04-13-2012, 12:02 PM
I know I have asked this before but…. can the TM400 work with an audix TM1 ? or do you still need a small extension cable to break up the RF issue ?
At present, the same problem still exists between the TM1 and the HM transmitter (along with the older UH400TM transmitter). We have reached a standstill mostly because both engineering teams feel that their product is not the issue (ahem…) so yes, a short cable changes the RF properties of the combination so that the problem is reduced to the point where it is usable.
END QUOTE:
It appears that a short XLR cable between the Audix TM1 & the transmitter resolves the issue.
Why must one use an omni mic instead of a cardioid mic? After all, we all own cardioid mics but it is uncommon to own an omni.
The most popular (2) mics ever invented are the Shure SM58 vocal mic & SM57 instrument mic. Both have cardioid pickup patterns.
Wouldn’t it be swell to just one one of those?
Let’s take a look.
INSERT RESPONSE OF SM58
INSERT RESPONSE OF SM57
INSERT RESPONSE OF OMNI X
What would happen if we used an SM57 (the flatter of the two Shure mics) to tune a sound system?
INSERT SIDE BY SIDE TRACES
One of things you will notice when looking for a measurement mic is that there are no “LARGE” diaphragm options. When it comes to reproduction accuracy, the smaller the diaphragm the more accurate it can reproduce sound.
Here is a great article by DPA that explains why.
DPA University – Large Versus Small Diaphragm article
As a side note, over the years, I have heard engineers who favor large diaphragm mics suggest that one of the reasons is because a large diaphragm mic can reproduce lows better. This is simply not true. It IS true that cardioid mics suffer from what is called “PROXIMITY EFFECT”:
WIKI – Proximity Effect
I would argue that if you want “accurate” low end response, nothing can compete with a small diaphragm omni. One example is the Earthworks M50 with a frequency specification of (3hz to 50khz +1/-3dB)!
This PDF makes for an interesting read.
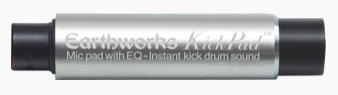
Earthworks Audio website – Kickpad link
Here is the description from the website:
“Just Plug the KickPad™ into the mic line feeding your favorite cardioid kick drum mic and you will experience an incredible instant kick drum sound that is exactly repeatable, every time. The KickPad™ can also be used for vocals and bass. This will work with any device that has a 3-pin XLR. The KickPad™ is a passive device (requiring no Phantom Power) that can be used with either condenser or dynamic microphones. It works for both recording and live performance applications.”
What does it do really???
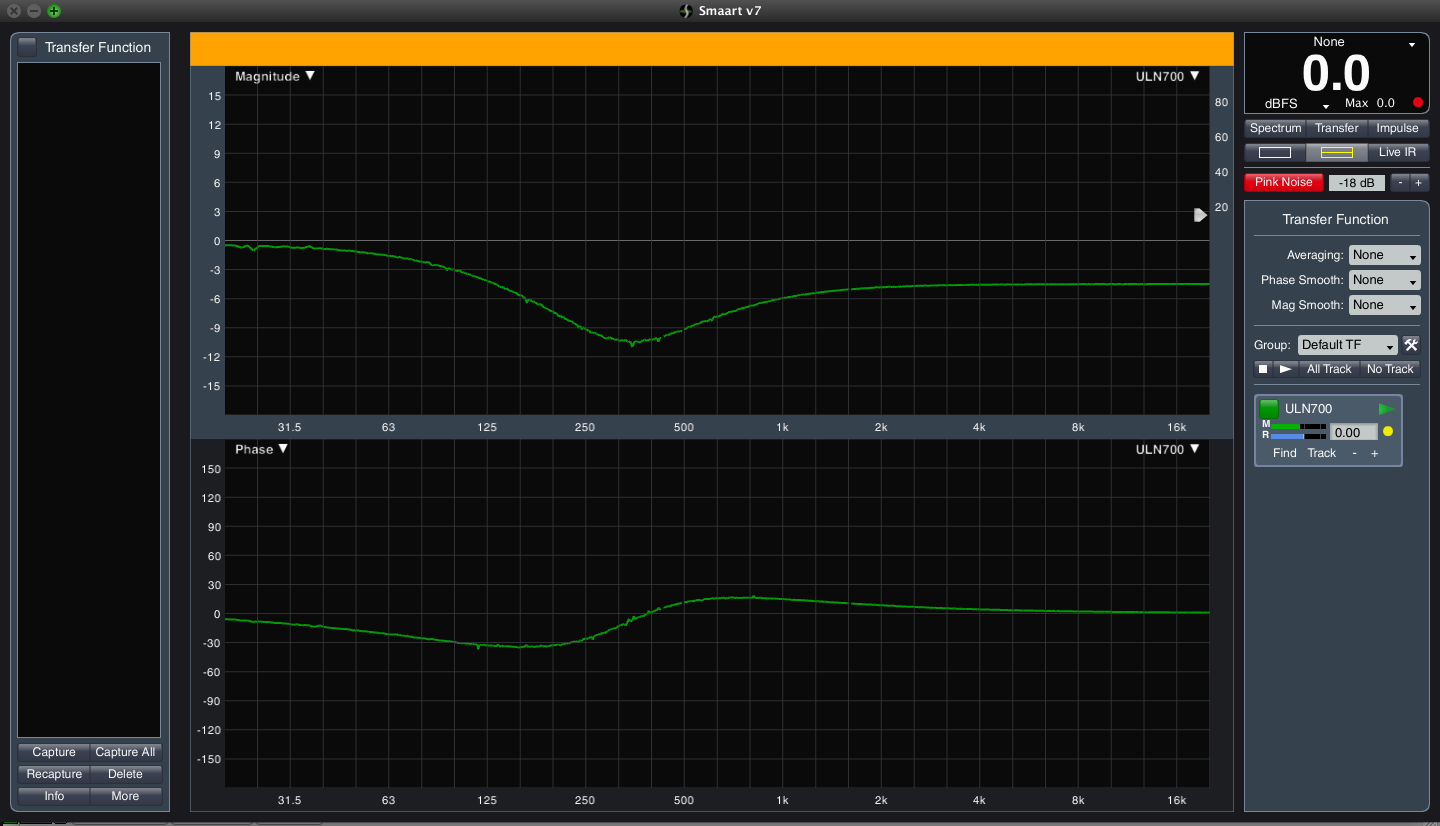
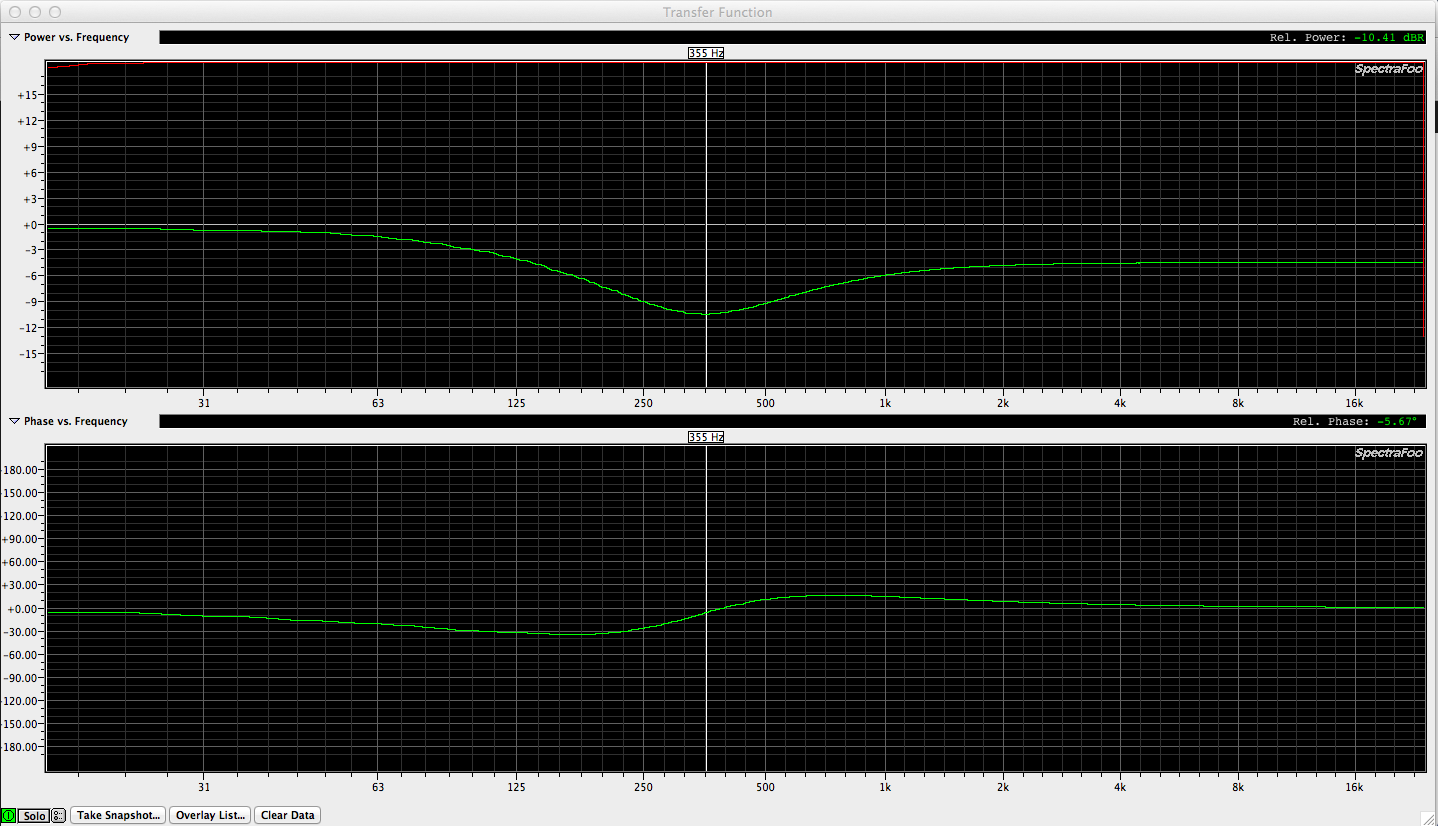
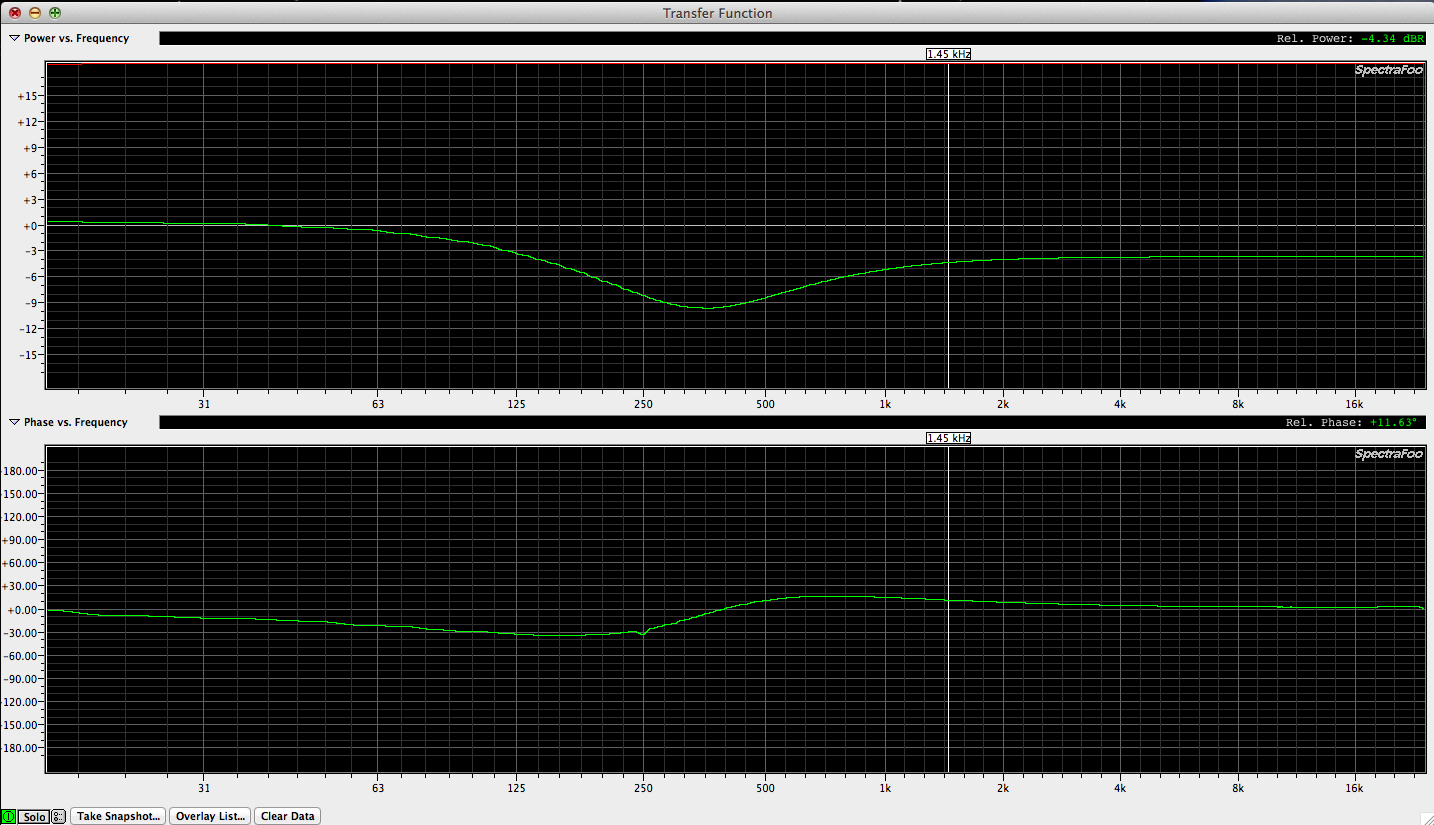
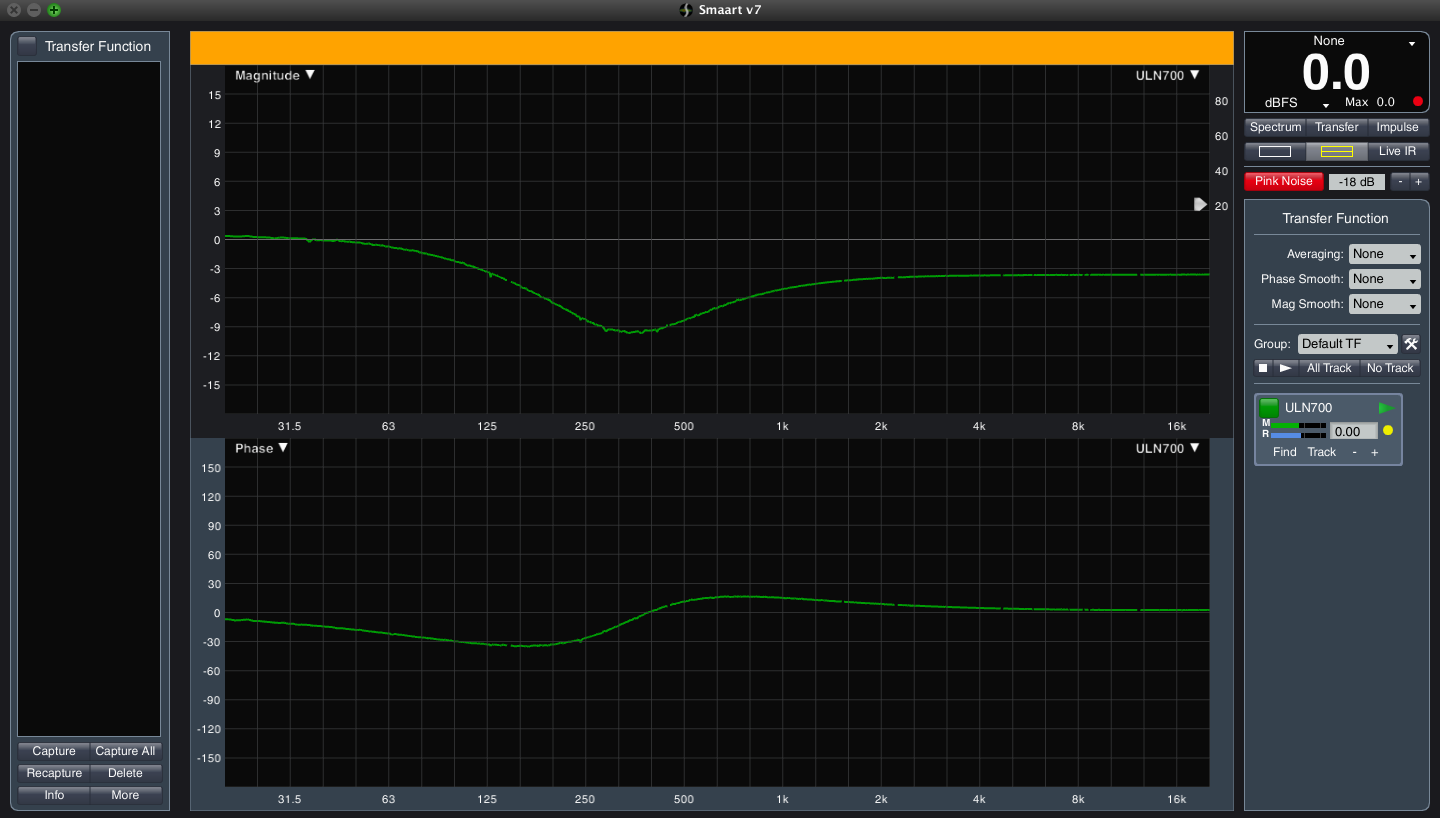
This evening I setup my measurement rig & patched one channel as a loop out / in with nothing more than a cable. The other channel had the KP1 Kickpad adapter inserted in the middle of two cables. Since I’m demoing Rational Acoustics Smaart 7 at the moment, I made measurements with both Spectra Foo & Smaart 7 to compare the two apps side by side. In case it’s not obvious, the upper trace of both measurements indicate the frequency response. The lower traces indicate the phase response.
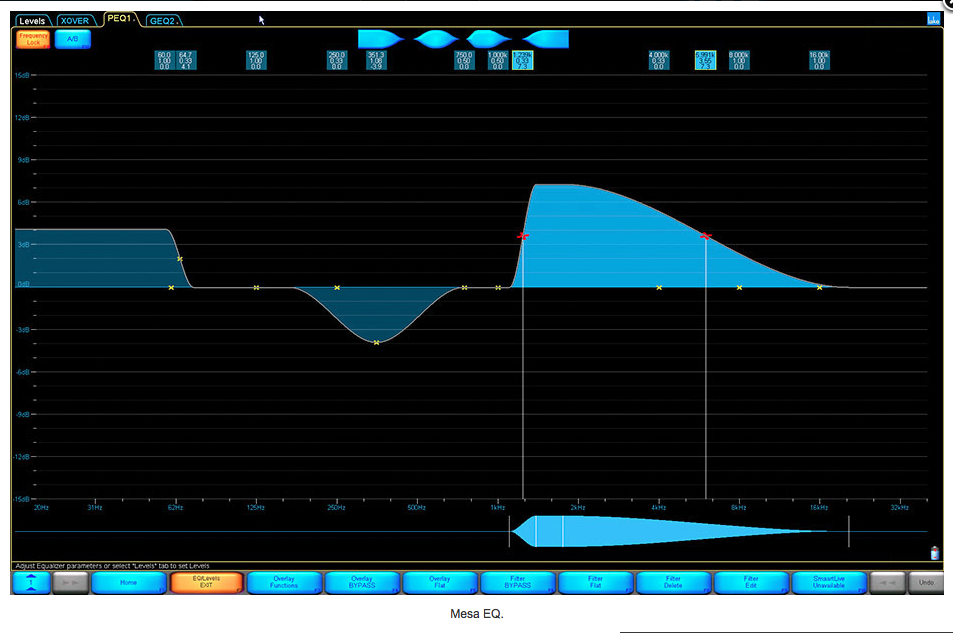
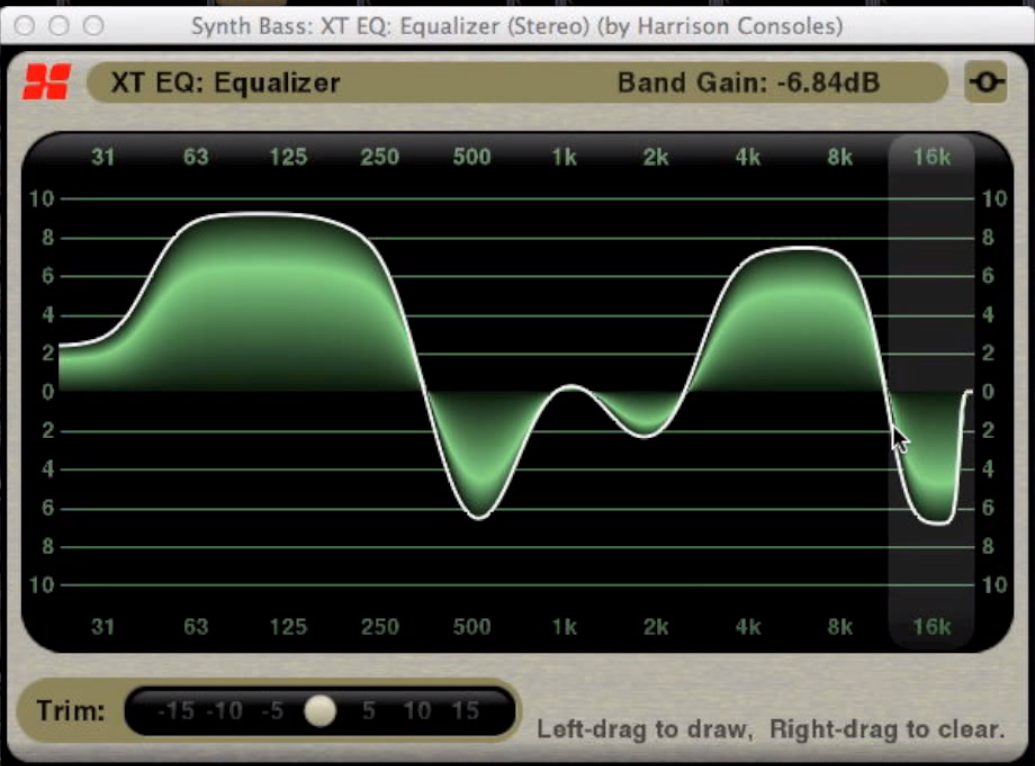
Interestingly this frequency adjustment would be hard if not impossible to accomplish with a console’s channels trip EQ. Even 4 band parametric EQ wouldn’t achieve the same curve because flat filters aren’t typically available on audio consoles. I can think of only (2) flat filter options I’ve seen in the audio DSP world. All based on modern DSP (digital signal processing).
1. Harrison’s EQ plugins for Mixbus is unique in that instead of being able to adjust level, frequency & Q parameters, your interface is the equivalent of a pen:
Harrison Mixbus EQ plugin
Harrison Mixbus EQ – Youtube video
Harrison Mixbus Mastering EQ plugin
Harrison Mixbus Mastering EQ – Youtube video
2.Lake’s MESA Processing:
Sadly neither of these options are available to the general public in a form that can be added to a kickdrum channel on a live console so for those who want a simple passive EQ / PAD device designed specifically for use with a kick drum mic, VIVA LA KICKPAD!
The screenshot below shows a measurement made with both Spectra Foo Complete and Smaart 7 at the same time.

In order to get things to look comparable I had to adjust some of the default settings in Spectra Foo to match the default settings in Smaart 7. I’ve included a screen short of those settings below.
SIZE
Smaart 7 has a default minimum size which is rather large on a MacBook Pro 15″ Screen. Spectra Foo is infinitely size adjustable. I looked for a way to kill some of the side bars in Smaart but didn’t find any.

Here is a comparison of the two apps maximized for my MacBook Pro 15″ screen.
Some of the exciting features of Smaart 7 which are likely important enough to purchase it are as follows:
Live IR – The impulse response updates as the mic is moved
Delay Tracking – The delay time updates constantly
For live audio measurement purposes, this is pretty spectacular.
Some exciting features of Spectra Foo include the “studiocentric” tools. Keep in mind that Spectra Foo was born as a Pro Tools measurement plugin & became a stand alone app.
I see good reasons to have both apps & with (2) you can verify one against the other to make sure your rig is working properly.
A win/win situation.
In order to measure the latency & A/D DA conversion quality of an interface, you can loop out of the interface & return the signal to an input.
The following are latency measurements at the (4) different sample rates:
 44.1k – 1.678 ms
 48k – 1.542 ms
 88k – .839 ms
 96k – .771 ms
Obviously if you want the lowest latency possible, you should run at a sample rate of 96k.
Next let’s look at the frequency & phase response at each sample rate.
These videos are fascinating. An interview between Metric Halo’s BJ Butler & Stephan
Tech Talk #1: The digits in digital audio
Tech Talk #2: Fixed and floating point audio
Tech Talk #4: Are all digital EQs the same? Part 1
Tech Talk #4: Are all digital EQs the same? Part 2
I’ve never much liked an open back guitar cabinet for my own rig but there are many classic designs that are open back designs.
Open back means that the speaker is acting like a dipole.
I would guess that the debate over which sounds better, digital or analog, will never be truly settled but one thing is clear.
Analog = instantaneous
Digital = delayed (latency)
You can route an analog signal thru a rack full of analog gear & the signal will still arrive at the final destination in (0) time. The electrons are traveling at almost the speed of light.
Due to the nature of digital conversion. Analog to Digital / Digital to Analog, a digitized signal cannot arrive in (0) time. There is inherent latency. The best we can hope for is to minimize the latency & use it when possible to our advantage.
One thing is for sure. Digital audio is here to stay & analog audio is a dying breed although there is hope when I see this in a grocery store check out line in 2014.

Some good news. The CD standard of 16 bit / 44.1k sample rate is fading. It can be argued that the 16/44.1 CD standard was never acceptable. A decision based on A/D D/A conversion technology at the time & cost savings.
I recently watched a video by Metric Halo’s own BJ Butler who stated that 24bit / 96k audio is as good as we need for capturing audio correctly. If you don’t want to watcht the whole thing, FF to around 17 minutes.
Metric Halo’s BJ Butler discusses sample & bit rates
@ a sample rate of 96k, latency drops by 1/2 compared to an audio device that is running at 48k. Even less latency @ 96k than at 44.1k. And the latency at 96k is small enough to be acceptable. 96k also sounds good so as long as the industry continues to move toward 96k sample rates as a standard, I think we will live through the growing pains of abandoning our analog roots & becoming digital sprouts:)
How much less latency are we talking about?
How do we measure the latency in and out of our gear?
How much latency is acceptable before it begins to cause issues?
For studio purposes where musician’s are monitoring themselves as they perform, the lower the latency amount the better. Some humans are bothered by even small amounts of latency when monitoring themselves (singers especially) where as some humans don’t seem to mind. What we do know is that when you’re trying to play or sing in time, the accuracy to which time is presented is important so I think we should be doing everything possible to avoid any unnecessary latency for monitoring purposes.