House of Blues Dallas – “Bricks In The Wall” Pink Floyd tribute 01/16/15

Last night I volunteered to assist my fellow engineer Jay Hogg who mixes the Pink Floyd tribute “Bricks In The Wall” @ House of Blues in Dallas.

The house of blues PA in Dallas and Bricks In The Wall were previously discussed in this post:

Bricks In The Wall – House Of Blues Dallas 091414

Jay had saved the eq and delay settings from last time so we had that point of reference. Jay has been practicing with Smaart 7. Much more than I have of late.

We measured the HR main line array and noticed a large dip from around 2k to 4k (-12db) which wasn’t an issue on the previous show. It seems obvious in hind site but when you’re measuring a line array you need to set the height of the mic ON AXIS of one of the cabinets. If you have your mic located OFF AXIS (vertically), you’ll be measuring the summation of two cabinets which in this case causes a lot of mid range cancellation.

To find the non cancellation zone, I lifted the mic stand up slowly while Jay watched for the frequency response to flatten out. Then I adjusted the mic stand to locate the mic at that newly found height. When you are making EQ decisions you want to do so optimizing the system for the most amount of people.

Guide to audio networking

Audio networking is here to stay. Related to making audio measurements, audio networking protocols like Cobranet / Dante and /AVB may make it possible to make measurements in ways that were previously complicated or impossible. For example, it may be possible to perform transfer functions between different nodes on a network to verify the latency from one end of the network to the next.

Guide To Audio Networking – PDF


Spectragram showing what happens when you overdrive a signal

What happens when you overdrive an input stage of a device or a group of devices?

For this measurement I sent a 1k tone from my Metric Halo 2882 into my Midas Venice mixer and returned it to the 2882.

1k tone

Here is what happens when I overdrive the input of the console which also overdrives the input of the 2882.

1K tone half overdriven

It’s pretty to look at but I am most certain that the audio equivalent will not be pretty to listen to.

1K tone overdrive completely

Managing your gain from the first device in your audio chain until the last is really important. If a simple 1k tone has this much harmonic content when clipping, think about what music does.

Spectragram showing latency based comb filtering

I just discovered a bad gain pot on one of my consoles and I thought I would see if I could see anything by passing pink noise audio through the channel as I move the pot. Dirt maybe. What does a dirty pot spew out when you move it?
I was hoping to find out but I ultimately learned that the pot has a dead spot.

This is what pink noise looks like leaving my Metric Halo 2882, going into the LINE INPUT of my Midas Venice and returning to the Metric Halo 2882 via the console DIRECT OUT. Pretty much textbook pink noise.

pink noise spectragram

If I have two paths for the signal to follow (one virtual path inside the box and one that passes out of the 2882 into another device and comes back again) there will obviously be latency between those two signals.

This is a screen shot of what happens when I combine those (2) signal at the spectragram instrument input. I unmuted the internal signal part way through the screen capture.

pink noise spectragram with and without comb filtering

Here we see what happens when two signal arriving out of time with each other combine. In this case the latency between signals is 73 sample / 1.655ms / 1.87 ft / .56 m.

Of special interest is the first cancellation at around 250hz. This could be expected once we know the latency between the signals is 1.655ms.

Pink noise comb filtering

Here is a transfer function view of the same measurement. Note the phase trace starting at around 250hz.

pink noise comb TF pre compensation delay

This screen capture shows the delay time between signals.

pink noise comb TF post compensation delay

Comb filter in the electronic or acoustic realm is best avoided whenever possible.

BPH analog ghost noises 121214

A venue where I frequently work feeds the house BSS London Blue DSP units via AES off their Soundcraft Vi6.

bph bss

(4) BLU – 160 (one is a powered down spare)
(2) BLU – BIB
(1) BLU – BOB

The BIBs are used when visiting shows have analog outputs such as my rig. There is currently a strange ghost like noise that is present in the PA when the analog inputs are used.

Here is a screenshot of the Spectragram measurement of the sound:

BSS Ghost noise

Here is a sample of the sound:

I can convert the outputs from my Midas console into AES via a Metric Halo box I own and I may do that but I’ll be at the venue for the rest of the year and there are other shows coming soon that will use the BIB inputs so it’s prudent to figure out what is causing the noise and resolve it as soon as possible.

We will be doing some troubleshooting once we’re through the weekend and I’ll report back with more information.

Earthworks M30BX

I’ve been intrigued by the Earthworks M30BX since it was release about 10 years ago. It’s essentially an M30 measurement mic with a built in mic preamp so the output is line level. What this means is that the mic can be used to interface with an Ipad or Iphone or Laptop without any external audio interface.

Ignoring the M30BX, all other Earthworks microphones require 10ma of 48vdc. This is the maximum allowed by the P48 standard and reveals one of the reasons Earthworks mics sound the way they do. Headroom.

The one downside is that many audio interfaces don’t provide enough current to use an Earthworks mic. Some will run one mic but not two. Others provide 15vdc or some other voltage which means that an Earthworks mic isn’t running at it’s true potential.

With the M30BX all that is resolved.

Yesterday I purchased an M30BX to move in the direction of wireless measurement. With regards to the industry standard Lectrosonics TM400 kit, having an M30BX will resolve any voltage / current issues.

My plan is to get a Line 6 XD-75 wireless mic kit and interface the M30BX with that system. I know it’s possible because others have done it. My aim is to do it myself and then share how to do it with others.

Stay tuned

Winspear Opera House – measurements

It always seems like the measurement process must wait until the very end of any process. The Winspear Opera House measurement event was no different. I skipped taking my dinner break on Friday to tune and delay the front fills and the main arrays. I also tuned the overstage speakers.

I did measure the delay time between the mains and the underbalc system but the delay time was already behind the mains and I couldn’t resolve that issue before doors.

I also measured the delay time between the mains and the upper balc center cluster (Meyer Melodie) but it too was already arriving later than mains.

I was again reminded of how desperately I need a wireless RF option. 200′ of XLR is just not fast enough when you’re working alone.

I have most of the traces saved from that measurement process and will post those soon.

NW Baptist 120114


I installed a PA system for a local church in 2008 consisting of (4) Toby Blasters for main speakers, (2) Toby Blasters for delay speakers and (2) Toby Sheriff subs for low end.  (2) more Toby Blasters were used as overhead monitor speakers for the stage. Fast forward to November of 2014 & I recently got a call from the new musical director wanted to revisit the system.
NWB pa

Upond arrival we discovered that (2) of the (8) Toby Blasters had blown HF drivers and those were fixed. We also retuned the system using Spectra Foo Complete’s TRANSFER FUNCTION.

Honestly, in 2008 I had no understanding of FFT / Tranfer Functions and literally no real understanding of how speaker interact with a room. In 2008 I used the dbx Driverack 260s built in RTA tool to system adjust eq.

Here is a trace showing the HLC main measured with it’s 2008 eq in place. Notice the 1k peak and the comb filtering starting at around 4k and extending up past 16k.

HLC original EQ

Here is an overlay trace showing the original EQ from 2008 and how the same speaker measured after bypassing the original EQ. Note how much gain has been thrown away and yet the 1k peak is unresolved.

This is a glaring example of how either trusting an RTA (which doesn’t tell you what you’re measuring) or using your ears can lead you astray. If I’d used a tranfer function instead of the RTA, I would of seen the comb filtering and realized it’s due to placing the mains too close to the ceiling.

The other newbie mistake I made was choosing a graphic EQ for system processing instead of the parametric eq that the driverack 260 offers.

HLC original eq and flat

This time I was able to flatten out the speakers with less than (4) filters per zone.

HLC no eq

HLC with eq

HLC with and without eq

HLC with eq and sub added

All main speakers no eq

All main speaker with eq

All main speaker with and with eq


Winspear Opera House – copper work around

After two long nights working on trying to stabilize the sound system based around cobranet and not getting to solid ground, I have decided to do my best to patch completely around the network audio side of the rig. Much of the system already has copper lines run as a backup to cobranet (note to self, “one must wonder about a system that is redundant by design that needs a third and different backup”). All of the signal distribution between the house DSP (Biamp Audia Flex) is achieved via cobranet. There are a few analog lines coming in to DSP units here and there but it’s possible that there simply is no way around using cobranet for some signal distribution (backstage, lobby, program, etc…) because there is simply no way to distribute that much audio in the analog domain of the system.

We’ve already bypassed the cobranet component of the main L/R arrays. Overstage monitors are working without any network audio. Subs will be easy. Front fills are ready. Underbalc / other delay rigs are a concern. Will I have time to set new delay times once I completely bypass the house DSP?

Fortunately some parts of the system have onboard DSP (some of the Renkus Heinz speakers) so maybe the job won’t be such a big deal. For example, if the Main L/R speakers are EQed internally, nothing is lost by bypassing the house DSP. Only delay times will change due to removing some of the latency of the system.

So before the first show on Friday night, I need to measure and verify all the venue speakers and my own speakers (eq and delay as necessary).

More soon…

Winspear Opera House – cobranet

The Winspear Opera House PA system is based on the COBRANET protocol.

WIKI – Cobranet network audio

cobranet website

The FOH console is a Yamaha PM5D. All other DSP is covered by a Biamp Audia system. The system includes multiple Yamaha mic pres, (2) Apogee BIG BEN work clock generators, network switches, etc…

All the original Renkus Heinz speakers are fed via Cobranet with a copper backbone for redundancy.

Forest Hill Church of Christ – part 1

I recently received a call from a audio fellow friend who is assisting a church in getting their system back up and running after some sort of DSP failure. He works in the PRO AUDIO department at Guitar Center so he sees a lot of this type of work.

Our initial conversation was about blown speakers and how to service them but in the end the DSP proved to be the issue. Just goes to show that without being able to correctly assess an issue, there is no path to a solution.

I volunteered to visit the venue last week just to check things out for myself. The PA currently sounds terrible even though it works again. This indicates that it wasn’t designed correctly in the first place. The room is a big rectangle without almost no acoustic treatment. Clapping my hands in the room yields some of the worst ping pong delay I’ve ever heard. When I put sound through the PA and mute it there is about a 2 second of reverb. This indicates that the PA is loading the walls and possibly the ceiling. Surprisingly the reverb is nice. Most rooms shaped like this church don’t sound nice when loaded.

The PA consists of (8) Frazier 69 speakers. (4) aimed long and (4) aimed short.

Yamaha LS9-16 for the front of house console.

DSP was a dbx Driverack 260 (which failed). It has been replaced by a dbx Driverack PA2.

On my next visit I’ll measure the PA and see if I can help make it sound more flattering.

photos coming soon…

Audinate’s “Dante Via”

Audinate – Dante Via webpage

QUOTE:

Dante Via creates a flexible software audio bridge for your computer to connect with local USB, FireWire, Thunderbolt and analog audio interfaces, transforming them into networked devices.

With Dante Via you can now build a complete, standalone audio system of networked PCs without the need for any dedicated Dante-enabled hardware to be present on the network.

Dante Via breaks down traditional physical barriers and allows for flexible networking of sound to and from any connected PC or existing Dante endpoint. Send, receive, and monitor any track while also recording. Use your Dante Via to connect to other media applications, such as Cubase, Pro Tools, Logic, PowerPoint audio or Skype. Connect your existing Dante network with Dante Via and extend sound from your Macs and PCs. Or use it to as a tool for monitoring any local or remote channel.

Dante Via allows networked audio to be sent anywhere within facilities like schools, houses of worship, meeting centers, conference rooms and court houses.

END QUOTE:

prosoundweb.com – New Audinate Dante Via Transforms Computers Into Networked I/O Devices

Quadratic Residue Diffusers

I have been interested in making some quadratic residue diffusers (QRD) to the BBC spec for some time but never got around to doing it. The concept is back on my list.

DIY Diffuser

Here is a document by the BBC that explains the concepts.

BBC Modular Acoustic Diffuser PDF

I was reminded of the concept when I saw these videos showing some in the background made with 4″x 4″ timber.
Hendrix Drum demo with Johnny Rabb – Part 1
Hendrix Drum demo with Johnny Rabb – Part 2
Hendrix Drum demo with Johnny Rabb – Part 3

Here is an article about making your own via TapeOp magazine:

tapeop.com – DIY Diffusors
PME Records – Diffusor

QRD diffuser calculator

Elevation Layout for QRD Diffuser

Rational Acoustics – training course description and full curriculum

Rational Acoustics training – course descriptions & full curriculum links

“Smaart Basics” course description

Length of Class: 1 Day
Smaart Platform: Smaart v.7 Di

At the completion of a single day Smaart Basics training class, attendees will have been guided through configuring and running RTA, Spectrograph, and Transfer Function measurements via the dual-channel Smaart v.7 Di platform. While the class uses the Smaart v.7 Di platform, many of the fundamental concepts used in Smaart will be addressed throughout.

Smaart Basics

“Smaart Operator Fundamentals” course description

Length of Class: 2 Days
Smaart Platform: Smaart v.7

Rational Acoustics’ Smaart Operator Fundamentals class comprises the material you need to know to use a Smaart rig effectively – it is the both starting point for learning to use Smaart, as well as the material that you will need to return to on an ongoing basis and master to become an advanced user. The standard session length for the Operator Fundamentals class is 16hrs, split between two 8hr days.

Smaart Operator Fundamentals

“Smaart Application Practicums”

Length of Class: 1 Day
Smaart Platform: Smaart v.7

Rational Acoustics’ Smaart Application Practicums focus on the use of the Smaart measurement platform in “real world” professional audio engineer work. They examine the implementation of the information presented in the Operator Fundamentals – the various measurement capabilities, control parameters, data reading and measurement rig configuration skills – in using Smaart as tool for professional sound system engineering tasks.

There are currently 2 different Application Practicums available:

“System Alignment Practicum”

This is the practicum included with all standard 3-day Smaart training sessions offered throughout the year. It focuses specifically on the implementation of the information presented in the Smaart Operator Fundamentals class.

Application Practicum: System Alignment

“Multichannel Measurement Practicum”

This practicum is a more advanced practicum focusing on the complexities of multi-channel measurement configurations and is offered as an optional 4th day at selected Smaart training sessions throughout the year. This practicum is designed to be very hands-on and requires all attendees to have computers outfitted with both Smaart v.7 and Dante Virtual Sound Card.

Application Practicum: Multi-Channel Measurement

Crystal Studios / Crystalab


One of my best friends Kevin Church had the privilege of working as an assistant engineer at Crystal Studios during the era when Stevie Wonder recorded “Songs in the Key of Life”

WIKI – Songs In The Key Of Life

This is about all I can find about Crystal Studios. Amazing technical and historical article!

http://www.soundoctor.com/crystal/

Of special interest to audiomeasurements.com is Barry’s explanation for how to manage speakers using “white noise” to aim and adjust speakers.

This is the article:

Barry Ober – Using White Noise to Aim and Adjust Speakers

Barry Ober – Using White Noise to Aim and Adjust Speakers PDF

WFX 2014 – Dallas Oct 1


Today was an exciting day. I volunteered to help in the Earthworks Audio booth in the Hall F at this years WFX convention.

Craig Breckenridge is the visiting rep for Earthworks.

Earthworks appoints Craig Breckenridge as product specialist ANNOUNCEMENT

Craig Breckenridge – LinkedIN

WFX 2014

Rational Acoustics has Chris Tsanjoures onsite with a IOEaZy SPL measurement rig up in the speaker demo room. I met him this morning.

Rational People – Chris Tsanhoures

The demo room is an interesting concept. A bunch of flown mono rigs all aimed toward the middle of the room.

WFX shootout 4

WFX shootout 1

WFX shootout 2

WFX shootout 3

I spent a lot of time talking to the CADAC Sound team, Paul Morini, Peter Hearl and Mitch Mortenson.

Tomorrow I hope to get some more information about the demo room shoot out and find out more about the IOEaZy rig.

More soon…

Cardioid Subs


Last night I mixed the orchestra for a concert with Sara Evans, number 1 country artist. When you mix an orchestra of classical musicians together with a modern pop band, there are going to be some growing pains. This event was no different. Fortunately Sara’s band was all on IEMs so that was a good start. Guitar amps and Leslie cabinet were placed offstage and baffled. The drum kit was mostly surrounded by plexiglass. That’s a pretty good start but what ended up being the real issue was the house volume and the sub woofers that sit on the stage. My conversation with Doug Kirk (house audio engineer) was about cardioid subs.

Since a typical sub configuration is omni directional, when you put musicians behind the subs, it’s like being in front of the subs.

What are the benefits of using a cardioid sub configuration?

Improved low-frequency gain before feedback
Prodigious output to cover even the largest venues
Cardioid pattern control minimizes reverberation

Here are some Youtube videos with Dave Rat of Rat Sound explaining the difference between various sub woofer arrays. Part 3 is specifically related to cardioid subs arrays:

Dave Rat – Live Sound Subwoofer Configurations part 1
Dave Rat – Live Sound Subwoofer Configurations part 2
Dave Rat – Live Sound Subwoofer Configurations part 3

Here are some other Youtube videos related to cardioid subs:

Malcom Gregory Sound – Cardioid Sub Arrays
EV – ETX Cardioid Setup

There are a few common methods for achieving a cardioid sub array.

One involves placing the subs one in front of the other. I have seen this configuration with only (2) subs per side. Between the physical displacement and by delaying one of the cabinets properly, you create the desired cardioid pattern.

Here are some articles about cardioid subs:

prosoundweb – Building directional subwoofer arrays

Setting Up Cardioid Subwoofer System – Joan La Roda DAS Audio, Engineering Department

Directional Subwoofer Arrays – A Practical Approach

Meyer Sound – PSW6 High Power Cardioid Subwoofer

Subwoofer Arrays in the Real World – FOH Online

Cardioid Arrays Using Powered Subwoofers – FOH Online

EV Subwoofer Arrays PDF

Meyer Sound – PSW-6 tests

SHOWCO’s Prism System

SHOWCO’s PRISM SYSTEM

prismtower

When it comes to “LARGE” PA systems, I’m not sure anything is as pretty as a huge Prism System!

bonjovi2006_02

GNR-Stage-Europe

Koblenz (73)

macca fedex 03

macca fenway 02

staind

The previous photos were taken from this website:

Tim Kelly’s SHOWCO PRISM Google page

———————————————————-

This is Jim Brawley’s website. He was part of the Prism System design team.

jimbrawley.com

Highlights include:

Prism

QUOTE:

In 1983 Jim Brawley was invited by Showco, Inc. of Dallas, TX to become a member of their product development team. Jim, along with Clay Powers, Richard Bratcher, Lester Burton and Lee Hardesty of the Showco staff, began the development of a new generation of Concert Production Loudspeakers. The Showco Prism system was debuted in 1986 on tours by Genesis, Peter Gabriel, and Phil Collins. A total of 13 Prism systems were built and have been in constant use since. The Prism has been used for the Rolling Stones Steel Wheels and Voodoo Lounge tours, Paul McCartney, Janet Jackson, Korn and a lengthy roster of pop and rock music artists and festivals. Clair Brothers Audio purchased Showco in 2001 and the Prism system is still in demand today nearly 20 Years after its development. (Prism System in use). The Prism incorporated technology that took many years to be adopted into the mainstream of Concert Loudspeaker products including:

– Low Frequency beam control
– FIR flat phase crossovers using DSP platforms
– Level tapering by proportional energy geometry
– Integrated rigging systems within the enclosure
– Subbass spatial integration with pre-emphasis comb filters

END QUOTE

————————————————————–

I toured with various Prism Systems in 1992 while working for SHOWCO. We flew singles Prism cabinets for sidefills, used them under the drum riser for butt fills and they were the main PA on the Ozzy “No More Tears” tour. If I find some photos from that tour, I’ll post them.

Prism 130453

These are articles related to the Prism system.

mixonline.com – Mixing Christina Aguilera Prism article

tpimagazine.com – Mixing Beyonce on Prism system article

davemx.tripod.com – John Mayer Prism Rig article

EAW KF850 “SketchUp” SPLAY study

I recently posted about the EAW KF-850 and thought I would do some homework regarding how those cabinets work as an array and whether or not the tight pack I’ve seen is actually the right array configuration or not.

For those who missed it, here is a link to my first post about the EAW KF-850.

EAW KF850 – Part 1

Google has a free 3D CAD tool called SketchUp that I’m using to do the experimentation. Amazing tool!

“SketchUp”

With some basic measurements, you can quickly make a speaker box once you know the dimensions of a cabinet. Once drawn, you can make that speaker box into a component that you can paste and rotate as an object. Then it’s a matter of wrapping your head around the various tools to SketchUp offers to make a multi speaker array which includes the move and rotate tool.

Here is the EAW KF850 array I’m working on.

EAW KF850 Sketchup array 1

Since you can measure angles with SketchUp, I’m trying to see how the horns of the KF850 interact and whether or not the splay angle built into the trap of the box is actually ideal and to learn how many degrees of overlap there are.

Obviously two cabinets that are side by side must be splayed for optimal overlap or the result can be severe comb filtering. A KF850 has a 55×40 degree horn. The cabinet itself has a 19 degree offset per side of the trap which means the cabinets when butted together are splayed by 38 degrees. With the horn dispersing 22.5 degrees in each horizontal direction, 19 degrees is a bit less than that. The question to answer is if that is right or not. We know that not always are decisions about making speakers based on good science. When it comes to splaying cabinets a few things are obviously just plain wrong.

In The Meyer Sound Design Reference book it explains the various names for different types of arrays.

Here is a sample of that text that shows those configurations and descriptions.

Meyer Sound Design Reference Page 98  array configurations

Obviously “parallel” and “crossfire” configurations are off the table. This leaves “point source narrow” and “point source wide”. If you’ve read the description of the “point source narrow” you’ll glean that it’s not ideal either.

We’re left with “point source wide” and the obvious question is “how wide?”

Here is my latest SketchUp model. Click on it to make it bigger.

EAW KF850 arrays with splay and overlap 4

Obviously the “parallel” and “point source narrow” options are no good. The last attempt was to try to get the dispersions to parallel each other but obviously this leaves a hole. This might be great if there was an isle right in the gap but let’s assume that there does need to be some overlap. Again, “how much?”

I’m on the hunt for a clear answer.

More soon…

West Hampton Beach PAC – part 2

Just got a text message from Jim McKeveny (house audio engineer) at West Hampton Beach Performing Arts Center. In a previous post I documented our measurement process and what we came to. You can read that post here:

WHBPAC – Part 1

“First show since measure and tweak. Robert Randolph. Me mix FOH. Noticeable improvement! Thanks..”

This is exactly why I spent the time and money to get a measurement rig and learn how to use it. The improvements that are possible are obvious.

EAW KF850 – discontinued (which version?)


EAW KF-850 naked

EAW KF850 hung 1

EAW KF850 hung 2

EAW KF850 hung 3

EAW KF850 stacked 1

EAW KF850 stacked 2

There was a time when EAW was king of the hill and their KF-850 trap box based array was the most popular large PA system in the world but because the box was produced for so long, it went through different revisions and versions.

Incarnations include:

Version E
Version Z / Rev 1

Description:

A 3-way triamplified full range system in a trapezoidal en-
closure. Includes a 15-in woofer in a wave guide cavity with
ARC™ device, a horn-loaded 10-in midrange cone and a 2-in
exit compression driver mounted coaxially in the wave guide
cavity on a 55 x 40 constant directivity horn..

I haven’t verified that the trap angles equal roughly 1/2 of the 55 degree horn pattern but since I’ve seen a million of these cabinets butted up against each other, it could be that one of the main reasons the cabinet became and then remained so popular was that the angles were idiot proof. Just push them together and the splay was correct regardless of how many boxes you used for an array.

KF850 Spec Sheet version Z rev 1
KF850 Spec Sheet
KF850 Data Sheet
EAW folder for KF850 files

The question to ask is which version of the KF850 are we talking about and can you mix and match the different versions. I guess the obvious answer is that people DO mix and match because they don’t realize there is such a variety of the KF850 and so who knows what a KF-850 rig is made up of any more.

Unlike Meyer Sound products where they make it a selling point that you can buy a cabinet they make now and 10 years from now, if you add more of the same cabinet to your stock, all of your cabinets will match, EAW appears to have taken the route of “fix it as you go” and so here is an article that mentions the “Z” version.

EAW KF 850 Upgrade – Mix Online article

Version Z? That was 2004. Through out the various revisions of this cabinet, there were different brands of drivers (TAD,RCF,

(4) JBL SR4732X – EBAY listing (what is wrong with this concept?)

I thought this would make for an interesting comparison and discussion about why you don’t want to purchase cabinets that have been “upgraded” without considering what that upgrade might indicate.

JBL SR4732X EBAY listing 1

Here is what the auction said:

“Up for sale are 4 JBL SR-X 4732 speakers. The 12in drivers in these speakers have been reloaded with high powered Eminence Impero 12a drivers. Each driver will produce 1100 watts with a 2200 watt music program. These 12in drivers have about 10 shows on them,I bought them new. Everything works including the baby cheeks. The speakers have some scrapes and scratches on them do to normal wear and tear. Would be able to deliver or meet someone within 200 miles of Shell Rock IA after the speakers are paid for. I also have some speakon to speakon 4 conductor cables I will throw in with the sale also. 1-50ft cable and 1- 8-10ft cable and (2) two 3 foot jumpers. These are one owner speakers- we bought them new. They cost $1600.00 each when we purchased them. The new Eminence drivers were around $500.00 for each speaker. The JBL drivers we felt were getting a little tired so we reloaded them with the Eminence. Each driver is twice the power of a JBL 2206H and we feel the sound is just as good or better. $2900.00 buys all four!”

Let’s compare a JBL 2206H with an Eminence Impero 12a for starters.

JBL 2206H : Eminence Impero 12a comparison

Right off the bat I notice that the JBL 2206H has a sensitivity of 95dB @ 1 watt 1 meter. The Eminence Impero 12a has a sensitivity of 93dB @ 1 watt 1 meter. Since there are (2) 12″ drivers in this cabinet, if you swap out the (2) 2206H drivers for (2) Impero 12a, you’ve just lost 4dB of LF if nothing else changes. If you run these boxes full range due to the cross over being designed around the 2206H, one would need to redesign the crossover with the Impero 12a in mind. Bad start.

Next there is the matter that JBL calls the black terminal + (unlike every other speaker manufacturer I am aware of) so if you swap out the JBL drivers for a different brand and put land the red wire on the + of the new driver (as anyone would logically do if they didn’t pay close attention), now you’re LF is not 180 degrees out of polarity with the rest of the box. Maybe the user was aware of this discrepancy and got that right. Without a measurement rig, how would you verify this yourself?

Lastly, the JBL goes both lower and higher and from the frequency response chart for both speakers, the JBL is much flatter.

If I were in the market for some JBL SR4732X, I’d ask if they still have the original 2206H 12″ speakers. If so, and they all work, maybe the concern that they’re “tired” is unjustified. Then you could sell the Impero 12a drivers for even $150 each and get back to a factory spec speaker cabinet.

FYI – I don’t believe they spent $500 per Impero 12a. I can’t find a price anywhere near that high. $250 seems to be close to street price.

BUYER BEWARE!!!

A hunt for a 4″ speaker with a flat frequency response

I visited my friend and retiree Toby Guynn of TOBY Speaker” fame to discuss guitar speakers this morning. I left with a lot more information than I expected to glean which is always nice! Toby knows a lot about music and speakers and acoustics and such. He is one of those people who takes time to explain things and even says, “I don’t know” on occasion which is rare. A person who if you asked a question, you would likely be led to the nearest chalk board and be presented with a diagram.

One concept Toby presented has to do with speaker cone reflections. Basically depending on the size of a speaker, it acts as a piston up to a certain frequency and then stops being a piston and becomes something else. At a certain frequency the sound begins to “skip” along the cone which causes modes (distortion). The smaller the speaker, the higher the frequency of the first mode.

COMING SOON.

Genelec 1029a / HT205 self powered reference monitors – discontinued


Genelec 1029a

My favorite “little” self powered speaker pair is the Genelec 1029 and it’s twin sister the HT205. The difference being that the 1029a has XLR and TRS inputs. The HT205 has XLR and RCA. Sorta handy some times…

5″ woofer / 3/4″ tweeter. 40 watts / 40 watts.

1029a webpage
1029a Spec Sheet
1029a Data Sheet

HT205 webpage
HT205 Specs
HT205 Operating Manual PDF
HT205 Acoustic Axis PDF

To be clear Genelec makes better sounding small speakers that are affordable so I wouldn’t run out and buy a used pair of 1029a or HT205 but for their size, they sound nice. Great for general listening.

There are some undesirable attributes that are inherent to the design. Note the frequency response weirdness between 1k and 3.5k. I’m definitely not looking for a reference monitor that has a 3db jump at 1500hz and another at 2500hz. Note how the BASS TILT switch affects the low end. This is a perfect example of why you need to be able to measure your speakers in the location they are. How would you set the BASS TILT switches by ear? Also note the TREBLE TILT response (ON/OFF) which effects HF above about 7k. Measure, measure, measure…

Genelec 1029a frequency response

Understanding SPL (sound pressure level)


I was recently horrified to learn that the City of Fort Worth is using explosives to scare birds away downtown. I learned this the hard way. With my ears. The city has mounted some sort of sound tube in the back of a pickup truck and city workers drive around blasting innocent people as they try to scare off birds. I know the SPL level of the explosion from a block away is dangerous because my ear nearest the open window of the car is still suffering the effects of the first blast.

How loud is too loud? And how long can you be exposed to a certain SPL before you suffer damage to your ears which would be classified as “Noise Induced Hearing Loss” or “NIHL”?

Here is a diagram I found on the following website that makes things pretty clear:

dangerousdecibels.org – decibel time exposure guidelines

Decibel Exposure Time Guidelines

If 115db is dangerous after only 30 seconds, what might the acceptable exposure time be for 150+db? None?

Here is a table I found on the following website that lists OSHA guidelines for SPL exposure time guidelines:

permissible exposure time

permissible exposure time

Here is website that shows the expected SPL of various gunfire.

freehearing test.com – SPL levels of gunfire

If I can find the truck doing it’s rounds again, I will take photos and measure SPL. Hopefully more soon…

Metric Halo 3D upgrade and MH Link

Being a Metric Halo user now for about 5 years, I’ve been anxiously waiting for find out more about their announced new hardware upgrade. The idea is that you will be able to use your Metric Halo hardware on different computers and with them all networked together, share audio between them all with low latency. Need (16) inputs on the drum riser? You could drop a Mac Book Pro and (2) 2882. Need 48 inputs in the pit? (Mac Mini in a rack and (6) 2882s). Etc…

Kinda like Dante but Metric Halocentric.

Moving away from Firewire and to USB3/USB2 class compliant so any of their audio devices can be used with Mac, PC, Linux or iOS.

From a live audio perspective, this is exciting because you could run single CAT5 cable runs around the building instead of mic cable to measure large systems.

Here are (2) video links where Metric Halo’s BJ Buchalter explains about the concept:

BJ Buchalter discusses MH Link and MH router – part 1

BJ Buchalter discusses MH Link and MH router – part 2

Shure Vocal Master VA300-S speaker column

I grew up with the Shure Vocal Master VA300-S speaker column. My parents band used (2) of them and now I own those same cabinets. Each cabinet encloses (2) 10″ speakers at the ends of the cabinet and (4) 8″ speakers in between those. They’re all wired in a series / parallel combination for a 16 ohm load. There was a companion 1/2 column speaker option called a VA301-S which was literally 1/2 of a VA300-S. It was wired for a 32 ohm load and was meant for stage monitors. Because the VA301-S cabinet was 32 ohms it acted as a parasite load on the same amp as the VA300-S cabinets.

Here is the specs for the cabinet:

Shure Vocal Master VA300-S specs

140 degree horizontal coverage x 65 degree vertical coverage? I guess one could argue that the VA300-S is a “line arrays”. Not really but sort of.

Shure Vocal Master VA300-S wiring diagram

Shure Vocal Master VA300S inside back view

I’ll measure the cabinets I have and post the results here soon.

How did the Shure SM58 become the industry standard mic for live vocals and is it still relevant?

In 1965 when the SM58 was introduced, the live audio industry was still very young and uncomplicated. One of the things I’ve always disliked about the SM58 is it’s advertised “frequency response tailored for vocals , with brightened midrange and bass rolloff”

Shure SM58 features

Shure SM58 frequency and polar response

Extra 2k to 4k might of been helpful if using the mic with a PA that didn’t have any HF drivers. For example, the Shure Vocal Master PA introduced in 1967. No high frequency drivers at all.

Shure SM58 spec sheet PDF

Shure SM58 – owners manual

How did the Shure SM57 become the industry standard mic for guitar amps and snare drum and is it still relevant?


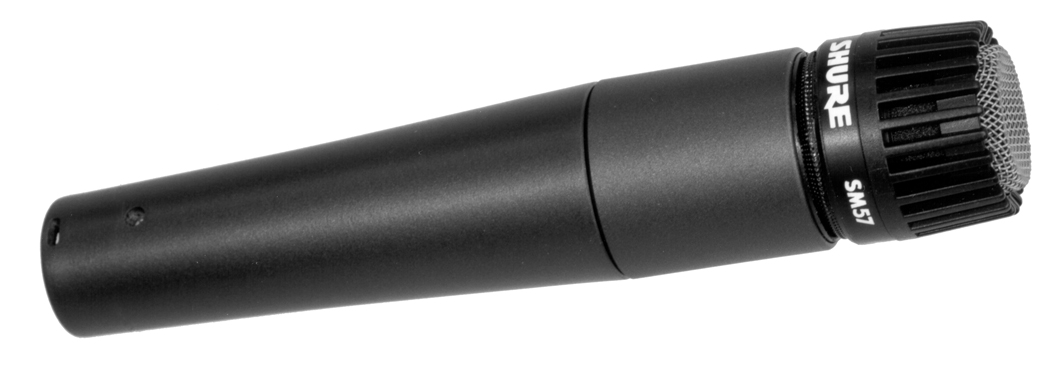
Anyone in the live audio industry is well acquainted with the Shure SM57 and the Shure SM58. The SM57 is the most widely used mic for micing guitar amps and snare drums on Earth.

shure sm57

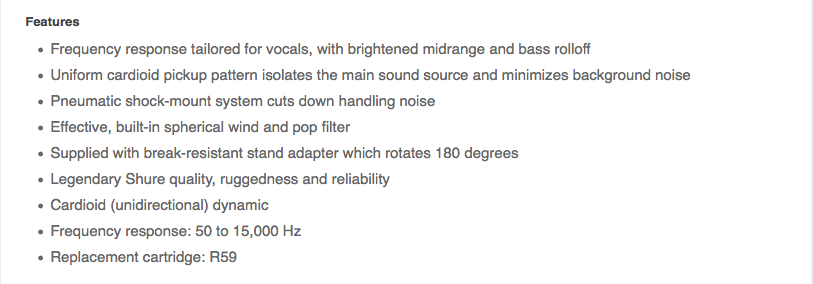
It’s important to note that the SM57 and SM58 share the exact same dynamic mic element. The Shure Unidyne III. The only real difference between the two mics being the metal ball on the SM58 which DOES affect the frequency response.

Shure SM57 webpage
Shure SM57 – user guide PDF
Shure SM57 specsheet PDF
Shure SM57 – Mix online article

[gview file=”http://www.audiomeasurements.com/wp-content/uploads/2014/09/us_pro_sm57_specsheet.pdf”]

WIKI – Shure SM57

Released in 1965, the SM57 turns 50 soon! Why are we still using this $100 mic for anything? I have a theory. People are afraid of change. We’re all used to what we get when we use a SM57 on a guitar amp or snare and so we use them. Does this mean that there isn’t room for improvement? Absolutely not. In recent experiments measuring guitar amps, it has become obvious that varying the placement of a microphone (any mic) on a guitar speaker can had huge effects on the captured sound.

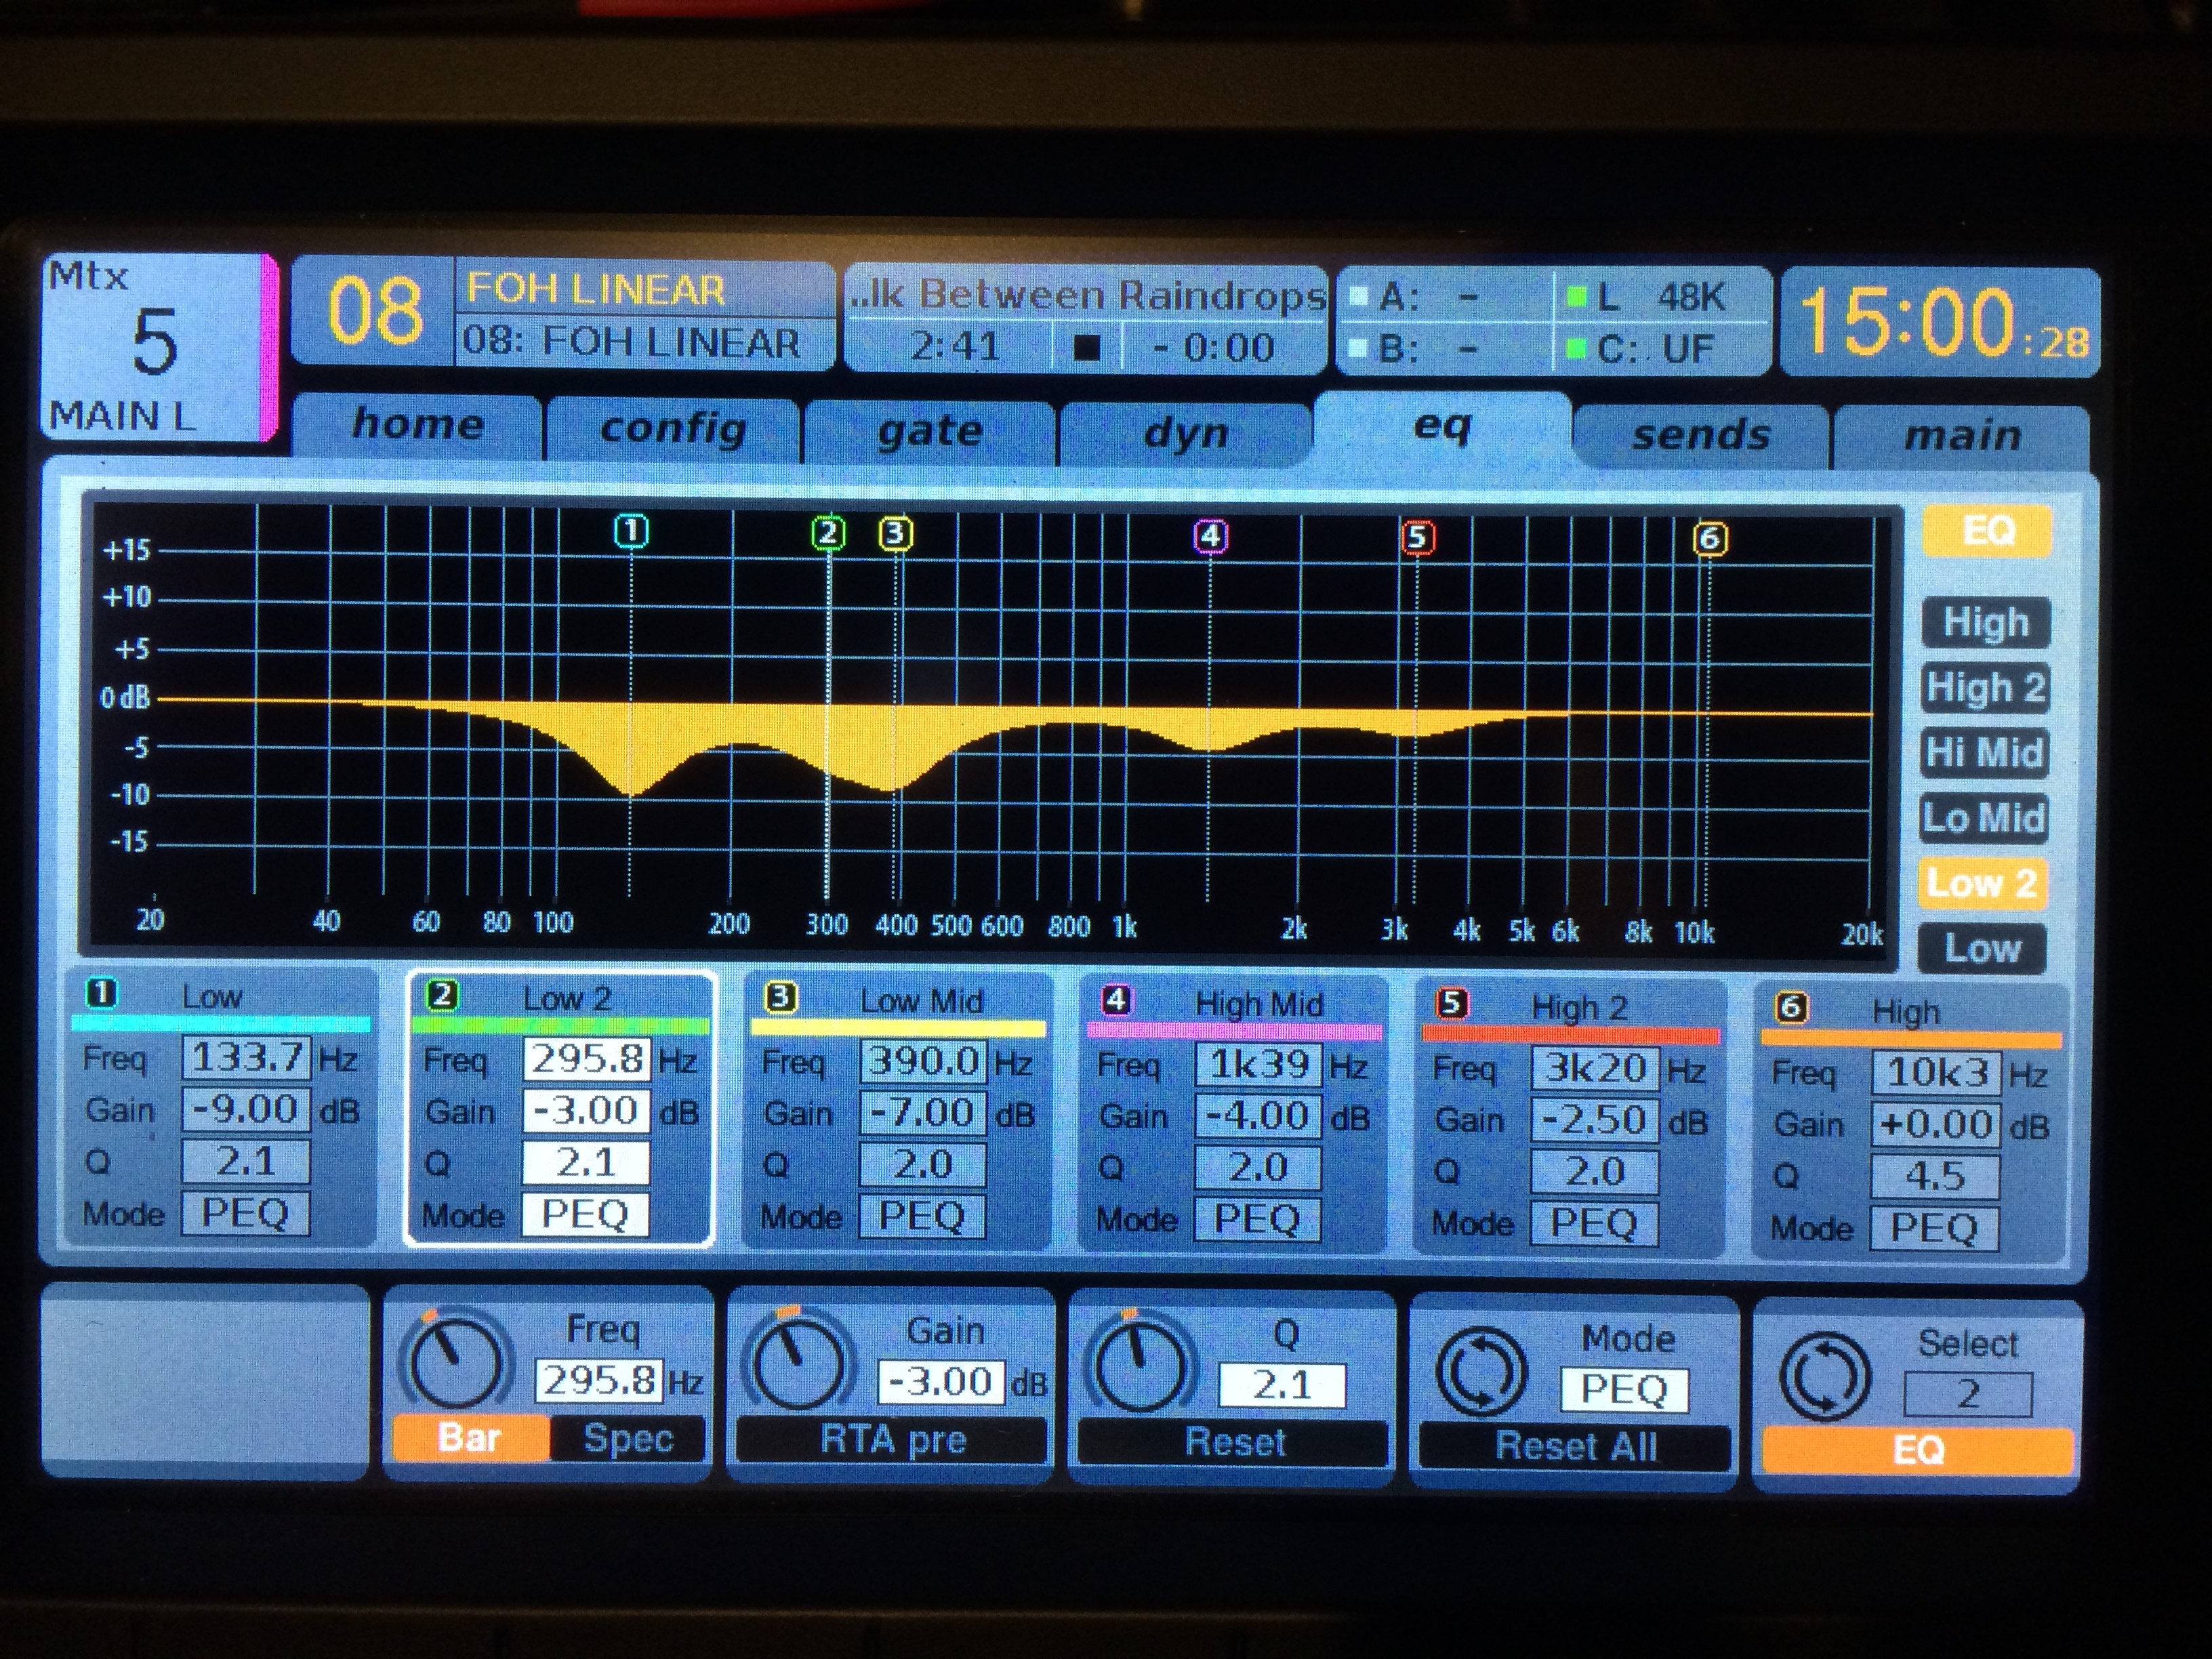
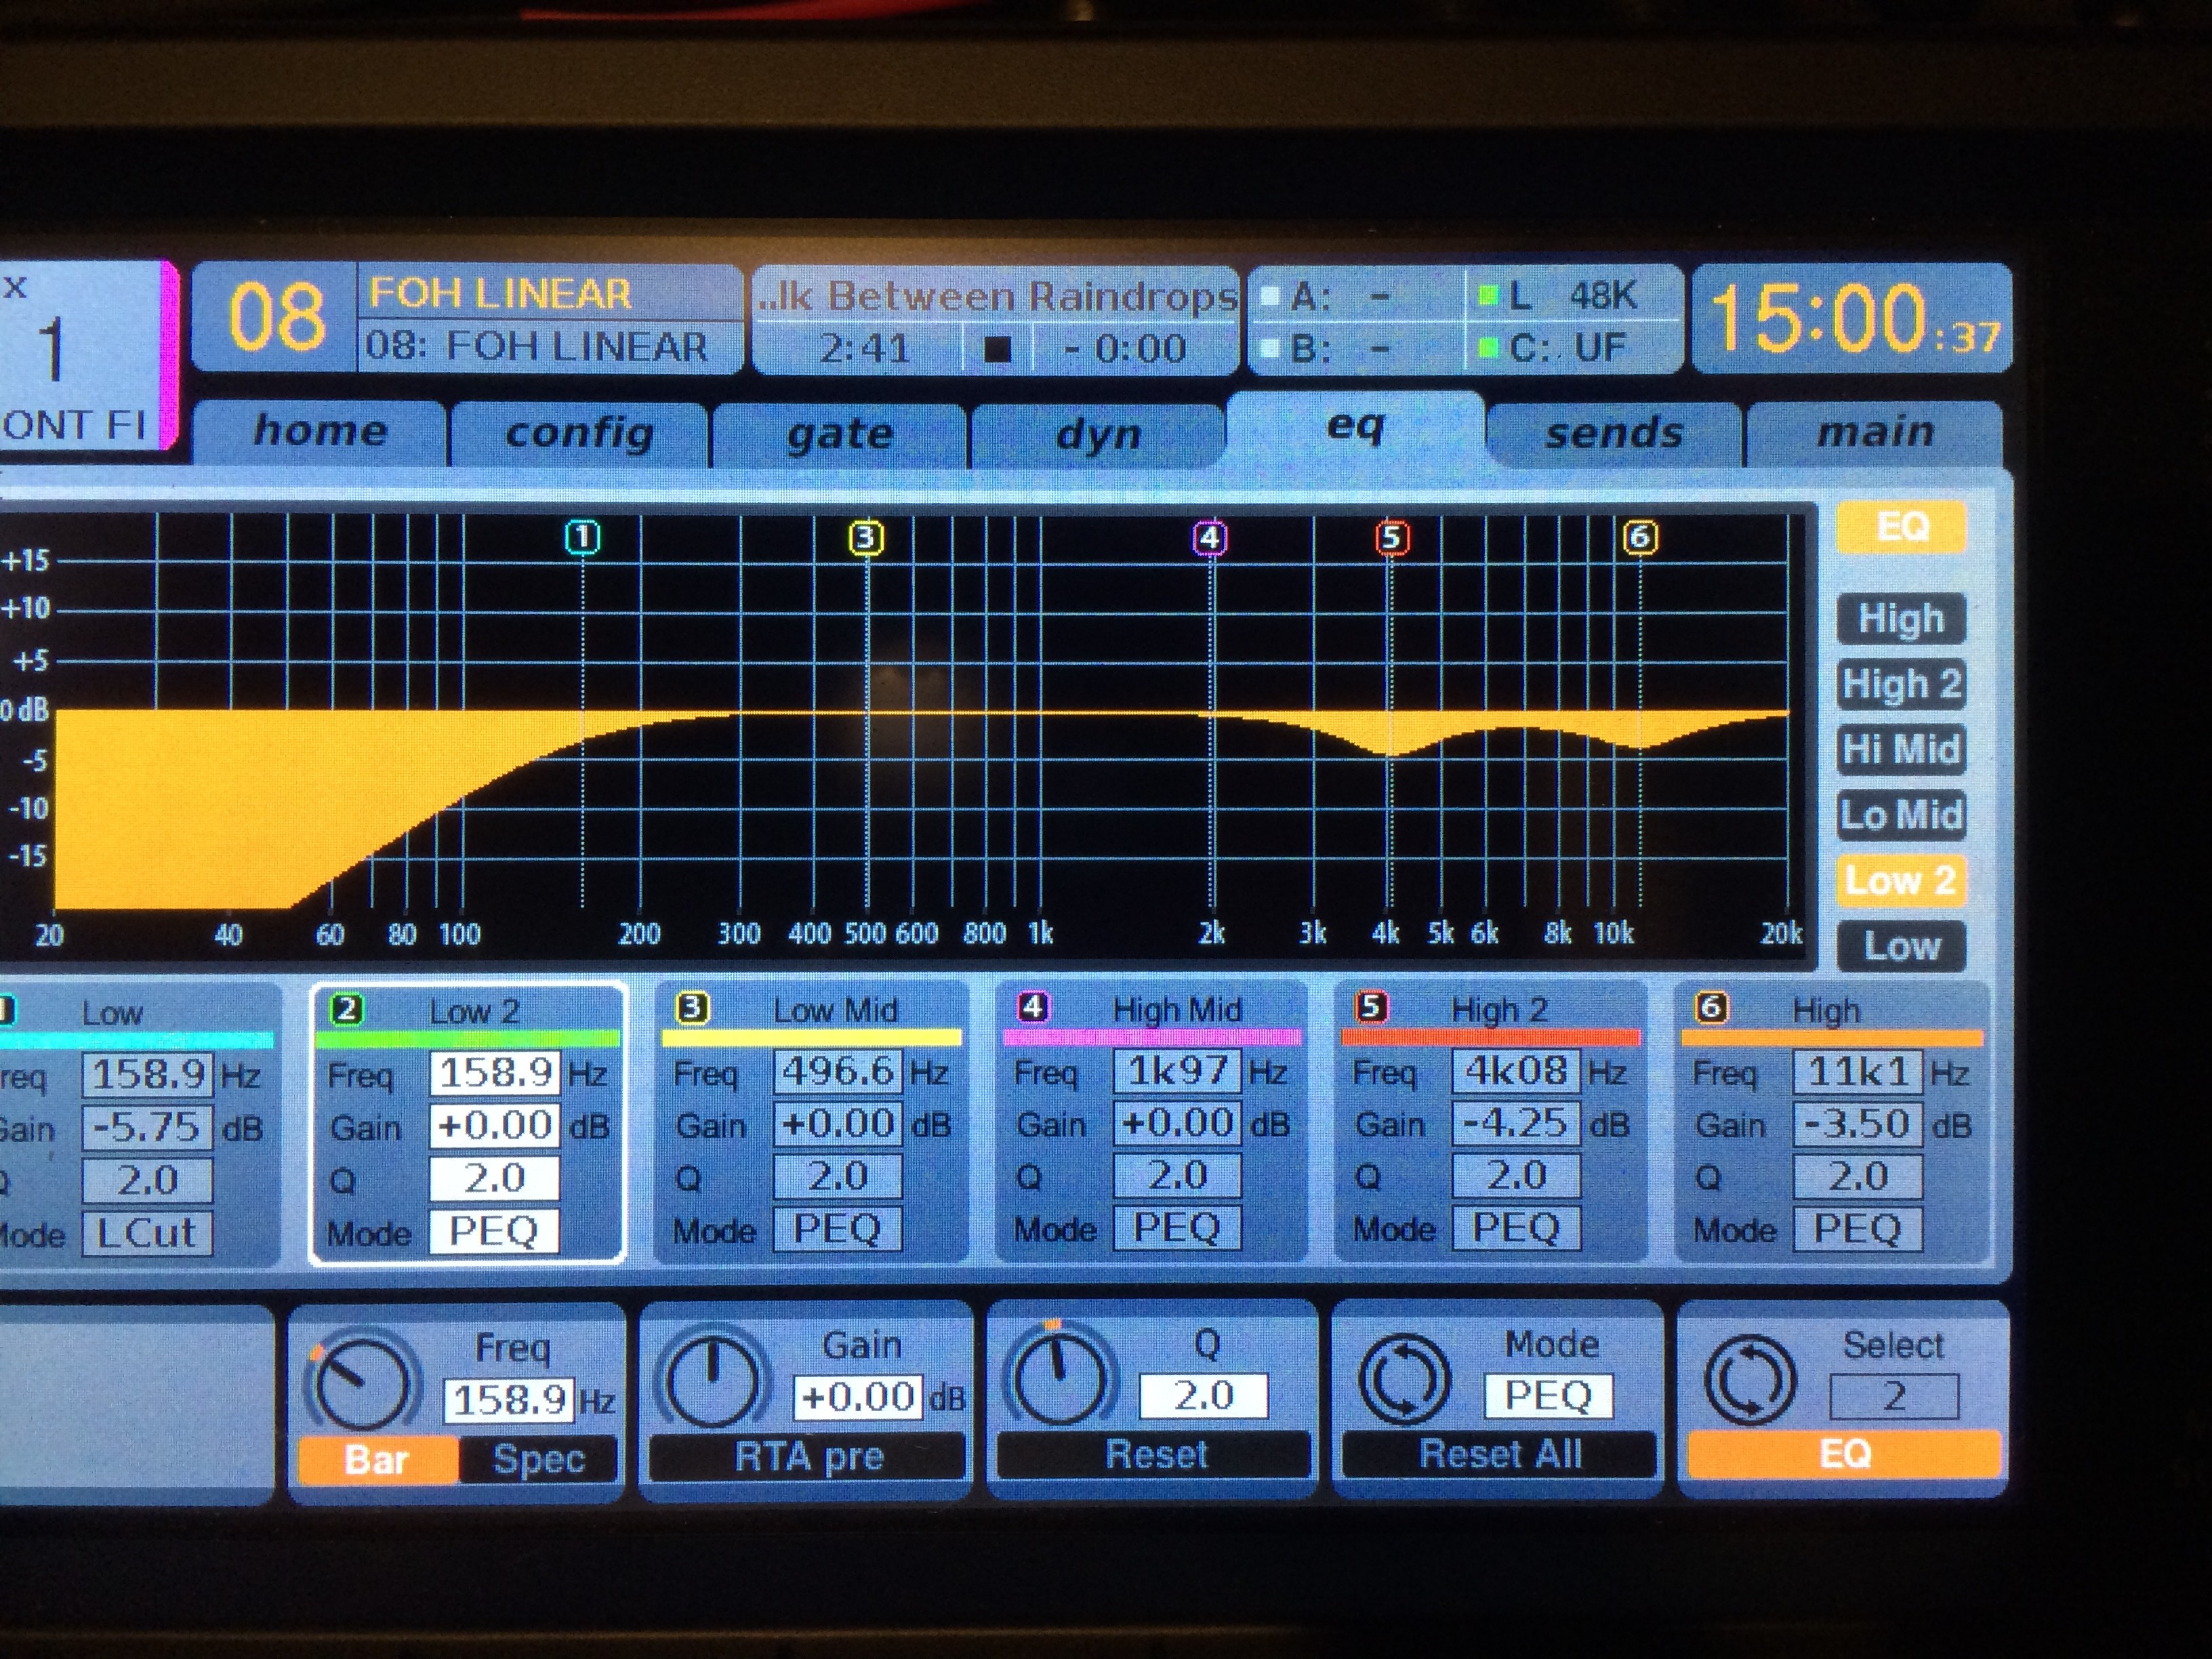
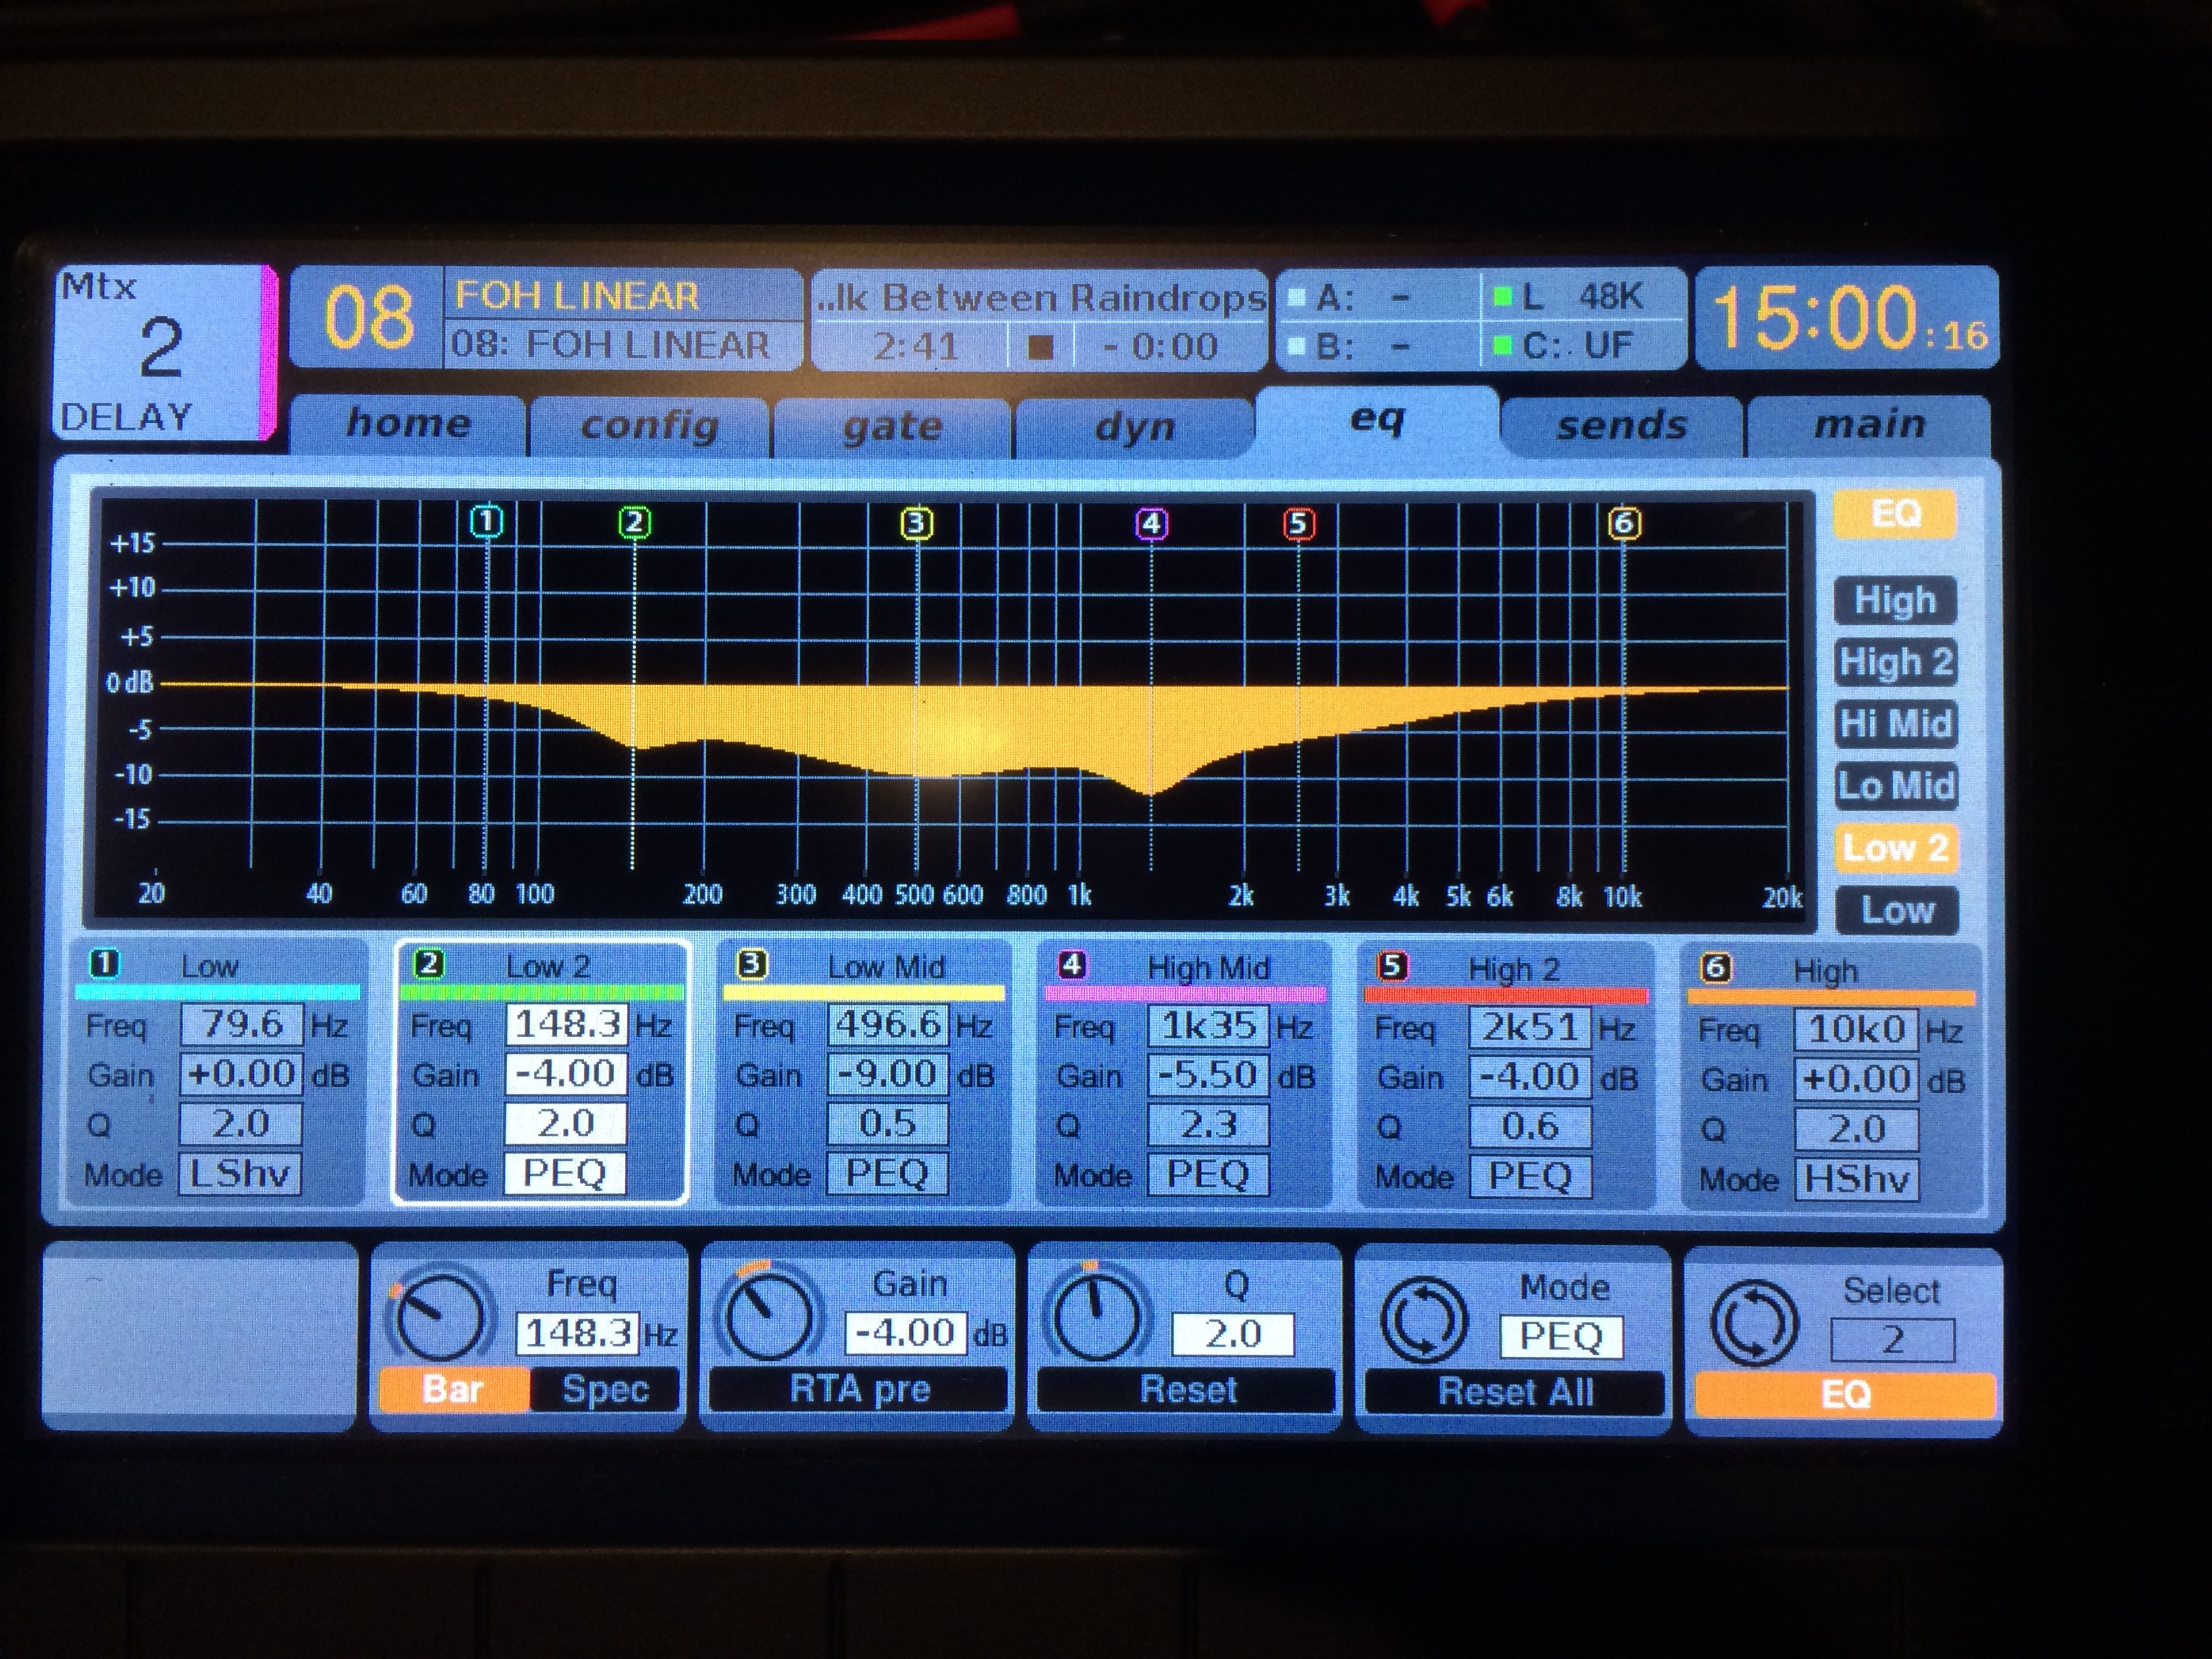
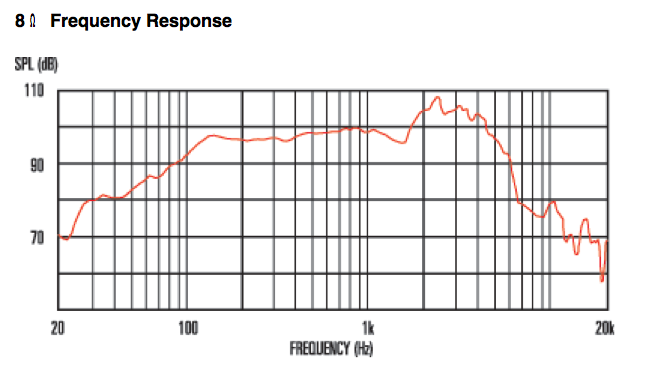
If you browse the frequency response charts of your average guitar speakers (any company, any model) you will notice that there is typically a huge amount of excess energy in the 2k to 4k range.

Here is an article about popular guitar speakers:

Guitar Player Magazine – All About Speakers

Here are a few samples to make the point.

Example 1: The Celestion Vintage 30.

Celestion – Vintage 30 webpage

Celestion Vintage 30 FR

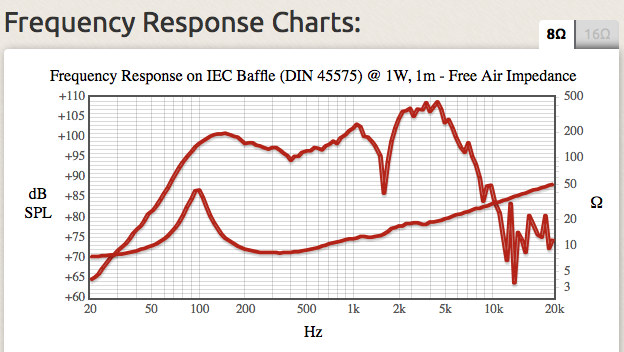
Example 2: Celestion G12M Greeback

Celestion – Greenback webpage

Celestion G12M Greenback FR

Example 3: Jensen P12N

Jensen – P12N webpage

Jensen P12N FR

Here is a neat page Jensen provides that lets you compare the frequency response of their speakers:

Jensen – Frequency Response Comparison Chart

Basically a 12″ speaker has an inherent 2k to 4k peak. Considering what we know about human hearing, that alone is a bad thing in my book. Then to use a microphone with a frequency response that looks a lot like a 12″ speaker (has a 2k to 4k peak), makes even less sense to me.

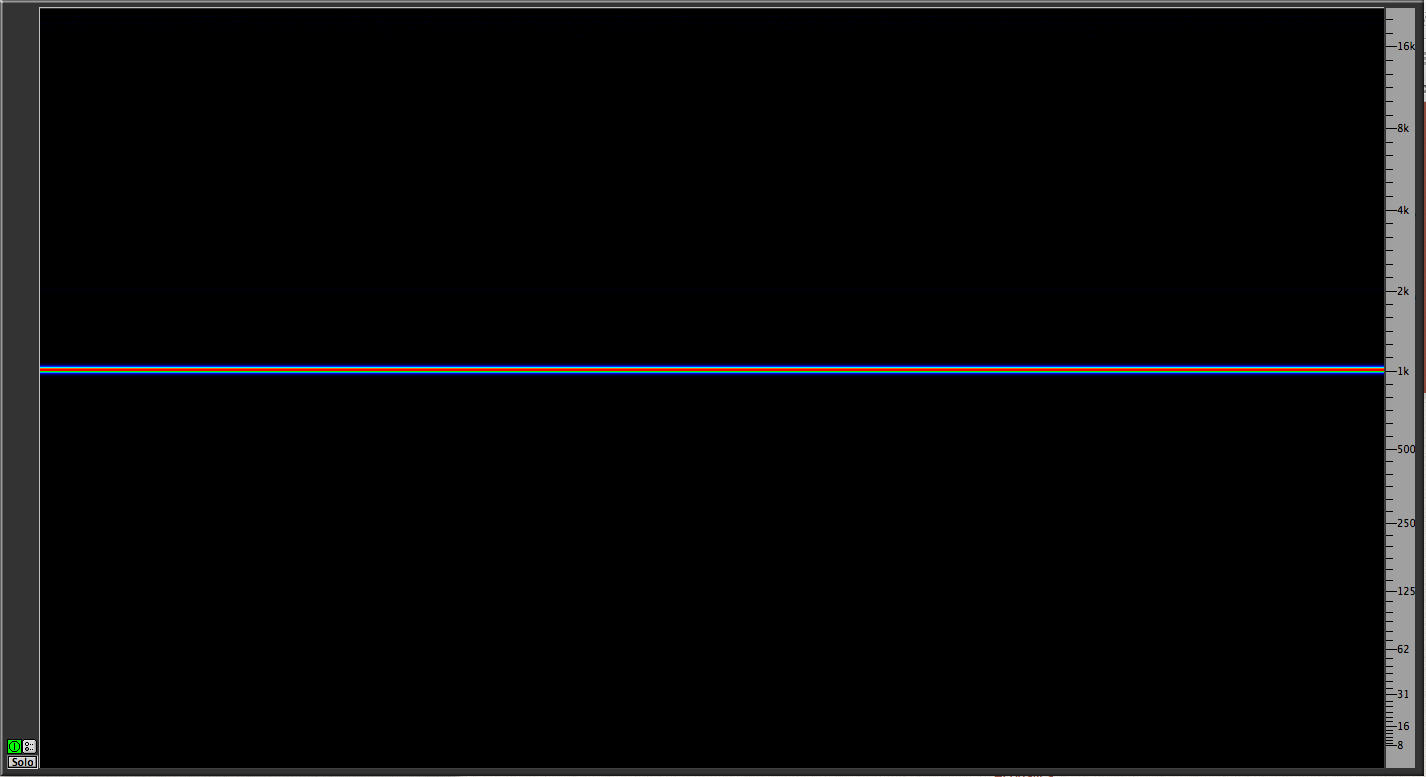
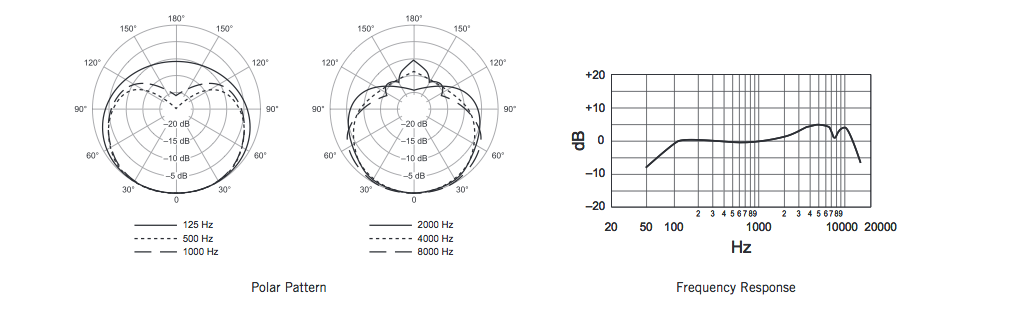
Here is the stated frequency response of an SM57 on axis.

Shure SM 57 frequency and polar response

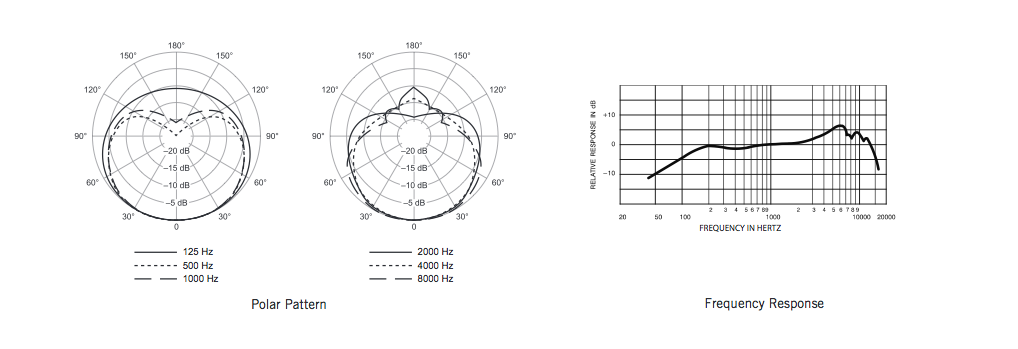
Let’s say your guitar speaker has a 5db peak between 2k and 4k. Then the mic you use has a 5db peak in it’s frequency response between 2k and 4k. 10db of extra 3k on an instrument that already be overly bright? NO THANKS!!!

If the idea is to use the right mic for the right instrument, I would argue (a lot actually) that an SM57 is NOT the right mic to mic a guitar speaker.

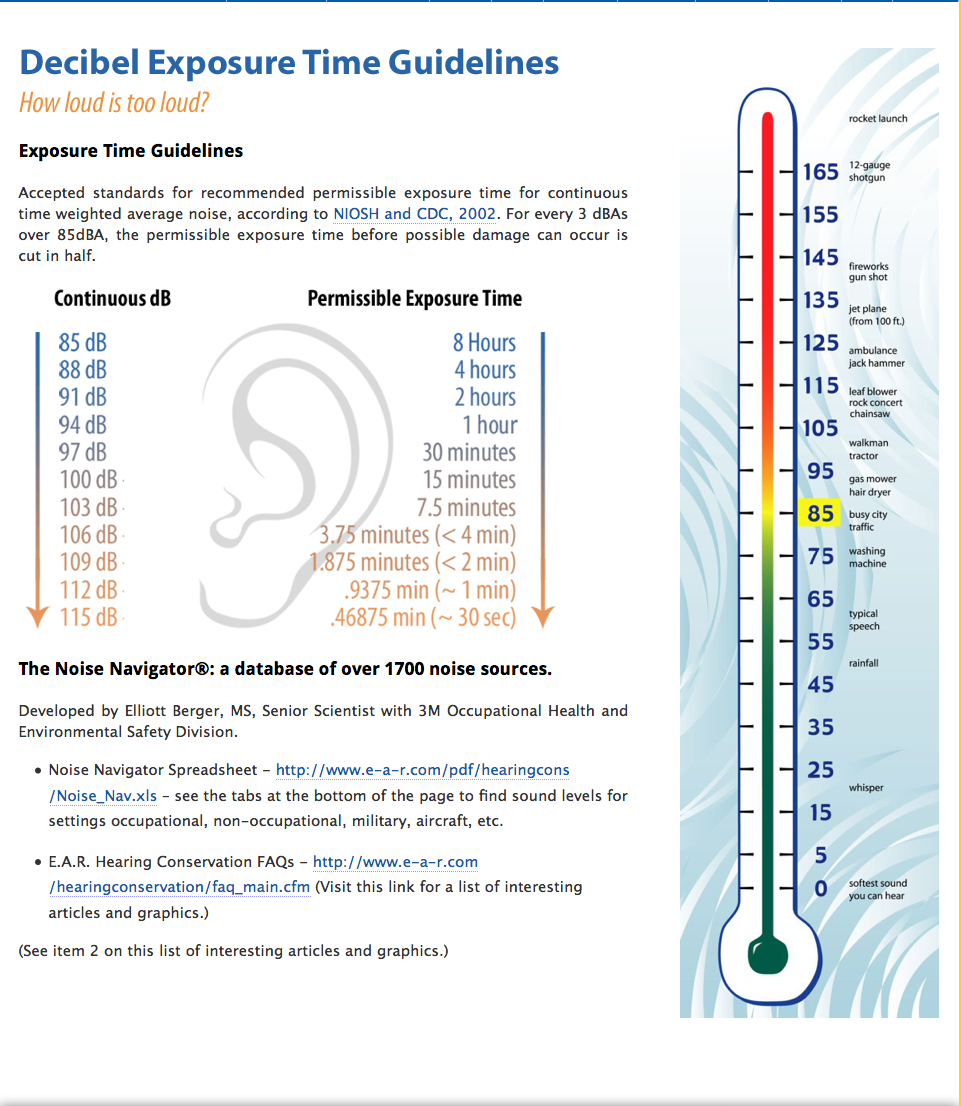
It’s important to take special note of the polar response (of any mic) and what doing so reveals. One of the things that is obvious when you start comparing different microphone’s polar patterns is that the concept of a true “cardioid” mic is flawed. At what frequency is the mic cardioid? Low end is mostly omni regardless of which microphone you use. This is why it’s really important to use your console HIGH PASS filters. Otherwise you end up with a stage that is completely omni at low frequencies. Your speakers are all omni and your mics are all omni at low frequencies. Now what?

If you high pass each mic to a frequency that is appropriate for each instrument, you clean up your mix a lot. Do we really need a mic producing 50hz that is micing a guitar amp? Maybe. If the guitarist is playing a 7 or 8 string guitar. Most people will benefit from using a HIGH PASS filter on most channels. I use one on even the kick drum and bass channels just to avoid subsonic mush. If a PA can’t produce a frequency below 40hz, there is no reason to send it signals that go down to 20hz. In a perfect world, they PA is being processed so it won’t harm the PA but why risk it?

Let’s move on to the high end response of a mic (any mic). Weird things happen when you start putting metal mesh over a mic element.

Shure SM57 polar response lows

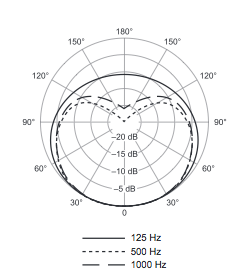
For the SM57, it’s basically omni up until above 125hz. It would be interesting to see where the transition from omni to cardioid truly happens. The mic response is cardioid by 500hz but where did most of the transition happen?

Shure SM57 polar response highs

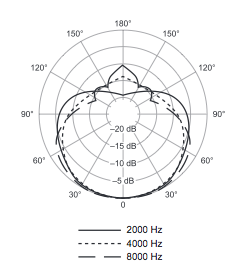
In the high range, the polar response shows the mic becoming omni like at 8k. If there was more information to this polar plot, we might see that above 8k, the mic continues to return to an omni like pickup pattern.

So when you aim a SM57 at a snare like every one pretty mic does, you’re obviously micing the snare off axis.
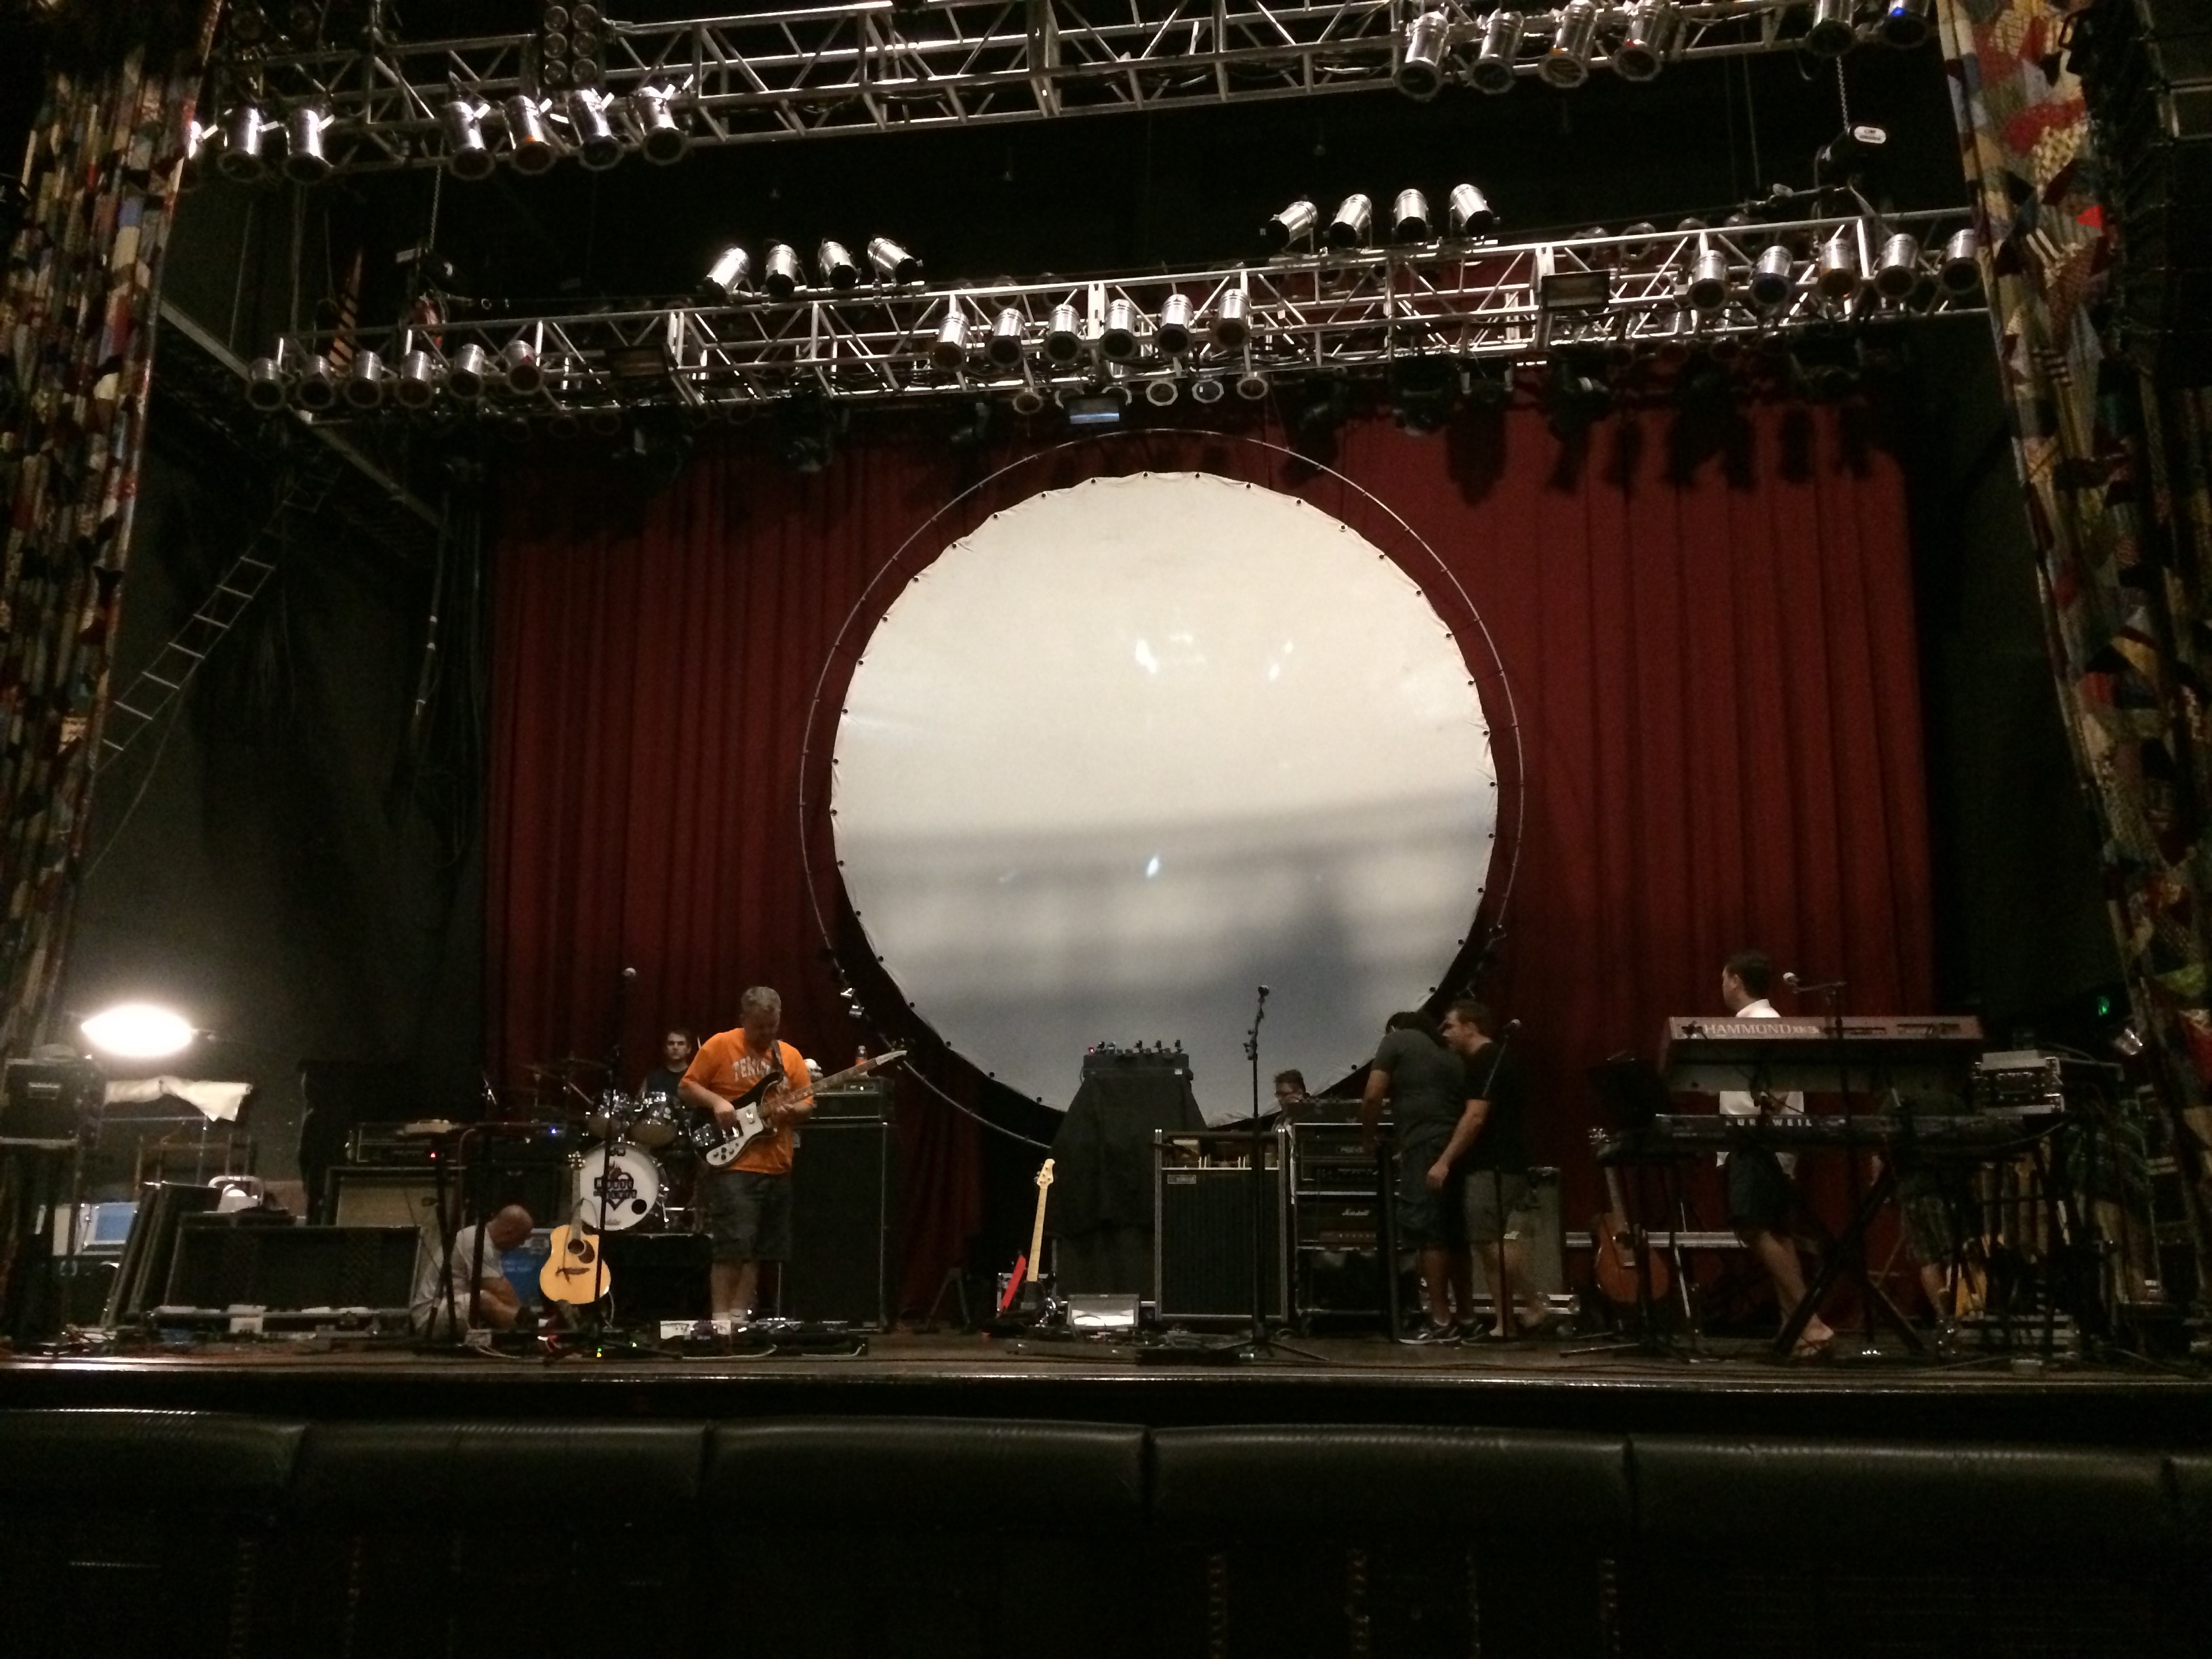
INSERT PHOTO

This could explain why people use it on a snare. The bulk of a snare drum hit is right in the frequency response of an SM57 that has a peak. By micing the snare off axis, you’re rejecting a lot of the “painful” part of the snare.

I would argue that using a mic with a flatter response and aiming it toward the drum is likely an option we should all explore. For this reason, my favorite affordable dynamic mic for all drums is the Sennheiser E604.

INSERT PHOTO

EAW UMX96 – SMAART enabled digital console


During a recent visit to NY, I was discussing the future of digital audio consoles with a fellow engineer and how we should be able to perform transfer functions between any two signals on the console. He reminded me that EAW already did it with their UMX96 console that had SMAART built in back in the mid 2000s.

EAW UMX96 side shot

Here is what I can find about the console:

EAW UMX96 Digital Console – MIX Online article
EAW UMX96 Digital Console – FOH Online article
EAW UMX96 Digital Console – Pro Audio Galicia article
EAW UMX96 Digital Console – ZioGiorgio article (German)
EAW UMX96 Digital Console – Audio Technology PDF

Here is the spec sheet for the console:

EAW UMX96 Digital Console spec sheet PDF

EAW UMX96 front shot with specs

As I can locate more information about the UMX96, I’ll add to this page.

Audio Control – SA 3052 / 3051 RTA with a third party measurement mic?


I just received and email asking if an Earthworks M30 or other mic can be used with an Audio Control SA 3052 RTA.

Lets take a look…

Audio Control SA 3052 front panel

Audio Control – SA 3052 RTA webpage

SA 3051 / 3052 user manual PDF

This is what the user manual states for the input specs:

Audio Control SA 3051 : 3052 input specs

So the SA 3051 / 3052 units provide 12vdc phantom power. Many condenser mics will operate with less than 48vdc phantom power but some will not operate to their full specification without 24vdc or 48vdc and enough available current.

Here is an explanation about phantom power:

WIKI – Phantom Power

To get a sense of the phantom power requirements of popular condenser mics, here is a chart of various mics phantom power requirements put together by Sound Devices.

Sound Devices – Phantom Powering Basics webpage

Note that all Earthworks mics require 10ma of Phantom power @ 48v to operate correctly. If your phantom power supply can’t provide enough current or voltage you may experience poor performance. This could manifest itself as distortion or other unstable output.
Notice that most of the “high end” mics all require 48vdc phantom power but most don’t require nearly as much current as the Earthworks product line with the exception of the AKG 451E which can use an measurement grade omni capsule.

While it’s possible that mics other than the CM-10 measurement provided with the Audio Control SA 3052 / 3051 units will work for measuring frequency but you will be giving up your “SPL calibration” in the process. I would consider the CM10 mic as mandatory personally because you know that your entire system will work as designed. Any deviation from that recipe might provide false information. Obviously the goal of any audio measurement system is to provide accurate information.

My recommendation is that if you own one of these units and have damaged or lost your original CM-10, purchase a replacement CM-10 microphone. They aren’t expensive and this way you will have a calibrated RTA and you will be able to trust the SPL readings on the device.

Audio Control CM-10 measurement mic

Replacement mics are available directly from Audio Control for $145 list price. Here is a webpage showing the microphone:

Audio Control CM-10 measurement mic webpage

Here is a screenshot of the same information.

Audio Control CM-10 webpage

Now if you’re not worried about losing the “calibrated” aspect of your RTA as an SPL device and want to experiment with the SA 3051 / 3052 unit with a different mic, you should be able to plug your third party mic into a mixing board or external mic preamp that can supply 48vdc and 10ma of current and then take the line out of that device and connect it to INPUT 3 (the balance TRS ((tip ring sleeve)) input of the SA 3051 /3052 device).

You may get more accurate results or you may get less accurate results. I haven’t tested the CM-10 mic against an Earthworks mic yet. I would have to assume that the CM-10 mic is relatively flat and certainly flat enough in the 1/3 octave range that the SA 3051 / 3052 unit displays.

Lastly I will point out that other than for showing absolutely SPL as a calibrated system (CM-10 and 3051 / 3052), I wouldn’t personally use an RTA for measuring live audio. A FFT based system performing a differential measurement will provide superior results.

The SA 3051 / 3052 unit in my mind is useful for two things. As a calibrated SPL meter and for seeing feedback. For more advanced audio work, I would choose an transfer function instrument every time due to it’s ability to see impulse, phase and frequency response at the same time and save traces for overlapping comparison.

Madison Theatre @ Molloy College, Rockville Center Long Island


I’m currently in Rockville Center NY doing “Live and Let Die” at the Madison Theatre on the Molloy College campus.

Madison Theater website

INSERT HOUSE PA SPECS.

One of the things this gig has reminded me is that good intentions don’t get you to the finish line. The venue spent about $18,000 upgrading their theater sound package and we still ran out of mic cable before we made every connection. There are mic cables that are running tightly across the stage causing a trip hazard. AC for stand lights are tight. There wasn’t enough sub snakes to avoid using 50′ to home run things. It’s just the hard way to do things.

The house tech document shows X gear but not all of it is in the building and not all of it has been delivered and not all of it is actually what was described.

Tomorrow I will attempt to measure the PA even though the sound check and orchestra rehearsal are over. Just out of my own curiosity.

More soon.

West Hampton Beach PAC – NY visit and PA measurements


I flew into NY a day early so I would have some time to spend with one of my favorite audio fellows, Jim McKeveny. Jim is the head house audio engineer at the West Hampton Beach Performing Arts Center.

WHBPAC website

On our way to WHBPAC, we made a visit to SK-Systems, a local pro audio supplier and Digico rental house. SK-Systems is owned by Tom Heinisch (FOH for Indigo Girls, Prince, etc…) who wasn’t around but I got to meet two SK techs, Ben and Keith.

sk-systems website

For the show I was working on, we were renting a Digico SD9 console and MADI recording rig from SK Systems and Ben showed me the ins and outs of the MADI recording rig. Very helpful.

SK SD9

While I was at the SK shop I got to look at two Digico SD consoles ruined (at the same time) on a show where a storm surprised the crew. Now delegated for spare parts… 🙁

SK SD8

SK SD10

Note to self…”Always carry plenty of tarps and be ready to cover the expensive gear at the first sign of bad weather!”

We headed for West Hampton Beach Performing Arts Center.

whbpac view of stage

whbpac view of house

Here is a link to the venue technical page:

whbpac technical webpage

Of special interest to us is the PA specs.

JBL VERTEC VT 4887 FOH line array (4 boxes per side)
2 McCauley dual 15″ Subwoofers (mounted next to arrays on proscenium wall)
2 JBL 2 x 18 CSR82L Subwoofers
2 JBL MS – 28 Center fills

whbpac house left pa

whbpac house right pa

whbpac house right sub and front fill

whbpac booth

The first thing I noticed when I arrived in the sound booth was a curve on the house Ashly graphic EQs.

whbpac house eq curve 1

Once I got patched in to the house console, we measured the House R side of the PA at (3) different locations with the house EQ bypassed. First row, middle of house, last row. All on axis of the array.

WHB main R with McCauley flown sub

Once I realized that the McCauley boxes were acting as flown subs, we muted those and measured again to see if that was the cause of the extra low end shown on the trace around 125hz. Nope!

WHB main R no subs at all

Here is what the HR McCauley sub measured by itself.

WHB McCauley subs

Here is what both JBL subs on the deck measured as:

WHB JBL subs on floor

Here is the entire PA with and without the JBL subs muted:

WHB all with and without subs

Here is the entire PA with the JBL subs on with the original house graphic EQ engaged:

WHB all with subs and original eq

Here is the entire PA with the JBL subs on with updated graphic EQ settings:

WHB all with complimentary eq

Here is an overlay of the two traces above. Before and after measuring with adjustments on the house graphic EQ:

WHB all with subs pre and post

With the entire PA (including subs) on and with the measurement mic in the center of the auditorium, we came to the following graphic eq settings by looking at the frequency response until it became somewhat flat.

whbpac house eq curve 2

You will note that it’s very similar to the original curve Jim came to just using his ears.

whbpac house eq curve 1

Regardless of which graphic EQ curve is better or worse, there is room for improvement at the DSP level. In a situation like this where no ones eqo is on the line and the system is used by visiting engineers constantly, ideally we would transfer the eq adjustments to the BSS Omnidrive DSP processors. This way the house EQ can remain flat and bypassed unless a visiting engineer wants to adjust things. We didn’t have a computer capable of talking to the DSP units, no guarantee there are filters available and we were out of time. We settled for a new graphic eq curve and drove back to Rockville Center where my hotel and gig were.

Note that the JBL subs are on an aux send so if an visiting engineer wants more low end, it’s available.

This story presents a good example of how it’s really helpful to measure PA systems without being under the stress and time crunch of a load in and setup. “We came, we measured, we left…”

Smaart 7 – acquired on 090914

Exciting day here at audiomeasurements.com

As mentioned elsewhere on this site, I have been a content SpectraFoo Complete user.

After playing with the Smaart 7 and Smaart 7 DI demos on multiple computers for the last month, asking fellow Smaart users lots of questions to try to understand whether I need another measurement app and comparing the Smaart 7 and SpectraFoo Complete side by side, I bought Smaart 7 today to add to my tool set. Both apps have their unique features.

A full version of Smaart 7 can be installed on (2) different computers at the same time and if necessary you can migrate your licenses to other computers. Very helpful since I do about 1/2 my work on site using my MacBook and the other half at my bench using my Imac.

What does Smaart 7 offer that makes it unique?

There are two functions in Smaart 7 that will prove to be indispensible for my live measurement work.

1. Live IR – allows you to move the mic or the source around without recalculating the delay compensation offset). Picture aiming a speaker and being able to watch for secondary reflections to guide the aiming process in real time.

2. Unlimited transfer function instruments – allows you to look at multiple measurement points on the same trace as overlays. For example you can compare the physical loop to multiple measurement mics, console outputs, DSP outputs, etc… All on the same screen at the same time.

The “AcousticTools Intelligibility Module” with RT60 and EDT (early decay time) calculations will be helpful to although I don’t know yet how to use them.

For those interested in Smaart 7,

Here is a link to the official Smaart 7 page:
Smaart 7

I will begin to do my measurements with Smaart 7 and SpectraFoo so I have a redundant measurement platform. One of the benefits of using them both at the same time is that I can see if they agree with each other.

House of Blues Dallas – “Bricks In The Wall” Pink Floyd tribute 09/06/14 show

When we returned to the venue, there was already a growing crowd. I’d struck my measurement rig before we left for dinner so I don’t have any data to share but the show itself was quite good which is the real proof that your measurement and corrective process has worked. The sound check had been a bit loud and a bit bright for my ears but those issues were resolved when the crowd arrived. This is to be expected since the venue is mostly hard surfaces (hardwood floors, hard walls, hard ceilings, hard balcony rail face, etc…) and the crowd is mostly soft:)

BITW @ HOB 1

Most of the notes I took for the show (yes I take notes when I watch shows) had more to do with musician related stuff than sound and the sound things I noted were notes Jay already had for himself. Given the circumstances, Jay did a great job. The crowd was uber happy and I am glad I had the chance to see the show and measure the PA.

BITW @ HOB 2

One of the points that Buford Jones makes during his Mixing Workshop is that if you are both the system tech and the mix engineer, you need to be able to take off the system tech hat and put on the mixing hat when the show starts. In this case, I was able to wear the system engineer hat and Jay was able to wear the mixing hat. If you do the math, (2) people with (2) hours can do double the amount of work that (1) person can do in (2) hours. Try doing your next gig with some extra help and ignoring the financial consequences, see if you don’t have a better day.

BITW @ HOB 3

Video clips from the show coming soon…

House of Blues Dallas – “Bricks In The Wall” Pink Floyd tribute 09/06/14 pre show measurements

HOB stage

The house audio engineer Coy provided us with the following inputs into the house sound system and the house EQs were flattened so we could make all adjustments at the X32 console. Note that there is more processing inherent to the amps that we didn’t touch:

Main L – (8) box Sound Bridge Xyon 7208 XY array
Main R – (8) box Sound Bridge Xyon 7208 XY array
Subs – (8) Sound Bridge Xyon subs (4) double 18″ cabinets PER SIDE
Delay row 1 – (2) EV boxes just behind FOH mix position
Delay row 2 – (4) EV boxes further under balcony
Front Fills – (2) EV XW-12 wedges on end cross firing

We started out my measuring the Main R array on axis. Notice the abundance of low mid content.

HOB HR main no eq

We did some complimentary EQ to the mains and moved the mic around a bit to make sure the change helped universally.

I forgot to take any snapshots during this process. Next time.

Next we measured the subs (all 8 of them). Notice the LF level was quite a bit above the 0db line. The second trace was after a reduction at the send to the subs to balance them out with the mains.

HOB subs pre and post level adjustment

When we combined the Main L/R and the subs we got this trace. Note there is an abundance of LM content between 150hz and 250hz. We made a few more adjustments after the measurement.

HOB main L:R and subs

Next we EQed the underbalc delay speakers. This trace is a before eq and after eq.

HOB delays pre and post eq

We also did a bit of complimentary EQ to the front fills but I didn’t save a snapshot for that measurement. We used the impulse response measurement to set the delay time between the front fills and the main L/R. We actually muted the Main L side and unplugged one of the front fills. Then restored them.
With plenty of time left, I placed a second mic in the balcony to see if the changes we made to the mains to correct the response on the floor were satisfactory upstairs. Sort of. This trace includes (3) measurements with the mic at the balcony rail, mid way up in the seating and another at the back of the balcony. Note that all 3 measurements show too much LM content in the 150hz to 400hz range. We reduced that frequency area a bit more in the Main L/R processing to balance out the response on the floor and the balc.

HOB HR main balc near mid and far

This is the complimentary EQ curves for the Mains, Front Fills and Delays.

MAINS

HOB main PA eq

FRONT FILLS

HOB front fills eq

DELAYS

HOB delays eq

Since the entire band is on IEMs, there was no monitor mixes to measure and correct.

We listened to some multitrack show audio previously recorded with Reaper to check our system tuning. Things seemed to be in the ball park.

A bit about the show itself.

X32 Input list:
01. Kick
02. Snare
03. Hat
04. Tom 1
05. Tom 2/3
06. Floor 1
07. Floor 2
08. Roto Toms
09. OH SR
10. OH SL
11. Bass
12. Bass Synth
13. Keys L
14. Keys R
15. Sampler L
16. Sampler R
17. GTR SR
18. GTR SL
19. ACC SR
20. ACC SL
21. Rotor SR
22. Rotor SL
23. ACC USL
24. Sax
25. Vox 1
26. Vox 2
27. Vox 3
28. Vox 4
29. Vox 5
30. Vox 6
31. Vox 7
32. Vox 8
33. Vox Verb L
34. Vox Verb R
35. Delay L
36. Delay R
37.
38.
39. Sampler from HSE
40. Click

HOB band setup

Sound check came and went without any need for PA adjustment and we took dinner.

More in another post.

House of Blues Dallas – “Bricks In The Wall” Pink Floyd tribute – 09/05/14 initial data

During a recent Meyer Sound Mixing Workshop with Buford Jones, I met a fellow audio gentlemen named Jay Hogg who mixes “Bricks In The Wall”, a US based Pink Floyd tribute.

bricksinthewall.com

Tomorrow I will assist Jay with setup and system tuning at House Of Blues in Dallas.

Here is the venue tech document:

HOB Dallas tech list

I’ll post after we measure and the show is over. Hopefully the system is already well aimed, adjusted and ready for some Pink Floyd.

More tomorrow…

audio DSP units with native audio measurement instruments

While working on another post about digital consoles with built in audio measurement instruments, I was reminded that some audio DSP devices offer audio measurement tools already.

For example, the BIAMP Audia device has a transfer function tool for trouble shooting signals withing the device.

Biamp – audiaflex website

Audiaflex manual PDF

Here is what the manual says about the transfer function tool on page 167 of the PDF.

Screen Shot 2014-08-28 at 12.28.19 AM

So we’re getting there. Having a tranfer function tool inside a DSP is really helpful. Most of the time on a large DSP system, you have to figure out how to measure your various signals pre and post DSP. If in the long run we can get the internal transfer function tools to work with our external tools, that will make optimizing a large and complicated sound system that much easier. If the console and the DSP can share signals digitally and allow for transfer functions between those signals, even better.

Digital Consoles with integrated audio measurement functions – the future

I just returned from a Midas M32 / Pro 1 / Pro 2 / Behringer X32 product demonstration hosted at Sound Productions in Irving Texas and presented by Music Group (Midas, Klark Technik, Turbosound, Behringer) rep Evan Hooten, ??? and the regional distributor ???

Screen Shot 2014-08-27 at 11.50.26 PM

Sound Productions Event Venue

Screen Shot 2014-08-28 at 12.02.53 AM

Midas M32 – digital mixing console

I was curious to see what was different about the M32 as it’s a Midas version of the Behringer X32. What is the difference? The M32 has Midas Pro series mic pres (supposedly taken from the XL4 analog console) and Midas Pro motorized faders.

While Evan Hooten was explaining about the console I learned that both the X32 and the M32 have RTA and Spectragram audio measurement instruments within their feature set as of firmware 2.0

Screen Shot 2014-08-27 at 11.59.41 PM

This is a great step in the right direction even if it falls short of offering the necessary Transfer Function instrument I would desire.

This all reminds me of the Presonus Studio Live consoles that have added a Smaart Lite fuctionality. I think the actual heavy lifting is being done on a computer and the console acts like an audio interface and a router but still, Smaart anything for the masses is a great thing.

Presonus Smaart M – website


It is only logical to presume that future generations of digital consoles will include a native transfer function instrument. Why not. Think about the possibilities. You could select your REFERENCE signal and your MEASUREMENT signal on the console and the console will show you the difference on the local screen. This would be very beneficial because you could reference any two signals easily without any additional patching or plugging and unplugging. Examples of how this might be useful include:

Comparing a Bass DI with a Bass mic for setting delay on DI to phase align them? Easy.
Snare top with Snare bot for checking polarity and phase? Done.
Output of console versus measurement mic? Of course.

This just makes way too much sense.

One of the things that is somewhat confusing and convoluted as far as current measurement procedures is highjacking signals. We use Y cables at the console outputs, DSP outputs, etc… It’s all very barbaric. If we could measure signals internally, that would certainly save a lot of time and make it very easy to optimize things internal to the console. Need to measure the outputs of the DSP? Split and return to spare console inputs that aren’t routed to any outputs.

First audiomeasurements.com sound 101 class @ McDavid Studio @ Performing Arts Fort Worth

After taking Buford Jones (2) day Mixing Workshop, I was inspired to schedule the first Sound 101 workshop for local stage hands who had previously shown interest. About 15 people turned out today. A diverse group of people (some with no past audio experience) with some very perceptive questions. I was actually amazed that some of the most logical questions were asked immediately as information was presented. We discussed acoustics, phantom speakers, time delaying a PA, stitching speaker sub systems together to act as one sonic image, filtering to make a PA work without too much overlap. I guess really, these aren’t “101” concepts at all. How do you EQ a system? Channel? If the PA isn’t aimed correctly? How do you manage your mix if the subs are 15dB too loud in general?
Understanding the nuts and bolts of acoustics and physics obviously has it’s place but I might of done better to show them how to put a simple PA together and use the mixing board. Maybe system design, tuning, etc… should wait. What do you think?

Fortunately there was enough interest after the class to do a follow up workshop tomorrow and try to cover Equalization.

It’s amazing how fast the clock moves when you’re trying to explain things to a group of people.

Using house gear we setup the following speakers:
(2) Meyer Sound UPJ for mains L/R
(2) Meyer Sound 650R2 for subs L/R
(2) Meyer Sound M1D for front fills L/R
(2) Meyer Sound UM1P for stage monitors

We set up the equivalent of (4) PA systems all tied together to make it possible to control signals from multiple locations and with multiple levels of functionality.

The first PA consisted of a single Mackie SRM150 which has a build in mixer, amp and speaker with a master volume and 3 band fixed EQ. One SM58 and a 1/8″ TRS cables to dual RCA for Iphone use. That system was completely self contained to demonstrate how simple a PA might be and how simple it would be to put together and use.

The second PA consisted of an API-3124m mic preamp / mixer. It has (4) inputs, a stereo output, a stereo return and an aux send.

Channel 1 – Wired SM58 @ Stage
Channel 2 – Wireless Sennheiser handheld mic
Channel 3 – Tascam CD L
Channel 4 – Tascam CD R

The outputs of that console landed on a Midas Venice 240 right behind it.
The same wired SM58 and wireless mic also landed direction on the Midas Venice 240 (via passive splitters) so that one system could be completely independent of the other
The same wired SM58 and wireless mic also landed on the house Soundcraft Vi6 digital console @ the true FOH position.

The PA was processed via a Metric Halo 2882+DSP.

Input 1 – FOH measurement mic
Input 2 – Roaming measurement mic
Input 3 – Midas Venice 240 Main output R
Input 4 – Midas Venice 240 Main R output
Input 5 – Midas Venice 240 Monitor 1 output
Input 6 – Midas Venice 240 Monitor 2 output
Input 7 – Loop (from output 8 – for measurement SOURCE purposes)

Output 1 – UPJ HL main
Output 2 – UPJ HR main
Output 3 – 650 Sub L
Output 4 – 640 Sub R
Output 5 – M1D HL front fill
Output 6 – M1D HR front fill
Output 7 –
Output 8 – Loop (right back into Input 8 – for measurement purposes)

Here is a shot of the setup we used.

McDavid Setup

We also setup a Gallien Kruger RM800 bass amp / Hartke 410XL bass rig and Fender Twin Reverb as sources which we didn’t get to today. Maybe tomorrow.

Fender Twin Reverb – Silver Face

A Fender Twin Reverb (Silver Face) is a classic guitar amp. It’s one of the most widely available amps for rent.

I’ve always wondered what sort of interaction is happening between the speakers in a multi speaker combo amp.

INSERT PHOTO OF AMP
INSERT PHOTO OF AMP WITH MIC
INSERT GRAPH WITH MIC AT EDGE, CENTER, MIDDLE, CENTER, EDGE